Docker 常见问题

Docker 常见问题

启动

docker daemon启动的时候如果报 socket错误,是因为daemon启动参数配置了: -H fd:// ,但是 docker.socket是disable状态,启动daemon依赖socket,但是systemctl又拉不起来docker.socket,因为被disable了,先 sudo systemctl enable docker.socket 就可以了。

如果docker.socket service被mask后比disable更粗暴,mask后手工都不能拉起来了,但是disable后还可以手工拉起,然后再拉起docker service。 这是需要先 systemctl unmask

1
2
$sudo systemctl restart docker.socket
Failed to restart docker.socket: Unit docker.socket is masked.

另外 docker.socket 启动依赖环境的要有 docker group这个组,可以添加: groupadd docker

failed to start docker.service unit not found. rhel 7.7

systemctl list-unit-files |grep docker.service 可以看到docker.service 是存在并enable了

实际是redhat 7.7的yum仓库所带的docker启动参数变了, 如果手工启动的话也会报找不到docker-runc 手工:

1
2
> ln -s /usr/libexec/docker/docker-runc-current /usr/bin/docker-runc
>

https://access.redhat.com/solutions/2876431 https://stackoverflow.com/questions/42754779/docker-runc-not-installed-on-system

yum安装docker会在 /etc/sysconfig 下放一些配置参数(docker.service 环境变量)

Docker 启动报错: Error starting daemon: Error initializing network controller: list bridge addresses failed: no available network

这是因为daemon启动的时候缺少docker0网桥,导致启动失败,手工添加:

1
2
ip link add docker0 type bridge
ip addr add dev docker0 172.30.0.0/24

启动成功后即使手工删除docker0,然后再次启动也会成功,这次会自动创建docker0 172.30.0.0/16 。

1
2
3
4
5
6
7
8
9
10
11
12
13
14
15
16
17
18
19
#systemctl status docker -l
● docker.service - Docker Application Container Engine
Loaded: loaded (/etc/systemd/system/docker.service; enabled; vendor preset: disabled)
Active: failed (Result: exit-code) since Fri 2021-01-22 17:21:45 CST; 2min 12s ago
Docs: http://docs.docker.io
Process: 68318 ExecStartPost=/sbin/iptables -I FORWARD -s 0.0.0.0/0 -j ACCEPT (code=exited, status=0/SUCCESS)
Process: 68317 ExecStart=/opt/kube/bin/dockerd (code=exited, status=1/FAILURE)
Main PID: 68317 (code=exited, status=1/FAILURE)
Jan 22 17:21:43 l57f12112.sqa.nu8 dockerd[68317]: time="2021-01-22T17:21:43.991179104+08:00" level=warning msg="failed to load plugin io.containerd.snapshotter.v1.aufs" error="modprobe aufs failed: "modprobe: FATAL: Module aufs not found.\n": exit status 1"
Jan 22 17:21:43 l57f12112.sqa.nu8 dockerd[68317]: time="2021-01-22T17:21:43.991371956+08:00" level=warning msg="could not use snapshotter btrfs in metadata plugin" error="path /var/lib/docker/containerd/daemon/io.containerd.snapshotter.v1.btrfs must be a btrfs filesystem to be used with the btrfs snapshotter"
Jan 22 17:21:43 l57f12112.sqa.nu8 dockerd[68317]: time="2021-01-22T17:21:43.991381620+08:00" level=warning msg="could not use snapshotter aufs in metadata plugin" error="modprobe aufs failed: "modprobe: FATAL: Module aufs not found.\n": exit status 1"
Jan 22 17:21:43 l57f12112.sqa.nu8 dockerd[68317]: time="2021-01-22T17:21:43.991388991+08:00" level=warning msg="could not use snapshotter zfs in metadata plugin" error="path /var/lib/docker/containerd/daemon/io.containerd.snapshotter.v1.zfs must be a zfs filesystem to be used with the zfs snapshotter: skip plugin"
Jan 22 17:21:44 l57f12112.sqa.nu8 systemd[1]: Stopping Docker Application Container Engine...
Jan 22 17:21:45 l57f12112.sqa.nu8 dockerd[68317]: failed to start daemon: Error initializing network controller: list bridge addresses failed: PredefinedLocalScopeDefaultNetworks List: [172.17.0.0/16 172.18.0.0/16 172.19.0.0/16 172.20.0.0/16 172.21.0.0/16 172.22.0.0/16 172.23.0.0/16 172.24.0.0/16 172.25.0.0/16 172.26.0.0/16 172.27.0.0/16 172.28.0.0/16 172.29.0.0/16 172.30.0.0/16 172.31.0.0/16 192.168.0.0/20 192.168.16.0/20 192.168.32.0/20 192.168.48.0/20 192.168.64.0/20 192.168.80.0/20 192.168.96.0/20 192.168.112.0/20 192.168.128.0/20 192.168.144.0/20 192.168.160.0/20 192.168.176.0/20 192.168.192.0/20 192.168.208.0/20 192.168.224.0/20 192.168.240.0/20]: no available network
Jan 22 17:21:45 l57f12112.sqa.nu8 systemd[1]: docker.service: main process exited, code=exited, status=1/FAILURE
Jan 22 17:21:45 l57f12112.sqa.nu8 systemd[1]: Stopped Docker Application Container Engine.
Jan 22 17:21:45 l57f12112.sqa.nu8 systemd[1]: Unit docker.service entered failed state.
Jan 22 17:21:45 l57f12112.sqa.nu8 systemd[1]: docker.service failed.

参考:https://github.com/docker/for-linux/issues/123

或者这样解决:https://stackoverflow.com/questions/39617387/docker-daemon-cant-initialize-network-controller

This was related to the machine having several network cards (can also happen in machines with VPN)

The solution was to start manually docker like this:

1
/usr/bin/docker daemon --debug --bip=192.168.y.x/24

where the 192.168.y.x is the MAIN machine IP and /24 that ip netmask. Docker will use this network range for building the bridge and firewall riles. The –debug is not really needed, but might help if something else fails.

After starting once, you can kill the docker and start as usual. AFAIK, docker have created a cache config for that –bip and should work now without it. Of course, if you clean the docker cache, you may need to do this again.

本机网络信息默认保存在:/var/lib/docker/network/files/local-kv.db 想要清理bridge网络的话,不能直接 docker network rm bridge 因为bridge是预创建的受保护不能直接删除,可以删掉:/var/lib/docker/network/files/local-kv.db 并且同时删掉 docker0 然后重启dockerd就可以了

alios下容器里面ping不通docker0

alios上跑docker,然后启动容器,发现容器里面ping不通docker0, 手工重新brctl addbr docker0 , 然后把虚拟网卡加进去就可以了。应该是系统哪里bug了.

image.png

非常神奇的是不通的时候如果在宿主机上对docker0抓包就瞬间通了,停掉抓包就不通

docker0-tcpdump.gif

猜测是 alios 的bug

systemctl start docker

Failed to start docker.service: Unit not found.

1
2
3
4
5
6
7
8
9
10
11
12
13
14
15
16
UNIT LOAD PATH
Unit files are loaded from a set of paths determined during
compilation, described in the two tables below. Unit files found
in directories listed earlier override files with the same name
in directories lower in the list.
Table 1. Load path when running in system mode (--system).
┌────────────────────────┬─────────────────────────────┐
│Path │ Description │
├────────────────────────┼─────────────────────────────┤
│/etc/systemd/system │ Local configuration │
├────────────────────────┼─────────────────────────────┤
│/run/systemd/system │ Runtime units │
├────────────────────────┼─────────────────────────────┤
│/usr/lib/systemd/system │ Units of installed packages │
└────────────────────────┴─────────────────────────────┘

systemd 设置path环境变量,可以设置

[Service]
Type=notify
Environment=PATH=/opt/kube/bin:/sbin:/usr/local/sbin:/usr/local/bin:/usr/sbin:/usr/bin:/usr/X11R6/bin:/opt/satools:/root/bin

容器没有systemctl

Failed to get D-Bus connection: Operation not permitted: systemd容器中默认无法启动,需要启动容器的时候

1
docker run -itd --privileged --name=ren drds_base:centos init //init 必须要或者systemd

1号进程需要是systemd(init 是systemd的link),才可以使用systemctl,推荐用这个来解决:https://github.com/gdraheim/docker-systemctl-replacement

systemd是用来取代init的,之前init管理所有进程启动,是串行的,耗时久,也不管最终状态,systemd主要是串行并监控进程状态能反复重启。

新版本init link向了systemd

busybox/Alpine/Scratch

busybox集成了常用的linux工具(nc/telnet/cat……),保持精细,方便一张软盘能装下。

Alpine一个精简版的Linux 发行版,更小更安全,用的musl libc而不是glibc

scratch一个空的框架,什么也没有

找不到shell

Dockerfile 中(https://www.ardanlabs.com/blog/2020/02/docker-images-part1-reducing-image-size.html):

1
2
3
CMD ./hello OR RUN 等同于 /bin/sh -c "./hello", 需要shell,
改用:
CMD ["./hello"] 等同于 ./hello 不需要shell

entrypoint VS cmd

dockerfile中:CMD 可以是命令、也可以是参数,如果是参数, 把它传递给:ENTRYPOINT

在写Dockerfile时, ENTRYPOINT或者CMD命令会自动覆盖之前的ENTRYPOINT或者CMD命令

从参数中传入的ENTRYPOINT或者CMD命令会自动覆盖Dockerfile中的ENTRYPOINT或者CMD命令

copy VS add

COPY指令和ADD指令的唯一区别在于是否支持从远程URL获取资源。 COPY指令只能从执行docker build所在的主机上读取资源并复制到镜像中。 而ADD指令还支持通过URL从远程服务器读取资源并复制到镜像中。

满足同等功能的情况下,推荐使用COPY指令。ADD指令更擅长读取本地tar文件并解压缩

Digest VS Image ID

pull镜像的时候,将docker digest带上,即使黑客使用手段将某一个digest对应的内容强行修改了,docker也能check出来,因为docker会在pull下镜像的时候,只要根据image的内容计算sha256

1
docker images --digests
  • The “digest” is a hash of the manifest, introduced in Docker registry v2.
  • The image ID is a hash of the local image JSON configuration. 就是inspect 看到的 RepoDigests

容器中抓包和调试 – nsenter

1
2
3
4
5
6
7
8
9
10
11
12
13
14
15
16
17
18
19
20
21
22
23
24
25
26
27
28
29
30
31
32
33
34
35
36
37
38
39
获取pid:docker inspect -f {{.State.Pid}} c8f874efea06
进入namespace:nsenter --target 17277 --net --pid –mount
//只进入network namespace,这样看到的文件还是宿主机的,能直接用tcpdump,但是看到的网卡是容器的
nsenter --target 17277 --net
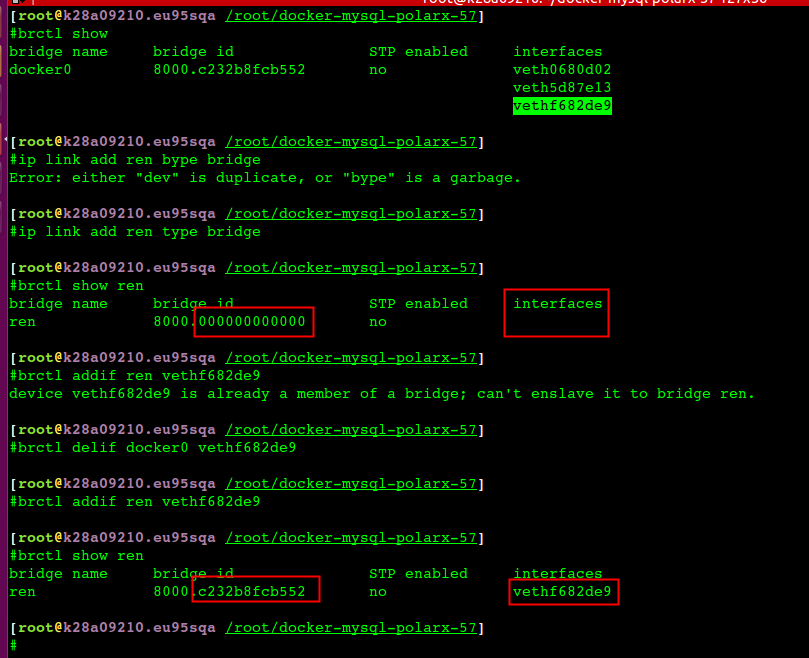
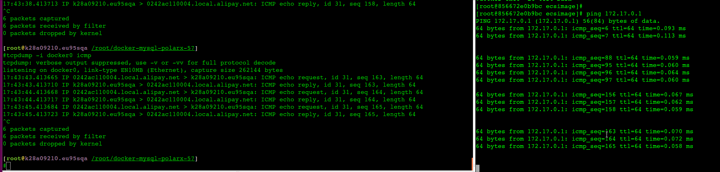
// ip netns 获取容器网络信息
1022 [2021-04-14 15:53:06] docker inspect -f '{{.State.Pid}}' ab4e471edf50 //获取容器进程id
1023 [2021-04-14 15:53:30] ls /proc/79828/ns/net
1024 [2021-04-14 15:53:57] ln -sfT /proc/79828/ns/net /var/run/netns/ab4e471edf50 //link 以便ip netns List能访问
// 宿主机上查看容器ip
1026 [2021-04-14 15:54:11] ip netns list
1028 [2021-04-14 15:55:19] ip netns exec ab4e471edf50 ifconfig
//nsenter调试网络
Get the pause container's sandboxkey:
root@worker01:~# docker inspect k8s_POD_ubuntu-5846f86795-bcbqv_default_ea44489d-3dd4-11e8-bb37-02ecc586c8d5_0 | grep SandboxKey
"SandboxKey": "/var/run/docker/netns/82ec9e32d486",
root@worker01:~#
Now, using nsenter you can see the container's information.
root@worker01:~# nsenter --net=/var/run/docker/netns/82ec9e32d486 ip addr show
1: lo: <LOOPBACK,UP,LOWER_UP> mtu 65536 qdisc noqueue state UNKNOWN group default qlen 1
link/loopback 00:00:00:00:00:00 brd 00:00:00:00:00:00
inet 127.0.0.1/8 scope host lo
valid_lft forever preferred_lft forever
3: eth0@if7: <BROADCAST,MULTICAST,UP,LOWER_UP> mtu 1450 qdisc noqueue state UP group default
link/ether 0a:58:0a:f4:01:02 brd ff:ff:ff:ff:ff:ff link-netnsid 0
inet 10.244.1.2/24 scope global eth0
valid_lft forever preferred_lft forever
Identify the peer_ifindex, and finally you can see the veth pair endpoint in root namespace.
root@worker01:~# nsenter --net=/var/run/docker/netns/82ec9e32d486 ethtool -S eth0
NIC statistics:
peer_ifindex: 7
root@worker01:~#
root@worker01:~# ip -d link show | grep '7: veth'
7: veth5e43ca47@if3: <BROADCAST,MULTICAST,UP,LOWER_UP> mtu 1450 qdisc noqueue master cni0 state UP mode DEFAULT group default
root@worker01:~#

nsenter相当于在setns的示例程序之上做了一层封装,使我们无需指定命名空间的文件描述符,而是指定进程号即可,详细case

1
2
3
4
5
6
7
8
9
10
11
12
13
14
15
16
17
18
19
#docker inspect cb7b05d82153 | grep -i SandboxKey //根据 pause 容器id找network namespace
"SandboxKey": "/var/run/docker/netns/d6b2ef3cf886",
[root@hygon252 19:00 /root]
#nsenter --net=/var/run/docker/netns/d6b2ef3cf886 ip addr show
3: eth0@if496: <BROADCAST,MULTICAST,UP,LOWER_UP> mtu 1450 qdisc noqueue state UP group default //496对应宿主机上的veth编号
link/ether 1e:95:dd:d9:88:bd brd ff:ff:ff:ff:ff:ff link-netnsid 0
inet 192.168.3.22/24 brd 192.168.3.255 scope global eth0
valid_lft forever preferred_lft forever
#nsenter --net=/var/run/docker/netns/d6b2ef3cf886 ethtool -S eth0
NIC statistics:
peer_ifindex: 496
#ip -d -4 addr show cni0
475: cni0: <BROADCAST,MULTICAST,UP,LOWER_UP> mtu 1450 qdisc noqueue state UP group default qlen 1000
link/ether 8e:34:ba:e2:a4:c6 brd ff:ff:ff:ff:ff:ff promiscuity 0 minmtu 68 maxmtu 65535
bridge forward_delay 1500 hello_time 200 max_age 2000 ageing_time 30000 stp_state 0 priority 32768 vlan_filtering 0 vlan_protocol 802.1Q bridge_id 8000.8e:34:ba:e2:a4:c6 designated_root 8000.8e:34:ba:e2:a4:c6 root_port 0 root_path_cost 0 topology_change 0 topology_change_detected 0 hello_timer 0.00 tcn_timer 0.00 topology_change_timer 0.00 gc_timer 43.31 vlan_default_pvid 1 vlan_stats_enabled 0 group_fwd_mask 0 group_address 01:80:c2:00:00:00 mcast_snooping 1 mcast_router 1 mcast_query_use_ifaddr 0 mcast_querier 0 mcast_hash_elasticity 4 mcast_hash_max 512 mcast_last_member_count 2 mcast_startup_query_count 2 mcast_last_member_interval 100 mcast_membership_interval 26000 mcast_querier_interval 25500 mcast_query_interval 12500 mcast_query_response_interval 1000 mcast_startup_query_interval 3124 mcast_stats_enabled 0 mcast_igmp_version 2 mcast_mld_version 1 nf_call_iptables 0 nf_call_ip6tables 0 nf_call_arptables 0 numtxqueues 1 numrxqueues 1 gso_max_size 65536 gso_max_segs 65535
inet 192.168.3.1/24 brd 192.168.3.255 scope global cni0
valid_lft forever preferred_lft forever

创建虚拟网卡

1
2
3
4
5
6
7
8
To make this interface you'd first need to make sure that you have the dummy kernel module loaded. You can do this like so:
$ sudo lsmod | grep dummy
$ sudo modprobe dummy
$ sudo lsmod | grep dummy
dummy 12960 0
With the driver now loaded you can create what ever dummy network interfaces you like:
$ sudo ip link add eth10 type dummy

修改网卡名字

1
2
3
4
5
6
7
8
9
ip link set ens33 down
ip link set ens33 name eth0
ip link set eth0 up
mv /etc/sysconfig/network-scripts/ifcfg-{ens33,eth0}
sed -ire "s/NAME=\"ens33\"/NAME=\"eth0\"/" /etc/sysconfig/network-scripts/ifcfg-eth0
sed -ire "s/DEVICE=\"ens33\"/DEVICE=\"eth0\"/" /etc/sysconfig/network-scripts/ifcfg-eth0
MAC=$(cat /sys/class/net/eth0/address)
echo -n 'HWADDR="'$MAC\" >> /etc/sysconfig/network-scripts/ifcfg-eth0

OS版本

搞Docker就得上el7, 6的性能太差了 Docker 对 Linux 内核版本的最低要求是3.10,如果内核版本低于 3.10 会缺少一些运行 Docker 容器的功能。这些比较旧的内核,在一定条件下会导致数据丢失和频繁恐慌错误。

清理mount文件

删除 /var/lib/docker 目录如果报busy,一般是进程在使用中,可以fuser查看哪个进程在用,然后杀掉进程;另外就是目录mount删不掉问题,可以 mount | awk ‘{ print $3 }’ |grep overlay2| xargs umount 批量删除

No space left on device

OSError: [Errno 28] No space left on device

​ 大部分时候不是真的磁盘没有空间了还有可能是inode不够了(df -ih 查看inode使用率)

​ 尝试用 fallocate 来测试创建文件是否成功

​ 尝试fdisk-l / tune2fs -l 来确认分区和文件系统的正确性

​ fallocate 创建一个文件名很长的文件失败(也就是原始报错的文件名),同时fallocate 创建一个短文件名的文件成功

​ dmesg 查看系统报错信息

1
2
[13155344.231942] EXT4-fs warning (device sdd): ext4_dx_add_entry:2461: Directory (ino: 3145729) index full, reach max htree level :2
[13155344.231944] EXT4-fs warning (device sdd): ext4_dx_add_entry:2465: Large directory feature is not enabled on this filesystem

​ 看起来是小文件太多撑爆了ext4的BTree索引,通过 tune2fs -l /dev/nvme1n1p1 验证下

1
2
3
4
5
6
7
8
#tune2fs -l /dev/nvme1n1p1 |grep Filesystem
Filesystem volume name: /flash2
Filesystem revision #: 1 (dynamic)
Filesystem features: has_journal ext_attr resize_inode dir_index filetype needs_recovery extent 64bit flex_bg sparse_super large_file huge_file uninit_bg dir_nlink extra_isize
Filesystem flags: signed_directory_hash
Filesystem state: clean
Filesystem OS type: Linux
Filesystem created: Fri Mar 6 17:08:36 2020

​ 执行 tune2fs -O large_dir /dev/nvme1n1p1 打开 large_dir 选项

1
2
tune2fs -l /dev/nvme1n1p1 |grep -i large
Filesystem features: has_journal ext_attr resize_inode dir_index filetype needs_recovery extent flex_bg large_dir sparse_super large_file huge_file uninit_bg dir_nlink extra_isize

如上所示,开启后Filesystem features 多了 large_dir,不过4.13以上内核才支持这个功能

CPU 资源分配

对于cpu的限制,Kubernetes采用cfs quota来限制进程在单位时间内可用的时间片。当独享和共享实例在同一台node节点上的时候,一旦实例的工作负载增加,可能会导致独享实例工作负载在不同的cpu核心上来回切换,影响独享实例的性能。所以,为了不影响独享实例的性能,我们希望在同一个node上,独享实例和共享实例的cpu能够分开绑定,互不影响。

内核的默认cpu.shares是1024,也可以通过 cpu.cfs_quota_us / cpu.cfs_period_us去控制容器规格

cpu.shares 多层级限制后上层有更高的优先级,可能会经常看到 CPU 多核之间不均匀的现象,部分核总是跑不满之类的。 cpu.shares 是用来调配争抢用,比如离线、在线混部可以通过 cpu.shares 多给在线业务

sock

docker有两个sock,一个是dockershim.sock,一个是docker.sock。dockershim.sock是由实现了CRI接口的一个插件提供的,主要把k8s请求转换成docker请求,最终docker还是要 通过docker.sock来管理容器。

kubelet —CRI—-> docker-shim(kubelet内置的CRI-plugin) –> docker

docker image api

1
2
3
4
5
获取所有镜像名字: GET /v2/_catalog
curl registry:5000/v2/_catalog
获取某个镜像的tag: GET /v2/<name>/tags/list
curl registry:5000/v2/drds/corona-server/tags/list

从registry中删除镜像

默认registry仓库不支持删除镜像,修改registry配置来支持删除

1
2
3
4
5
6
7
8
9
10
11
12
13
14
15
16
17
18
19
20
21
22
23
24
#cat config.yml
version: 0.1
log:
fields:
service: registry
storage:
delete: //增加如下两行,默认是false,不能删除
enabled: true
cache:
blobdescriptor: inmemory
filesystem:
rootdirectory: /var/lib/registry
http:
addr: :5000
headers:
X-Content-Type-Options: [nosniff]
health:
storagedriver:
enabled: true
interval: 10s
threshold: 3
#docker cp ./config.yml registry:/etc/docker/registry/config.yml
#docker restart registry

然后通过API来查询要删除镜像的id:

1
2
3
4
5
6
7
8
9
//查询要删除镜像的tag
curl registry:5000/v2/drds/corona-server/tags/list
//根据tag查找Etag
curl -v registry:5000/v2/drds/corona-server/manifests/2.0.0_3012622_20220214_4ca91d96-arm64 -H 'Accept: application/vnd.docker.distribution.manifest.v2+json'
//根据前一步返回的Etag来删除对应的tag
curl -X DELETE registry:5000/v2/drds/corona-server/manifests/sha256:207ec19c1df6a3fa494d41a1a8b5332b969a010f0d4d980e39f153b1eaca2fe2 -v
//执行垃圾回收
docker exec -it registry bin/registry garbage-collect /etc/docker/registry/config.yml

检查是否restart能支持只重启deamon,容器还能正常运行

1
2
$sudo docker info | grep Restore
Live Restore Enabled: true

参考资料

https://www.ardanlabs.com/blog/2020/02/docker-images-part1-reducing-image-size.html