//从修改的 /etc/default/grub 生成 /boot/grub2/grub.cfg 配置 //如果是uefi引导,则是 /boot/efi/EFI/redhat/grub.cfg sudo grub2-mkconfig -o /boot/grub2/grub.cfg #limit the journald log to 500M sed -i 's/^#SystemMaxUse=$/SystemMaxUse=500M/g' /etc/systemd/journald.conf #重启系统 #sudo reboot ## 选择不同的kernel启动 #sudo grep "menuentry " /boot/grub2/grub.cfg | grep -n menu ##grub认的index从0开始数的 #sudo grub2-reboot 0; sudo reboot or #grub2-set-default "CentOS Linux (3.10.0-1160.66.1.el7.x86_64) 7 (Core)" ; sudo reboot
GRUB 2 reads its configuration from the /boot/grub2/grub.cfg file on traditional BIOS-based machines and from the /boot/efi/EFI/redhat/grub.cfg file on UEFI machines. This file contains menu information.
The GRUB 2 configuration file, grub.cfg, is generated during installation, or by invoking the /usr/sbin/grub2-mkconfig utility, and is automatically updated by grubby each time a new kernel is installed. When regenerated manually using grub2-mkconfig, the file is generated according to the template files located in /etc/grub.d/, and custom settings in the /etc/default/grub file. Edits of grub.cfg will be lost any time grub2-mkconfig is used to regenerate the file, so care must be taken to reflect any manual changes in /etc/default/grub as well.
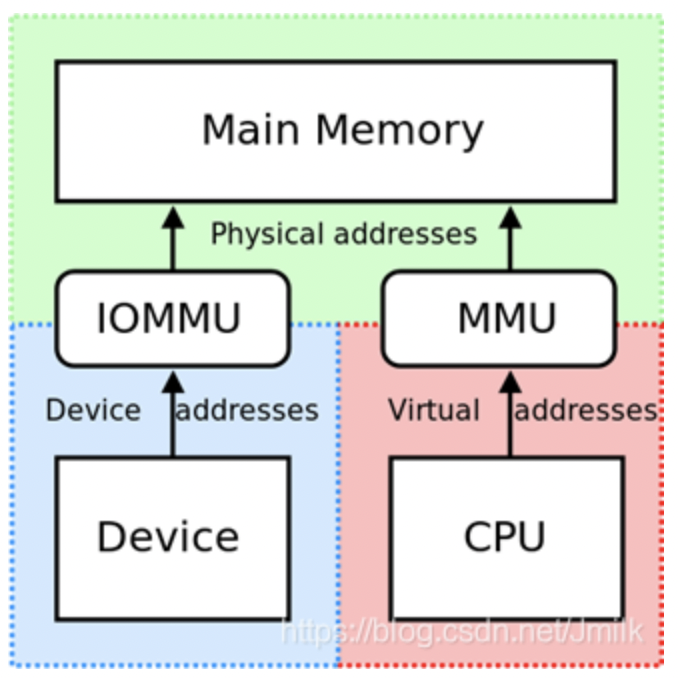
/*
 * This variable becomes 1 if iommu=pt is passed on the kernel command line.
 * If this variable is 1, IOMMU implementations do no DMA translation for
 * devices and allow every device to access to whole physical memory. This is
 * useful if a user wants to use an IOMMU only for KVM device assignment to
 * guests and not for driver dma translation.
 */
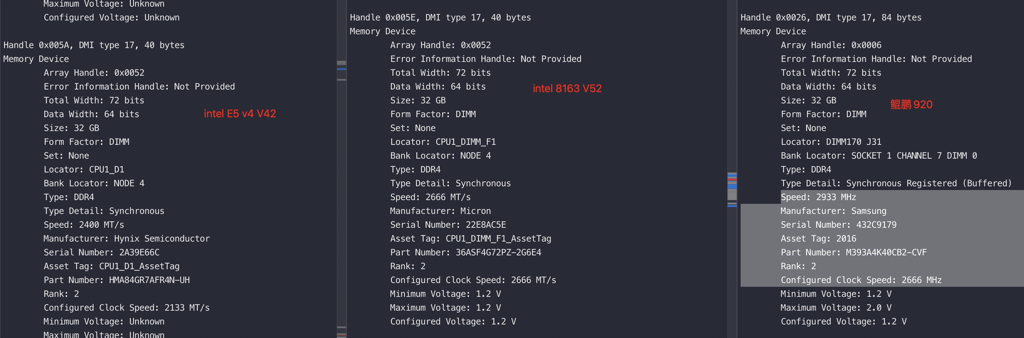
#dmidecode -t memory
# dmidecode 3.2
Getting SMBIOS data from sysfs.
SMBIOS 3.2.1 present.
# SMBIOS implementations newer than version 3.2.0 are not
# fully supported by this version of dmidecode.

Handle 0x0033, DMI type 16, 23 bytes
Physical Memory Array
	Location: System Board Or Motherboard
	Use: System Memory
	Error Correction Type: Multi-bit ECC
	Maximum Capacity: 2 TB  //最大支持2T
	Error Information Handle: 0x0032
	Number Of Devices: 32   //32个插槽

	Handle 0x0041, DMI type 17, 84 bytes
Memory Device
	Array Handle: 0x0033
	Error Information Handle: 0x0040
	Total Width: 72 bits
	Data Width: 64 bits
	Size: 32 GB
	Form Factor: DIMM
	Set: None
	Locator: CPU0_DIMMA0
	Bank Locator: P0 CHANNEL A
	Type: DDR4
	Type Detail: Synchronous Registered (Buffered)
	Speed: 2933 MT/s                    //内存最大频率
	Manufacturer: SK Hynix
	Serial Number: 220F9EC0
	Asset Tag: Not Specified
	Part Number: HMAA4GR7AJR8N-WM
	Rank: 2
	Configured Memory Speed: 2400 MT/s  //内存实际运行速度--比如内存条数插太多会给内存降频
	Minimum Voltage: 1.2 V
	Maximum Voltage: 1.2 V
	Configured Voltage: 1.2 V
	Memory Technology: DRAM
	Memory Operating Mode Capability: Volatile memory
	Module Manufacturer ID: Bank 1, Hex 0xAD
	Non-Volatile Size: None
	Volatile Size: 32 GB

	#lshw
	*-bank:19
             description: DIMM DDR4 Synchronous Registered (Buffered) 2933 MHz (0.3 ns) //内存最大频率
             product: HMAA4GR7AJR8N-WM
             vendor: SK Hynix
             physical id: 13
             serial: 220F9F63
             slot: CPU1_DIMMB0
             size: 32GiB  //实际所插内存大小
             width: 64 bits
             clock: 2933MHz (0.3ns)
./Linux/mlc
Intel(R) Memory Latency Checker - v3.9
Measuring idle latencies (in ns)...
    Numa node
Numa node      0       1
       0    77.9   143.2
       1   144.4    78.4

Measuring Peak Injection Memory Bandwidths for the system
Bandwidths are in MB/sec (1 MB/sec = 1,000,000 Bytes/sec)
Using all the threads from each core if Hyper-threading is enabled
Using traffic with the following read-write ratios
ALL Reads        :  225097.1
3:1 Reads-Writes :  212457.8
2:1 Reads-Writes :  210628.1
1:1 Reads-Writes :  199315.4
Stream-triad like:  190341.4

Measuring Memory Bandwidths between nodes within system
Bandwidths are in MB/sec (1 MB/sec = 1,000,000 Bytes/sec)
Using all the threads from each core if Hyper-threading is enabled
Using Read-only traffic type
    Numa node
Numa node      0       1
       0  113139.4  50923.4
       1  50916.6 113249.2

Measuring Loaded Latencies for the system
Using all the threads from each core if Hyper-threading is enabled
Using Read-only traffic type
Inject  Latency Bandwidth
Delay (ns)  MB/sec
==========================
 00000  261.50   225452.5
 00002  263.79   225291.6
 00008  269.02   225184.1
 00015  261.96   225757.6
 00050  260.56   226013.2
 00100  264.27   225660.1
 00200  130.61   195882.4
 00300  102.65   133820.1
 00400   95.04   101353.2
 00500   91.56    81585.9
 00700   87.94    58819.1
 01000   85.54    41551.3
 01300   84.70    32213.6
 01700   83.14    24872.5
 02500   81.74    17194.3
 03500   81.14    12524.2
 05000   80.74     9013.2
 09000   80.09     5370.0
 20000   78.92     2867.2

Measuring cache-to-cache transfer latency (in ns)...
Local Socket L2->L2 HIT  latency  51.6
Local Socket L2->L2 HITM latency  51.7
Remote Socket L2->L2 HITM latency (data address homed in writer socket)
      Reader Numa Node
Writer Numa Node     0       1
            0      -   111.3
            1  111.1       -
Remote Socket L2->L2 HITM latency (data address homed in reader socket)
      Reader Numa Node
Writer Numa Node     0       1
            0      -   175.8
            1  176.7       -

[root@numaopen.cloud.et93 /home/admin]
#lscpu
Architecture:          x86_64
CPU op-mode(s):        32-bit, 64-bit
Byte Order:            Little Endian
CPU(s):                104
On-line CPU(s) list:   0-103
Thread(s) per core:    2
Core(s) per socket:    26
Socket(s):             2
NUMA node(s):          2
Vendor ID:             GenuineIntel
CPU family:            6
Model:                 85
Model name:            Intel(R) Xeon(R) Platinum 8269CY CPU @ 2.50GHz
Stepping:              7
CPU MHz:               3199.902
CPU max MHz:           3800.0000
CPU min MHz:           1200.0000
BogoMIPS:              4998.89
Virtualization:        VT-x
L1d cache:             32K
L1i cache:             32K
L2 cache:              1024K
L3 cache:              36608K
NUMA node0 CPU(s):     0-25,52-77
NUMA node1 CPU(s):     26-51,78-103

#dmidecode -t memory
Handle 0x003C, DMI type 17, 40 bytes
Memory Device
  Array Handle: 0x0026
  Error Information Handle: Not Provided
  Total Width: 72 bits
  Data Width: 64 bits
  Size: 32 GB
  Form Factor: DIMM
  Set: None
  Locator: CPU1_DIMM_E1
  Bank Locator: NODE 2
  Type: DDR4
  Type Detail: Synchronous
  Speed: 2666 MHz
  Manufacturer: Samsung
  Serial Number: 14998029
  Asset Tag: CPU1_DIMM_E1_AssetTag
  Part Number: M393A4K40BB2-CTD
  Rank: 2
  Configured Clock Speed: 2666 MHz
  Minimum Voltage:  1.2 V
  Maximum Voltage:  1.2 V
  Configured Voltage:  1.2 V