史上最全 SSH 暗黑技巧详解
史上最全 SSH 暗黑技巧详解
我见过太多的老鸟、新手对ssh 基本只限于 ssh到远程机器,实际这个命令我们一天要用很多次,但是对它的了解太少了,他的强大远远超出你的想象。当于你也许会说够用就够了,确实没错,但是你考虑过效率没有,或者还有哪些脑洞大开的功能会让你爱死他,这些功能又仅仅是一行命令就够了。
疫情期间一行SSH命令让我节省了70%的出差时间,来,让我们一起走一遍,看看会不会让你大开眼界
本文试图解决的问题
- 如何通过ssh命令科学上网
- docker 镜像、golang仓库总是被墙怎么办
- 公司跳板机要输入动态token,太麻烦了,如何省略掉这个token;
- 比如多机房总是要走跳板机,如何
绕过跳板机直连; - 我的开发测试机器如何免打通、免密码、直达;
- 如何访问隔离环境中(k8s)的Web服务 – 将隔离环境中的web端口映射到本地
- 如何让隔离环境的机器用上yum、apt
- 如何将服务器的图形界面映射到本地(类似vnc的作用)
- ssh如何调试诊断,这才是终极技能……
注意事项
- ssh是指的openSSH 命令工具
- 本文适用于各种Linux、macOS下命令行操作,Windows的话各种可视化工具都可以复制session、配置tunnel来实现类似功能。
- 如果文章中提到的文件、文件夹不存在可以直接创建出来。
- 所有配置都是在你的笔记本上(相当于ssh client上)
科学上网
有时候科学上网还得靠自己,一行ssh命令来科学上网:
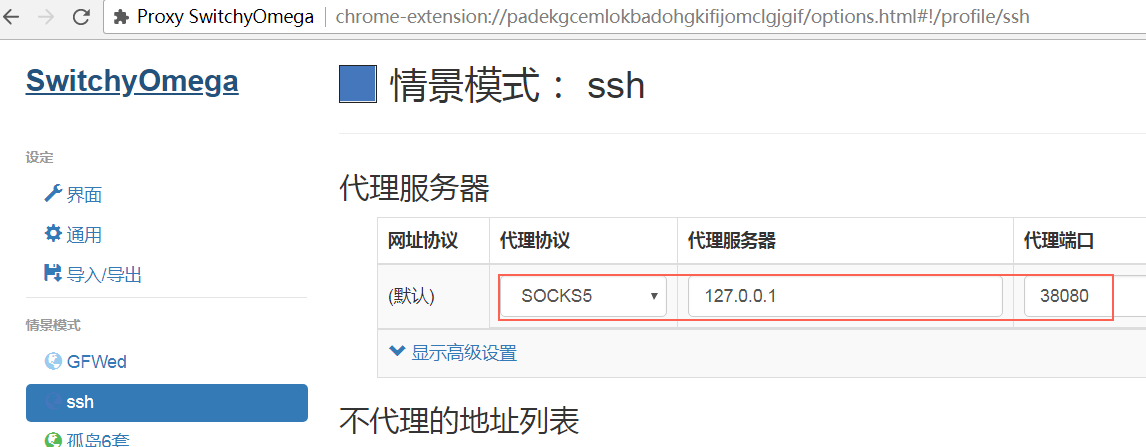
1 | nohup ssh -qTfnN -D 127.0.0.1:38080 root@1.1.1.1 "vmstat 10" 2>&1 >/dev/null & |
上面的 1.1.1.1 是你在境外的一台服务器,已经做好了免密登陆(免密见后面,要不你还得输一下密码),这句话的意思就是在本地启动一个38080的端口,上面收到的任何东西都会转发给 1.1.1.1:22(做了ssh加密),1.1.1.1:22 会解密收到的东西,然后把他们转发给google之类的网站(比如你要访问的是google),结果依然通过原路返回
127.0.0.1:38080 socks5 就是要填入到你的浏览器中的代理服务器,什么都不需要装,非常简单
原理图如下(灰色矩形框就是你本地ssh命令,ssh 线就是在穿墙, 国外服务器就是命令中的1.1.1.1):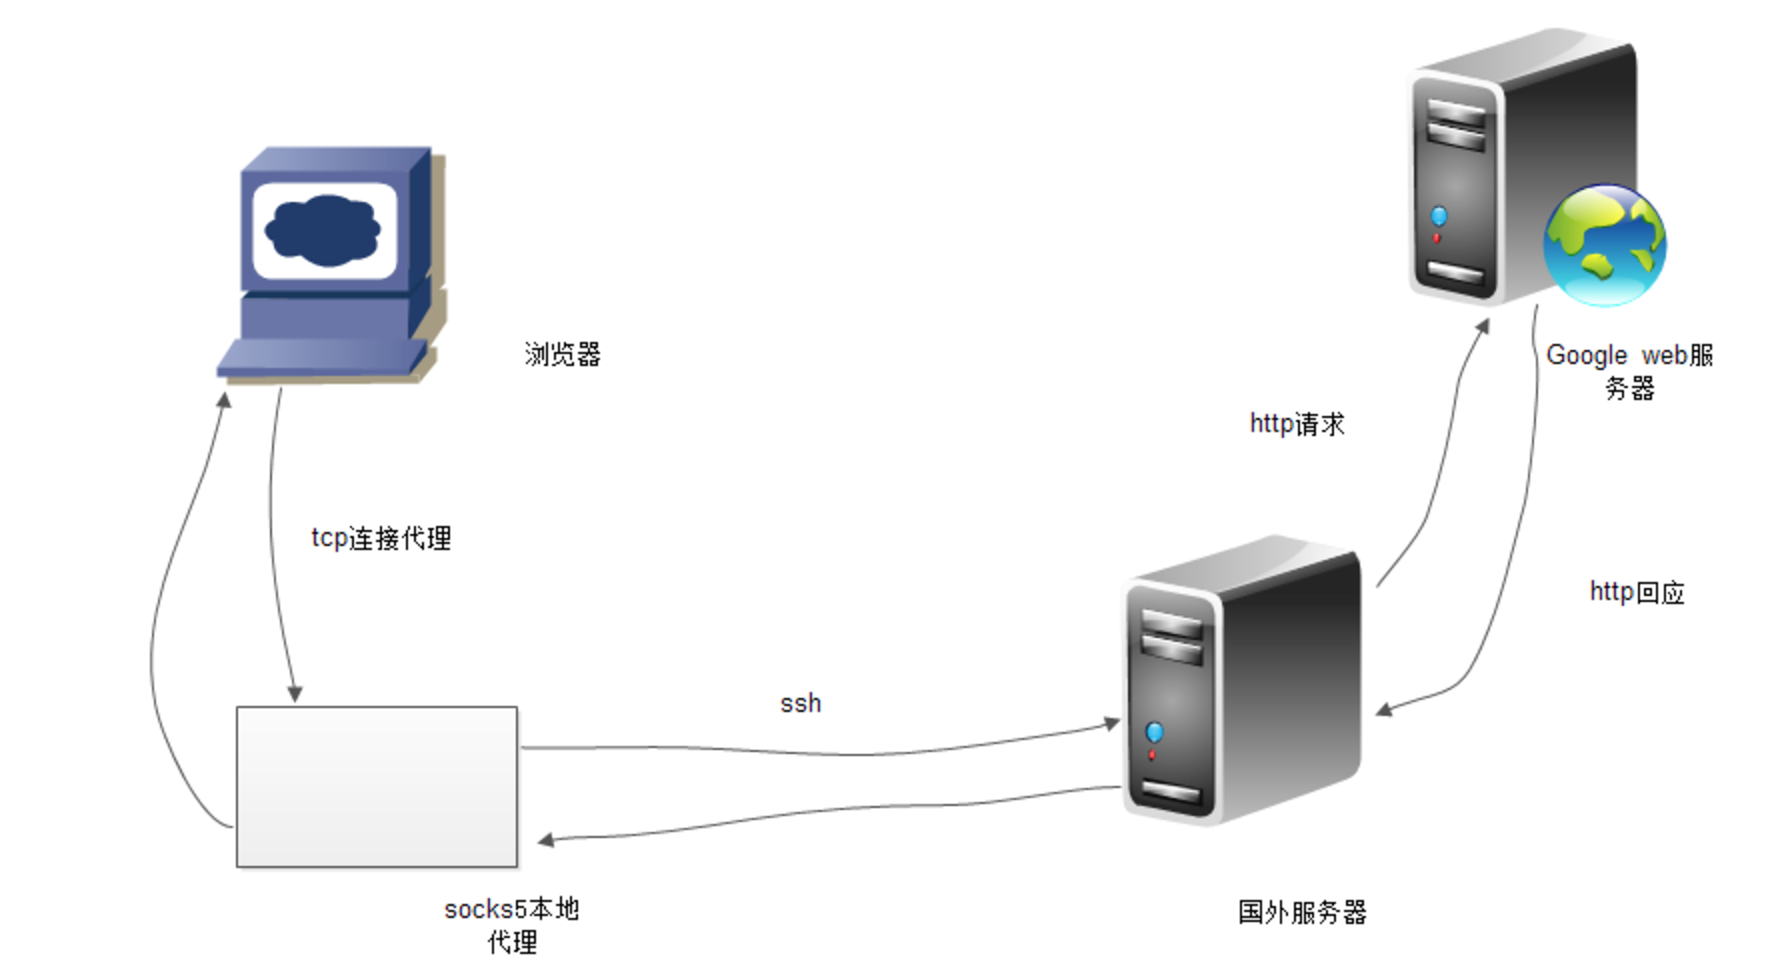
科学上网之http特殊代理–利用ssh 本地转发是HTTP协议
前面所说的代理是socks5代理,一般浏览器都有插件支持,但是比如你的docker(或者其他程序)需要通过http去拉取镜像就会出现如下错误:
Sending build context to Docker daemon 8.704 kB
Step 1 : FROM k8s.gcr.io/kube-cross:v1.10.1-1
Get https://k8s.gcr.io/v1/_ping: dial tcp 108.177.125.82:443: i/o timeout
如果是git这样的应用内部可以配置socks5和http代理服务器,请参考另外一篇文章,但是有些应用就不能配置了,当然最终通过ssh大法还是可以解决这个问题:
sudo ssh -L 443:108.177.125.82:443 root@1.1.1.1 //在本地监听443,转发给远程108.177.125.82的443端口
然后再在 /etc/hosts 中将域名 k8s.gcr.io 指向 127.0.0.1, 那么本来要访问 k8s.gcr.io:443的,变成了访问本地 127.0.0.1:443 而 127.0.0.1:443 又通过ssh重定向到了 108.177.125.82:443 这样就实现了http代理或者说这种特殊情况下的科学上网。这个方案不需要装任何东西,但是每个访问目标都要这样处理,好在这种情况不多
内部堡垒机、跳板机都需要密码+动态码,太复杂了,怎么解?
1 | cat ~/.ssh/config |
在你的ssh配置文件增加上述参数,意味着72小时内登录同一台跳板机只有第一次需要输入密码,以后都是重用之前的连接,所以也就不再需要输入密码了。
加了如上参数后的登录过程就有这样的东东(默认没有,这是debug信息):
1 | debug1: setting up multiplex master socket |
/home/ren/tmp/ssh_mux_10.16.._22_corp 这个就是保存好的socket,下次可以重用,免密码。 in 259200 seconds 对应 72小时
我有很多不同机房(或者说不同客户)的机器都需要跳板机来登录,能一次直接ssh上去吗?
比如有一批客户机房的机器IP都是192.168.., 然后需要走跳板机100.10.1.2才能访问到,那么我希望以后在笔记本上直接 ssh 192.168.1.5 就能直接连上
$ cat /etc/ssh/ssh_config

Host 192.168.*.*
ProxyCommand ssh -l ali-renxijun 100.10.1.2 exec /usr/bin/nc %h %p
上面配置的意思是执行 ssh 192.168.1.5的时候命中规则 Host 192.168.. 所以执行 ProxyCommand 先连上跳板机再通过跳板机连向192.168.1.5 。这样在你的笔记本上就跟192.168.. 的机器仿佛在一起,ssh可以上去,但是ping不通这个192.168.1.5的ip
划重点:公司的线上跳板机做了特殊限制,限制了这个技能。日常环境跳板机支持这个功能
比如我的跳板配置:
#到美国的机器用美国的跳板机速度更快
Host 10.74.*
ProxyCommand ssh -l user us.jump exec /bin/nc %h %p 2>/dev/null
#到中国的机器用中国的跳板机速度更快
Host 10.70.*
ProxyCommand ssh -l user cn.jump exec /bin/nc %h %p 2>/dev/null

Host 192.168.0.*
ProxyCommand ssh -l user 1.1.1.1 exec /usr/bin/nc %h %p
其实我的配置文件里面还有很多规则,懒得一个个隐藏IP了,这些规则是可以重复匹配的
来看一个例子
ren@ren-VirtualBox:/$ ping -c 1 10.16.1.*
        PING 10.16.1.* (10.16.1.*) 56(84) bytes of data.^C
    --- 10.16.1.* ping statistics ---
    1 packets transmitted, 0 received, 100% packet loss, time 0ms

ren@ren-VirtualBox:~$ ssh -l corp 10.16.1.* -vvv
OpenSSH_6.7p1 Ubuntu-5ubuntu1, OpenSSL 1.0.1f 6 Jan 2014
debug1: Reading configuration data /home/ren/.ssh/config
debug1: Reading configuration data /etc/ssh/ssh_config
debug1: /etc/ssh/ssh_config line 28: Applying options for *
debug1: /etc/ssh/ssh_config line 44: Applying options for 10.16.*.*
debug1: /etc/ssh/ssh_config line 68: Applying options for *
debug1: auto-mux: Trying existing master
debug1: Control socket "/home/ren/tmp/ssh_mux_10.16.1.*_22_corp" does not exist
debug1: Executing proxy command: exec ssh -l corp 139.*.*.* exec /usr/bin/nc 10.16.1.* 22
本来我的笔记本跟 10.16.1.* 是不通的(ping 不通),但是ssh可以直接连上,实际ssh登录过程中自动走跳板机139...* 就连上了
-vvv 参数是debug,把ssh登录过程的日志全部打印出来。
将隔离环境中的web端口映射到本地(本地代理)
远程机器部署了WEB Server(端口 8083),需要通过浏览器来访问这个WEB服务,但是server在隔离环境中,只能通过ssh访问到。一般来说会在隔离环境中部署一个windows机器,通过这个windows机器来访问到这个web server。能不能省掉这个windows机器呢?
现在我们试着用ssh来实现本地浏览器直接访问到这个隔离环境中的WEB Server。
假设web server是:10.1.1.123:8083, ssh账号是:user
先配置好本地直接 ssh user@10.1.1.123 (参考前面的 ProxyCommand配置过程,最好是免密也配置好),然后在你的笔记本上执行:
ssh -CNfL 0.0.0.0:8088:10.1.1.123:8083 user@10.1.1.123
或者:(root@100.1.2.3 -p 54900 是可达10.1.1.123的代理服务器)
ssh -CNfL 0.0.0.0:8089:10.1.1.123:8083 root@100.1.2.3 -p 54900
这表示在本地启动一个8088的端口,将这个8088端口映射到10.1.1.123的8083端口上,用的ssh账号是user
然后在笔记本上的浏览器中输入: 127.0.0.1:8088 就看到了如下界面:

反过来,也可以让隔离环境机器通过代理上网,比如安装yum
为什么有时候ssh 比较慢,比如总是需要30秒钟后才能正常登录
先了解如下知识点,在 ~/.ssh/config 配置文件中:
GSSAPIAuthentication=no
禁掉 GSSAPI认证,GSSAPIAuthentication是个什么鬼东西请自行 Google(多一次没必要的授权认证过程,然后等待超时)。 这里要理解ssh登录的时候有很多种认证方式(公钥、密码等等),具体怎么调试请记住强大的命令参数 ssh -vvv 上面讲到的技巧都能通过 -vvv 看到具体过程。
比如我第一次碰到ssh 比较慢总是需要30秒后才登录,不能忍受,于是登录的时候加上 -vvv明显看到控制台停在了:GSSAPIAuthentication 然后Google了一下,禁掉就好了
当然还有去掉每次ssh都需要先输入yes
批量打通所有机器之间的ssh登录免密码
Expect在有些公司是被禁止的
ssh免密码的原理是将本机的pub key复制到目标机器的 ~/.ssh/authorized_keys 里面。可以手工复制粘贴,也可以 ssh-copy-id 等
如果有100台机器,互相两两打通还是比较费事(大概需要100*99次copy key)。 下面通过 expect 来解决输入密码,然后配合shell脚本来批量解决这个问题。
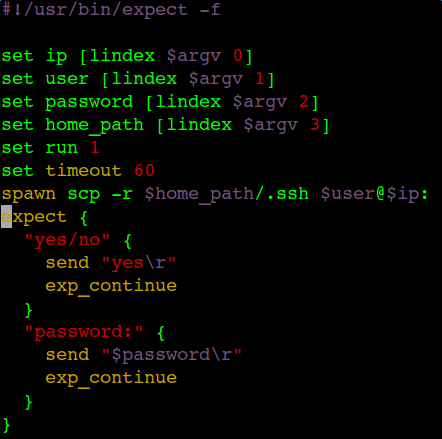
这个脚本需要四个参数:目标IP、用户名、密码、home目录,也就是ssh到一台机器的时候帮我们自动填上yes,和密码,这样就不需要人肉一个个输入了。
再在外面写一个循环对每个IP执行如下操作:
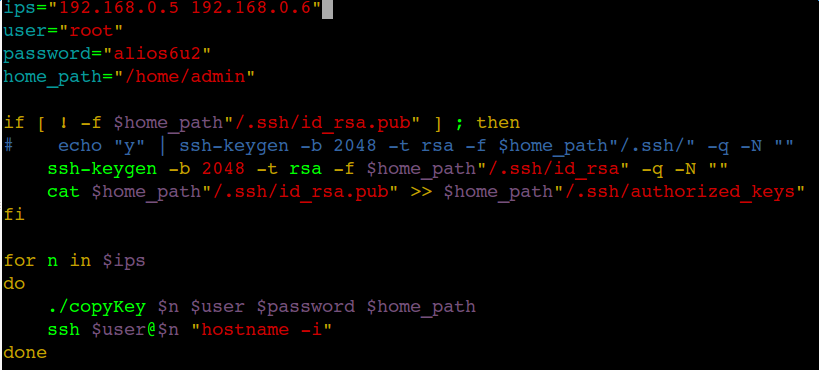
if代码部分检查本机~/.ssh/下有没有id_rsa.pub,也就是是否以前生成过密钥对,没生成的话就帮忙生成一次。
for循环部分一次把生成的密钥对和authorized_keys复制到所有机器上,这样所有机器之间都不需要输入密码就能互相登陆了(当然本机也不需要输入密码登录所有机器)
最后一行代码:
ssh $user@$n "hostname -i"
验证一下没有输密码是否能成功ssh上去。
思考一下,为什么这么做就可以打通两两之间的免密码登录,这里没有把所有机器的pub key复制到其他所有机器上去啊
答案:其实这个脚本做了一个取巧投机的事,那就是让所有机器共享一套公钥、私钥。
有时候我也会把我的windows笔记本和我专用的某台虚拟机共享一套秘钥,这样任何新申请的机器打通一次账号就可以在两台机器上随便登录。请保护好自己的私钥
如果免密写入 authorized_keys 成功,但是通过ssh pubkey认证的时候还是有可能失败,这是因为pubkey认证要求:
- authorized_keys 文件权限要对
- .ssh 文件夹权限要对
- /home/user 文件夹权限要对 —-这个容易忽视掉
留个作业:第一次ssh某台机器的时候总是出来一个警告,需要yes确认才能往下走,怎么干掉他?
StrictHostKeyChecking=no
UserKnownHostsFile=/dev/null
如果按照文章操作不work,推荐就近问身边的同学。问我的话请cat 配置文件 然后把ssh -vvv user@ip (user、ip请替换成你的),再截图发给我。**
测试成功的同学也请留言说下什么os、版本,以及openssl版本,我被问崩溃了
这里只是帮大家入门了解ssh,掌握好这些配置文件和-vvv后有好多好玩的可以去挖掘,同时也请在留言中说出你的黑技能
~/.ssh/config 参考配置
下面是我个人常用的ssh config配置
1 | cat ~/.ssh/config |
ProxyJump完全可以取代 ProxyCommand,比如ProxyJump 不再依赖nc、也更灵活一些
/etc/ssh/ssh_config 参考配置
1 | Host * |
其他知识点
参数的优先级是:命令行配置选项 > ~/.ssh/config > /etc/ssh/ssh_config
在SSH的**身份验证阶段,SSH只支持服务端保留公钥,客户端保留私钥的方式,**所以方式只有两种:客户端生成密钥对,将公钥分发给服务端;服务端生成密钥对,将私钥分发给客户端。只不过出于安全性和便利性,一般都是客户端生成密钥对并分发公钥(阿里云服务器秘钥对–服务器将一对密钥中的公钥放在 authorized_keys, 私钥给client登陆用)
服务器上的 /etc/ssh/ssh_host* 是用来验证服务器身份的秘钥对(对应client的 known_hosts), 在主机验证阶段,服务端持有的是私钥,客户端保存的是来自于服务端的公钥。注意,这和身份验证阶段密钥的持有方是相反的。
SSH支持多种身份验证机制,它们的验证顺序如下:gssapi-with-mic,hostbased,publickey,keyboard-interactive,password,但常见的是密码认证机制(password)和公钥认证机制(public key). 当公钥认证机制未通过时,再进行密码认证机制的验证。这些认证顺序可以通过ssh配置文件(注意,不是sshd的配置文件)中的指令PreferredAuthentications改变。
永久隧道
大多时候隧道会失效,或者断开,我们需要有重连机制,一般可以通过autossh(需要单独安装)搞定自动重连,再配合systemd或者crond搞定永久自动重连
比如以下代码在gf开启2个远程转发端口
1 | remote_port=(30081 30082) |
或者另外创建一个service服务
1 | [Unit] |
调试ssh–终极大招
好多问题都是可以 debug 发现的
- 客户端增加参数 -vvv 会把所有流程在控制台显示出来。卡在哪个环节;密码不对还是key不对一看就知道
- server端还可以:/usr/sbin/sshd -ddd -p 2222 在2222端口对sshd进行debug,看输出信息验证为什么pub key不能login等. 一般都是权限不对,/root 以及 /root/.ssh 文件夹的权限和owner都要对,更不要说 /root/.ssh/authorized_keys 了
1 | /usr/sbin/sshd -ddd -p 2222 |
ssh 提示信息
可以用一下脚本生成一个彩色文件,放到 /etc/motd 中就行
Basic colors are numbered:
- 1 – Red
- 2 – Green
- 3 – Yellow
- 4 – Blue
- 5 – Magenta
- 6 – Cyan
- 7 – White
1 | !/bin/sh |
以上脚本运行结果
sshd Banner
Banner指定用户登录后,sshd 向其展示的信息文件(Banner /usr/local/etc/warning.txt),默认不展示任何内容。
或者配置:
1 | cat /etc/ssh/sshd_config |
/etc/ssh/my_banner 中可以放置提示内容
验证秘钥对
-y Read a private OpenSSH format file and print an OpenSSH public key to stdout.
cd ~/.ssh/ ; ssh-keygen -y -f id_rsa | cut -d’ ‘ -f 2 ; cut -d’ ‘ -f 2 id_rsa.pub
ssh-keygen -y -e -f <private key>获取一个私钥并打印相应的公钥,该公钥可以直接与您可用的公钥进行比较
github 上你的公钥
github可以取到你的公钥,如果别人让你查看他的服务器,直接给 https://github.com/plantegg.keys 这个链接,让他把下载的key 加到 ~/.ssh/authorized_keys 里面就行了
ssh-keygen
1 | ssh-keygen -q -t rsa -N '' -f ~/.ssh/id_rsa <<<y |
删除或者修改 passphrase
run
ssh-keygen -pin a terminal. It will then prompt you for a keyfile (defaulted to the correct file for me,~/.ssh/id_rsa), the old passphrase (enter what you have now) and the new passphrase (enter nothing).
要注意openssh 不同版本使用的不同 format,用openssh 8.0 默认用 “RFC4716” 格式,老的 4.0 默认是 PKCS8 格式
去修改dsa密钥后 openssh 4.0 不认
-m key_format
Specify a key format for the -i (import) or -e (export) conversion options. The sup‐
ported key formats are: “RFC4716” (RFC 4716/SSH2 public or private key), “PKCS8” (PEM
PKCS8 public key) or “PEM” (PEM public key). The default conversion format is
“RFC4716”.
如果用 8.0 去修改 PKCS8 格式的 key 可以指定格式参数
1 | ssh-keygen -p -m "PKCS8" -f ./id_dsa |
ssh-agent
私钥设置了密码以后,每次使用都必须输入密码,有时让人感觉非常麻烦。比如,连续使用scp命令远程拷贝文件时,每次都要求输入密码。
ssh-agent命令就是为了解决这个问题而设计的,它让用户在整个 Bash 对话(session)之中,只在第一次使用 SSH 命令时输入密码,然后将私钥保存在内存中,后面都不需要再输入私钥的密码了。
第一步,使用下面的命令新建一次命令行对话。
1 | $ eval `ssh-agent` |
上面命令中,ssh-agent会先自动在后台运行,并将需要设置的环境变量输出在屏幕上,类似下面这样。
1 | $ ssh-agent |
eval命令的作用,就是运行上面的ssh-agent命令的输出,设置环境变量。
第二步,在新建的 Shell 对话里面,使用ssh-add命令添加默认的私钥(比如~/.ssh/id_rsa,或~/.ssh/id_dsa,或~/.ssh/id_ecdsa,或~/.ssh/id_ed25519)。
1 | $ ssh-add |
上面例子中,添加私钥时,会要求输入密码。以后,在这个对话里面再使用密钥时,就不需要输入私钥的密码了,因为私钥已经加载到内存里面了。
如果添加的不是默认私钥,ssh-add命令需要显式指定私钥文件。
1 | $ ssh-add my-other-key-file |
上面的命令中,my-other-key-file就是用户指定的私钥文件。
SSH agent 程序能够将您的已解密的私钥缓存起来,在需要的时候用它来解密key chanllge返回给 SSHD https://webcache.googleusercontent.com/search?q=cache:7OfvSBFki10J:https://www.ibm.com/developerworks/cn/linux/security/openssh/part2/+&cd=7&hl=en&ct=clnk&gl=hk keychain介绍
安装sshd和debug
sshd 有自己的一对或多对密钥。它使用密钥向客户端证明自己的身份。所有密钥都是公钥和私钥成对出现,公钥的文件名一般是私钥文件名加上后缀.pub。
DSA 格式的密钥文件默认为/etc/ssh/ssh_host_dsa_key(公钥为ssh_host_dsa_key.pub),RSA 格式的密钥为/etc/ssh/ssh_host_rsa_key(公钥为ssh_host_rsa_key.pub)。如果需要支持 SSH 1 协议,则必须有密钥/etc/ssh/ssh_host_key。
如果密钥不是默认文件,那么可以通过配置文件sshd_config的HostKey配置项指定。默认密钥的HostKey设置如下。
1 | # HostKey for protocol version 1 |
注意,如果重装 sshd,/etc/ssh下的密钥都会重新生成(这些密钥对用于验证Server的身份),导致客户端重新 ssh 连接服务器时,会跳出警告,拒绝连接。为了避免这种情况,可以在重装 sshd 时,先备份/etc/ssh目录,重装后再恢复这个目录。
调试:非后台(-D)和debug(-d)模式启动sshd,同时监听2222和3333端口
sshd -D -d -p 2222 -p 3333
sshd config 配置多端口
1 | #cat /etc/ssh/sshd_config |
scp设置socks代理
scp -o “ProxyCommand=nc -X 5 -x [SOCKS_HOST]:[SOCKS_PORT] %h %p” [LOCAL/FILE/PATH] [REMOTE_USER]@[REMOTE_HOST]:[REMOTE/FILE/PATH]
其中[SOCKS_HOST]和[SOCKS_PORT]是socks代理的LOCAL_ADDRESS和LOCAL_PORT。[LOCAL/FILE/PATH]、[REMOTE_USER]、[REMOTE_HOST]和[REMOTE/FILE/PATH]分别是要复制文件的本地路径、要复制到的远端主机的用户名、要复制到的远端主机名、要复制文件的远端路径,这些参数与不使用代理时一样。“ProxyCommand=nc”表示当前运行命令的主机上需要有nc命令。
ProxyCommand
Specifies the proxy command for the connection. This command is launched prior to making the connection to Hostname. %h is replaced with the host defined in HostName and %p is replaced with 22 or is overridden by a Port directive.
在ssh连接目标主机前先执行ProxyCommand中的命令,比如 .ssh/config 中有如下配置
1 | host remote-host |
如上配置指的是,如果执行ssh remote-host 命中host规则,那么先执行命令 ssh -l root -p 52146 1.2.3.4 exec /usr/bin/nc 同时把remote-host和端口(默认22)传给nc
ProxyCommand和ProxyJump很类似,ProxyJump使用:
1 | //ssh到centos8机器上,走的是gf这台跳板机,本地一般和centos8不通 |
ProxyJump
需要 OpenSSH 7.3 以上版本才可以使用 ProxyJump, 相对 ProxyCommand 更简洁方便些
1 | #ssh 116 就可以通过 jumpserver:50023 连上 root@1.116.2.1:22 |
加密算法
列出本地所支持默认的加密算法
1 | #ssh -Q key |
比如连服务器报如下错误:
1 | debug1: kex: algorithm: (no match) |
表示服务端支持 diffie-hellman-group1-sha1,diffie-hellman-group14-sha1 加密,但是client端不支持,那么可以指定算法来强制client端使用某种和server一致的加密方式
1 | ssh -oKexAlgorithms=+diffie-hellman-group14-sha1 -l user |
如果仍然报以下错误:
1 | debug2: first_kex_follows 0 |
那么可以配置来解决:
1 | Host * |
When an SSH client connects to a server, each side offers lists of connection parameters to the other. These are, with the corresponding ssh_config keyword:
KexAlgorithms: the key exchange methods that are used to generate per-connection keysHostkeyAlgorithms: the public key algorithms accepted for an SSH server to authenticate itself to an SSH clientCiphers: the ciphers to encrypt the connectionMACs: the message authentication codes used to detect traffic modification
无所不能的 SSH 三大转发模式
了解完前面的一些小知识,再来看看无所不能的三大杀招。上面的各种代理基本都是由这三种转发模式实现的。
SSH能够做动态转发、本地转发、远程转发。先简要概述下他们的特点和使用场景
- 动态转发完全可以代替本地转发,只是动态转发是
socks5协议,当科学上网用,本地转发是tcp协议 - 本地转发完全是把动态转发特例化到访问某个固定目标的转发,类似 iptable 的 port forwarding
- 远程转发是启动转端口的机器同时连上两端的两个机器,把本来不连通的两端拼接起来,中间显得多了个节点。
- 三个转发模式可以串联使用
动态转发常用来科学上网,本地转发用来打洞,这两种转发启动的端口都是在本地;远程转发也是打洞的一种,只不过启用的端口在远程机器上。
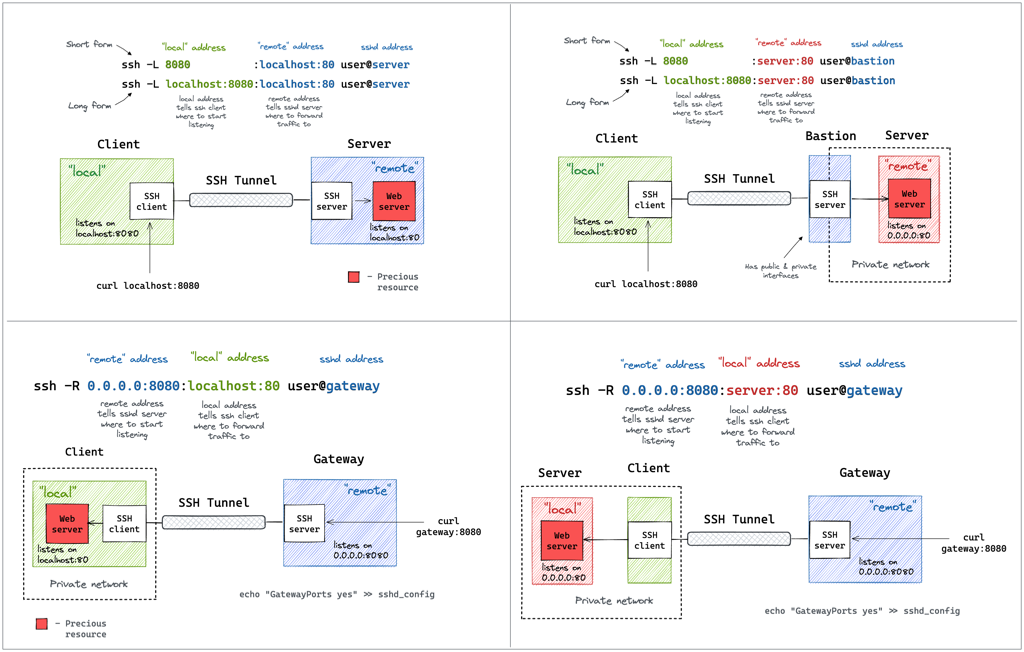
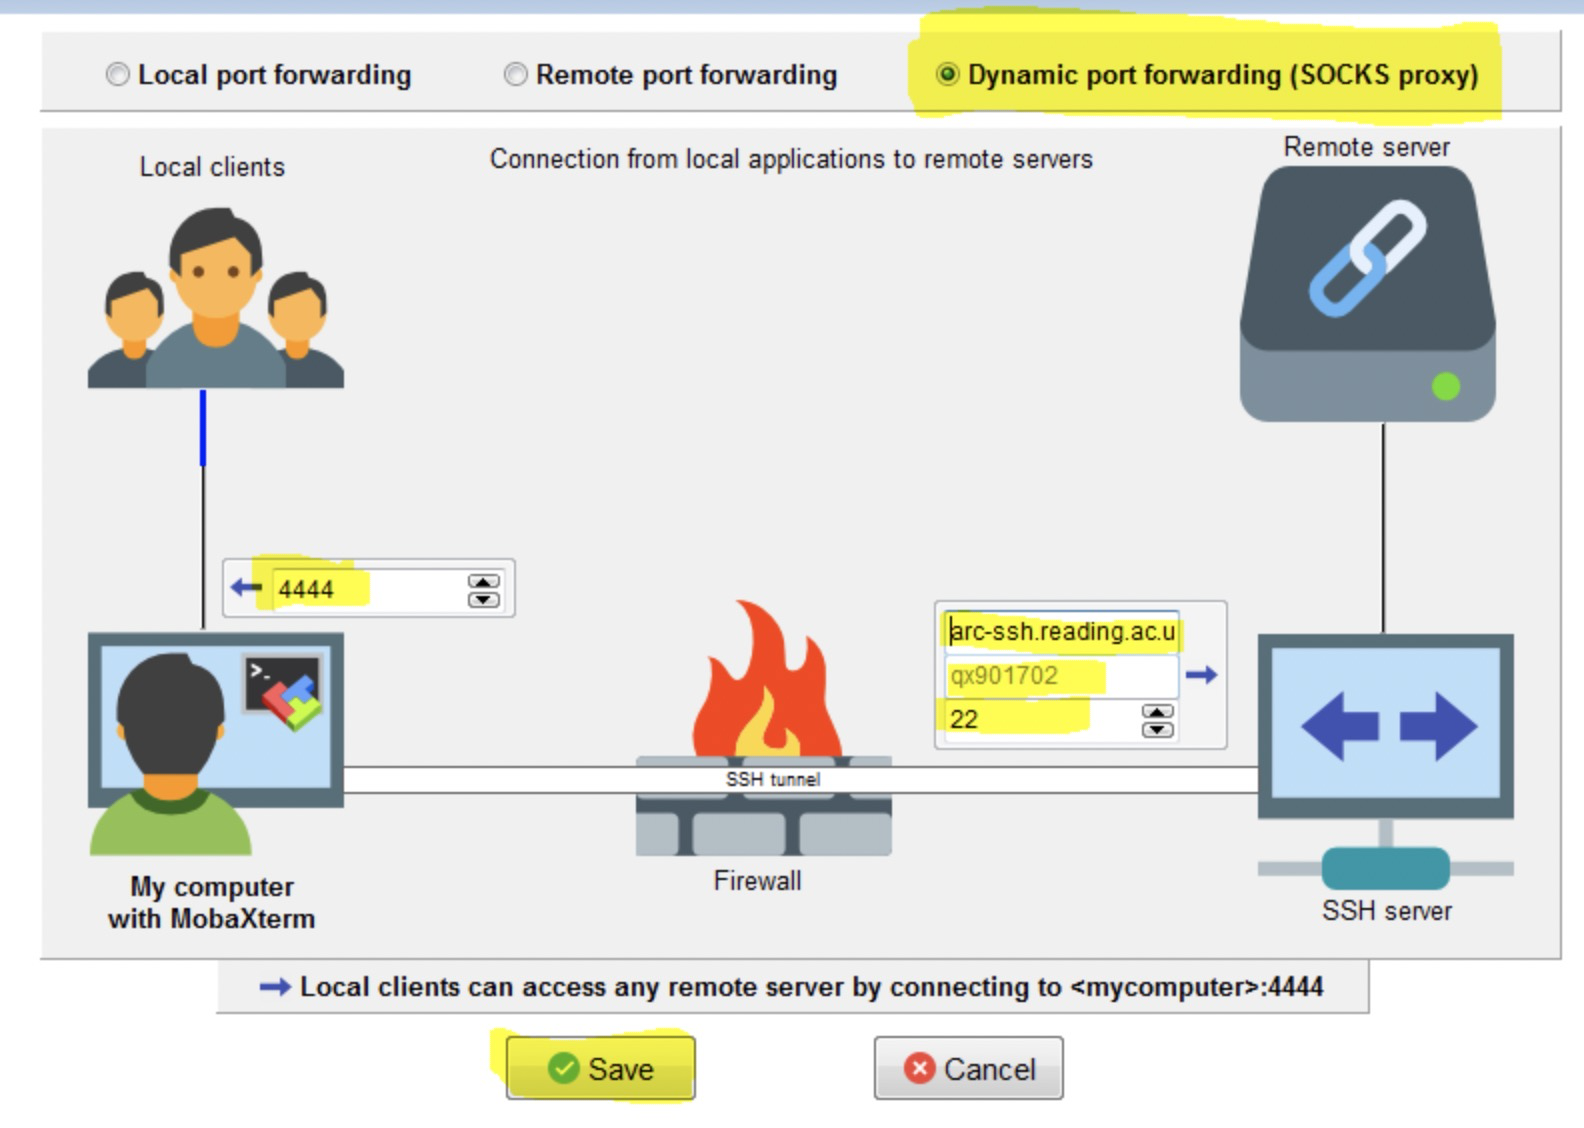
动态转发 (-D) SOCKS5 协议
动态转发指的是,本机与 SSH 服务器之间创建了一个加密连接,然后本机内部针对某个端口的通信,都通过这个加密连接转发。它的一个使用场景就是,访问所有外部网站,都通过 SSH 转发。
动态转发需要把本地端口绑定到 SSH 服务器。至于 SSH 服务器要去访问哪一个网站,完全是动态的,取决于原始通信,所以叫做动态转发。
动态的意思就是:需要访问的目标、端口还不确定。后面要讲的本地转发、远程转发都是针对具体IP、port的转发。
1 | ssh -D 4444 ssh-server -N |
注意,这种转发采用了 SOCKS5 协议。访问外部网站时,需要把 HTTP 请求转成 SOCKS5 协议,才能把本地端口的请求转发出去。-N参数表示,这个 SSH 连接不能执行远程命令,只能充当隧道。
下面是 ssh 隧道建立后的一个使用实例。
1 | curl -x socks5://localhost:4444 http://www.example.com |
上面命令中,curl 的-x参数指定代理服务器,即通过 SOCKS5 协议的本地3000端口,访问http://www.example.com。
官方文档关于 -D的介绍
-D [bind_address:]port
Specifies a local “dynamic” application-level port forwarding. This works by allocat‐
ing a socket to listen to port on the local side, optionally bound to the specified
bind_address. Whenever a connection is made to this port, the connection is forwarded
over the secure channel, and the application protocol is then used to determine where
to connect to from the remote machine. Currently the SOCKS4 and SOCKS5 protocols are
supported, and ssh will act as a SOCKS server. Only root can forward privileged ports.
Dynamic port forwardings can also be specified in the configuration file.
特别注意,如果ssh -D 要启动的本地port已经被占用了是不会报错的,但是实际socks代理会没启动成功
本地转发 (-L)
本地转发(local forwarding)指的是,SSH 服务器作为中介的跳板机,建立本地计算机与特定目标网站之间的加密连接。本地转发是在本地计算机的 SSH 客户端建立的转发规则。
典型使用场景就是,打洞,经过跳板机访问无法直接连通的服务。
它会指定一个本地端口(local-port),所有发向那个端口的请求,都会转发到 SSH 跳板机(ssh-server),然后 SSH 跳板机作为中介,将收到的请求发到目标服务器(target-host)的目标端口(target-port)。
1 | ssh -L :local-port:target-host:target-port ssh-server //target-host是ssh-server的target-host, target-host 域名解析、路由都是由ssh-server完成 |
上面命令中,-L参数表示本地转发,local-port是本地端口,target-host是你想要访问的目标服务器,target-port是目标服务器的端口,ssh-server是 SSH 跳板机。当你访问localhost:local-port 的时候会通过ssh-server把请求转给target-host:target-port
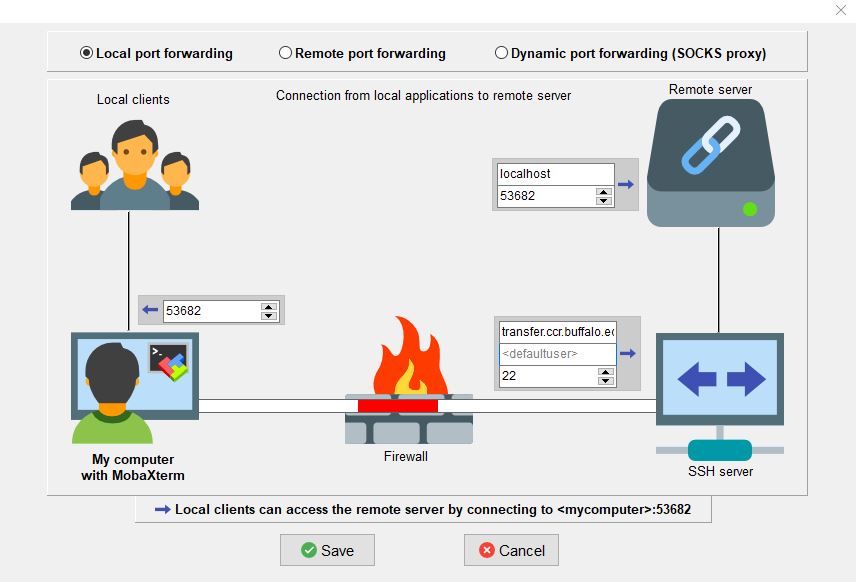
上图对应的命令是:
1 | ssh -L 53682:remote-server:53682 ssh-server |
然后,访问本机的53682端口,就是访问remote-server的53682端口.
1 | $ curl http://localhost:53682 |
注意,本地端口转发采用 HTTP 协议,不用转成 SOCKS5 协议。如果需要HTTP的动态代理,可以先起socks5动态代理,然后再起一个本地转发给动态代理的socks5端口,这样就有一个HTTP代理了,能给yum、docker之类的使用。
这个命令最好加上-N参数,表示不在 SSH 跳板机执行远程命令,让 SSH 只充当隧道。另外还有一个-f参数表示 SSH 连接在后台运行。
如果经常使用本地转发,可以将设置写入 SSH 客户端的用户个人配置文件。
1 | Host test.example.com |
远程转发(-R)
远程端口指的是在远程 SSH 服务器建立的转发规则。主要是执行ssh转发的机器别人连不上,所以需要一台client能连上的机器当远程转发端口,要不就是本地转发了。
由于本机无法访问内网 SSH 跳板机,就无法从外网发起 SSH 隧道,建立端口转发。必须反过来,从 SSH 跳板机发起隧道,建立端口转发,这时就形成了远程端口转发。
1 | ssh -fNR 30.1.2.3:30081:166.100.64.1:3128 root@30.1.2.3 -p 2728 |
上面的命令,首先需要注意,不是在30.1.2.3 或者166.100.64.1 上执行的,而是找一台能联通 30.1.2.3 和166.100.64.1的机器来执行,在执行前Remote clients能连上 30.1.2.3 但是 30.1.2.3 和 166.100.64.1 不通,所以需要一个中介将 30.1.2.3 和166.100.64.1打通,这个中介就是下图中的MobaXterm所在的机器,命令在MobaXterm机器上执行
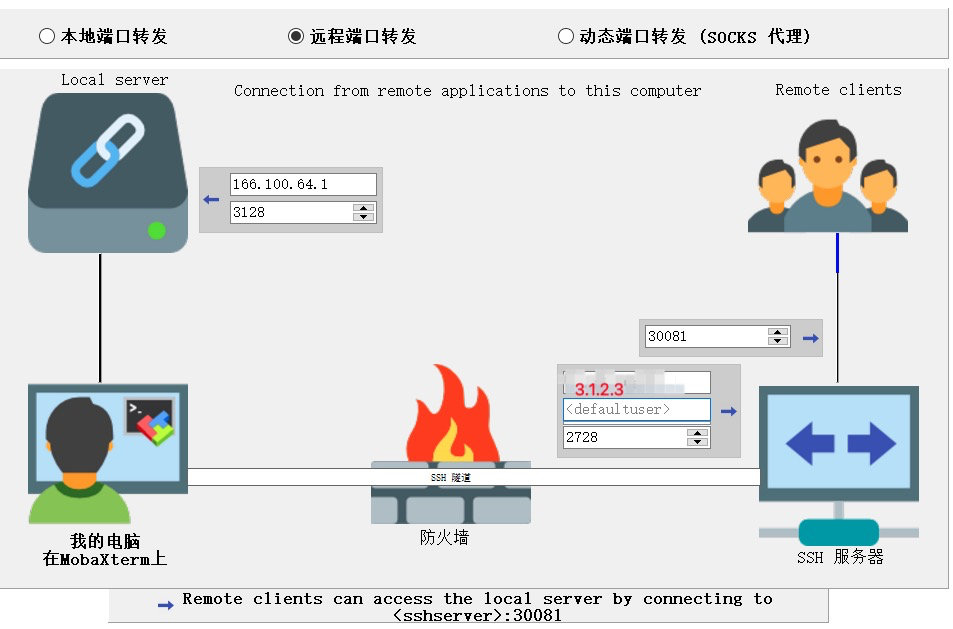
执行上面的命令以后,跳板机30.1.2.3 到166.100.64.1的隧道已经建立了,这个隧道是依赖两边都能连通的MobaXterm机器。然后,就可以从Remote Client访问目标服务器了,即在Remote Client上执行下面的命令。
1 | $ curl http://30.1.2.3:30081 |
执行上面的命令以后,命令就会输出服务器 166.100.64.1 的3128端口返回的内容。
如果经常执行远程端口转发,可以将设置写入 SSH 客户端的用户个人配置文件。
1 | Host test.example.com |
注意远程转发需要:
- sshd_config里要打开
AllowTcpForwarding选项,否则-R远程端口转发会失败。- 默认转发到远程主机上的端口绑定的是
127.0.0.1,如要绑定0.0.0.0需要打开sshd_config里的GatewayPorts选项(然后ssh -R 后加上*:port )。这个选项如果由于权限没法打开也有办法,可配合ssh -L将端口绑定到0.0.0.0。
开通远程转发后,如果需要动态代理(比如访问所有web服务),那么可以在30081端口机器上(30.1.2.3)执行:
1 | nohup ssh -qTfnN -D *:13658 root@127.0.0.1 -p 30081 vmstat 10 >/dev/null 2>&1 |
表示在30081机器上(30.1.2.3)启动了一个socks5动态代理服务
调试转发、代理是否能联通
命令行调试
1 | ssh -o 'ProxyCommand nc -X 5 -x 127.0.0.1:1080 %h %p' admin@1.1.1.1 |
curl
curl -I –socks5-hostname localhost:13659 twitter.com
curl -x socks5://localhost:13659 twitter.com
Suppose you have a socks5 proxy running on localhost:13659 .
In curl >= 7.21.7, you can use
1 | curl -x socks5h://localhost:13659 http://www.google.com/ |
In a proxy string, socks5h:// and socks4a:// mean that the hostname is
resolved by the SOCKS server. socks5:// and socks4:// mean that the
hostname is resolved locally. socks4a:// means to use SOCKS4a, which is
an extension of SOCKS4. Let’s make urllib3 honor it.
In curl >= 7.18.0, you can use
1 | curl --socks5-hostname localhost:13659 http://www.google.com/ |
–proxy 参数含义如下:
1 | The --socks5 option is basically considered obsolete since curl 7.21.7. This is because starting in that release, you can now specify the proxy protocol directly in the string that you specify the proxy host name and port number with already. The server you specify with --proxy. If you use a socks5:// scheme, curl will go with SOCKS5 with local name resolve but if you instead use socks5h:// it will pick SOCKS5 with proxy-resolved host name. |
wget
指定命令行参数,通过命令行指定HTTP代理服务器的方式如下:
wget -Y on -e “http_proxy=http://[HTTP_HOST]:[HTTP_PORT]“ http://facebook.com/其中:[HTTP_HOST]和[HTTP_PORT]是http proxy的ADDRESS和PORT。
-Y表示是否使用代理,on表示使用代理。
-e执行后面跟的命令,相当于在.wgetrc配置文件中添加了一条命令,将http_proxy设置为需要使用的代理服务器。
wget –limit-rate=2.5k 限制下载速度,进行测试
PKI (Public Key Infrastructure)证书
X.509 只是一种常用的证书格式,一般以PEM编码,PEM 编码的证书通常以 .pem、.crt 或 .cer 为后缀。再次提醒,这只是“通常”情况,实际上某些工具可能并不遵循这些惯例。通过pem证书可以访问需要认证的https服务(比如etcd、apiserver等)
- ASN.1 用于定义数据类型,例如证书(certificate)和秘钥(key)——就像用 JSON 定义一个 request body —— X.509 用 ASN.1 定义。
- DER 是一组将 ASN.1 编码成二进制(比特和字节)的编码规则(encoding rules)。
- PKCS#7 and PKCS#12 是比 X.509 更大的数据结构(封装格式),也用 ASN.1 定义,其中能包含除了证书之外的其他东西。二者分别在 Java 和 Microsoft 产品中使用较多。
- DER 编码之后是二进制数据,不方便复制粘贴,因此大部分证书都是用 PEM 编码的,它用 base64 对 DER 进行编码,然后再加上自己的 label。
- 私钥通常用是 PEM 编码的 PKCS#8 对象,但有时也会用密码来加密。
通过命令 cat /etc/kubernetes/pki/ca.crt | openssl x509 -text 也可以得到下图信息
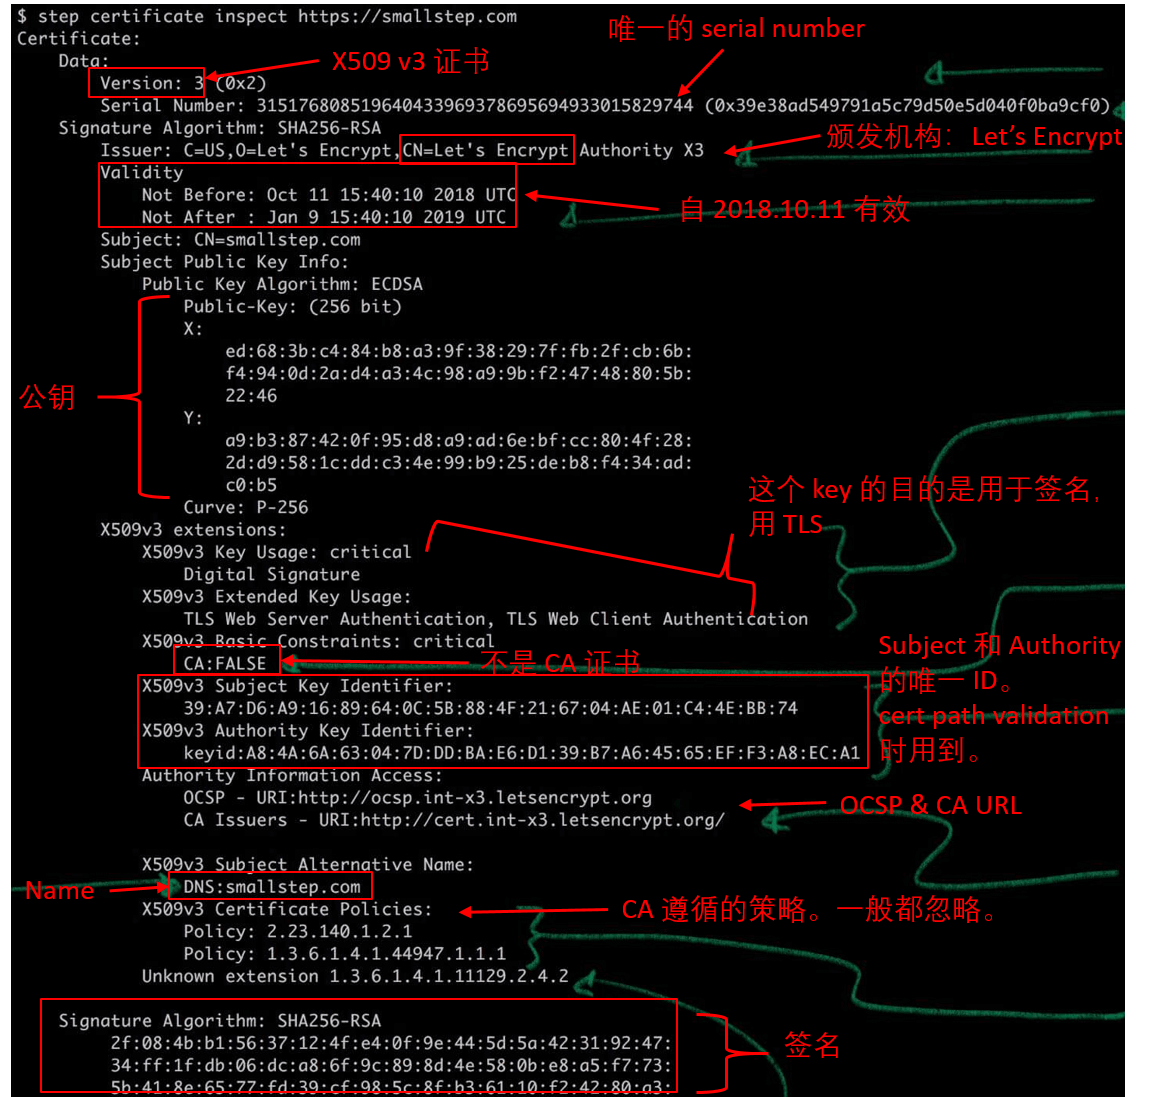
公钥、私钥常见扩展名
- 公钥:
.pubor.pem,ca.crt - 私钥:
.prv,.key, or.pem,ca.key。
证书生成过程演示
并不是所有的场景都需要向这些大型的 CA 机构申请公钥证书,在任何一个企业,组织或是团体内都可以自己形这样的“小王国”,也就是说,你可以自行生成这样的证书,只需要你自己保证自己的生成证书的私钥的安全,以及不需要扩散到整个互联网。下面,我们用 openssl命令来演示这个过程。
1)生成 CA 机构的证书(公钥) ca.crt 和私钥 ca.key
1 | openssl req -newkey rsa:2048 \ |
- 生成 alice 的私钥
1 | openssl genrsa -out alice.key 2048 |
3)生成 Alice 的 CSR – Certificate Signing Request
1 | openssl req -new -key alice.key -days 365 -out alice.csr \ |
4)使用 CA 给 Alice 签名证书
1 | openssl x509 -req -in alice.csr \ |
参考资料:
http://docs.corp-inc.com/pages/editpage.action?pageId=203555361
https://wiki.archlinux.org/index.php/SSH_keys_(%E7%AE%80%E4%BD%93%E4%B8%AD%E6%96%87)
https://wangdoc.com/ssh/key.html
https://robotmoon.com/ssh-tunnels/
https://daniel.haxx.se/blog/2020/05/26/curl-ootw-socks5/
Why when I transfer a file through SFTP, it takes longer than FTP?