kubernetes Flannel网络剖析

kubernetes Flannel网络剖析

cni(Container Network Interface)

CNI 全称为 Container Network Interface,是用来定义容器网络的一个 规范containernetworking/cni 是一个 CNCF 的 CNI 实现项目,包括基本的 bridge,macvlan等基本网络插件。

一般将cni各种网络插件的可执行文件二进制放到 /usr/libexec/cni/ ,在 /etc/cni/net.d/ 下创建配置文件,剩下的就交给 K8s 或者 containerd 了,我们不关心也不了解其实现。

比如:

1
2
3
4
5
6
7
8
9
10
11
12
13
14
15
16
17
18
19
20
21
22
23
24
25
26
27
# ls -lh /usr/libexec/cni/
总用量 133M
-rwxr-xr-x 1 root root 4.4M 8月 18 11:51 bandwidth
-rwxr-xr-x 1 root root 4.3M 3月 6 2021 bridge
-rwxr-x--- 1 root root 31M 8月 18 11:51 calico
-rwxr-x--- 1 root root 30M 8月 18 11:51 calico-ipam
-rwxr-xr-x 1 root root 12M 3月 6 2021 dhcp
-rwxr-xr-x 1 root root 5.6M 3月 6 2021 firewall
-rwxr-xr-x 1 root root 3.1M 8月 18 11:51 flannel
-rwxr-xr-x 1 root root 3.8M 3月 6 2021 host-device
-rwxr-xr-x 1 root root 3.9M 8月 18 11:51 host-local
-rwxr-xr-x 1 root root 4.0M 3月 6 2021 ipvlan
-rwxr-xr-x 1 root root 3.6M 8月 18 11:51 loopback
-rwxr-xr-x 1 root root 4.0M 3月 6 2021 macvlan
-rwxr-xr-x 1 root root 4.2M 8月 18 11:51 portmap
-rwxr-xr-x 1 root root 4.2M 3月 6 2021 ptp
-rwxr-xr-x 1 root root 2.7M 3月 6 2021 sample
-rwxr-xr-x 1 root root 3.2M 3月 6 2021 sbr
-rwxr-xr-x 1 root root 2.8M 3月 6 2021 static
-rwxr-xr-x 1 root root 3.7M 8月 18 11:51 tuning
-rwxr-xr-x 1 root root 4.0M 3月 6 2021 vlan
#ls -lh /etc/cni/net.d/
总用量 12K
-rw-r--r-- 1 root root 607 12月 23 09:39 10-calico.conflist
-rw-r----- 1 root root 292 12月 23 09:47 10-flannel.conflist
-rw------- 1 root root 2.6K 12月 23 09:39 calico-kubeconfig

CNI 插件都是直接通过 exec 的方式调用,而不是通过 socket 这样 C/S 方式,所有参数都是通过环境变量、标准输入输出来实现的。

跨主机通信流程

Step-by-step communication from Pod 1 to Pod 6:

  1. Package leaves Pod 1 netns\ through the eth1\ interface and reaches the root netns\ through the virtual interface veth1*;*
  2. Package leaves veth1\ and reaches cni0*, looking for **Pod 6***’s address;
  3. Package leaves cni0\ and is redirected to eth0*;*
  4. Package leaves eth0\ from Master 1\ and reaches the gateway*;*
  5. Package leaves the gateway\ and reaches the root netns\ through the eth0\ interface on Worker 1*;*
  6. Package leaves eth0\ and reaches cni0*, looking for **Pod 6***’s address;
  7. Package leaves cni0\ and is redirected to the veth6\ virtual interface;
  8. Package leaves the root netns\ through veth6\ and reaches the Pod 6 netns\ though the eth6\ interface;

image-20220115124747936

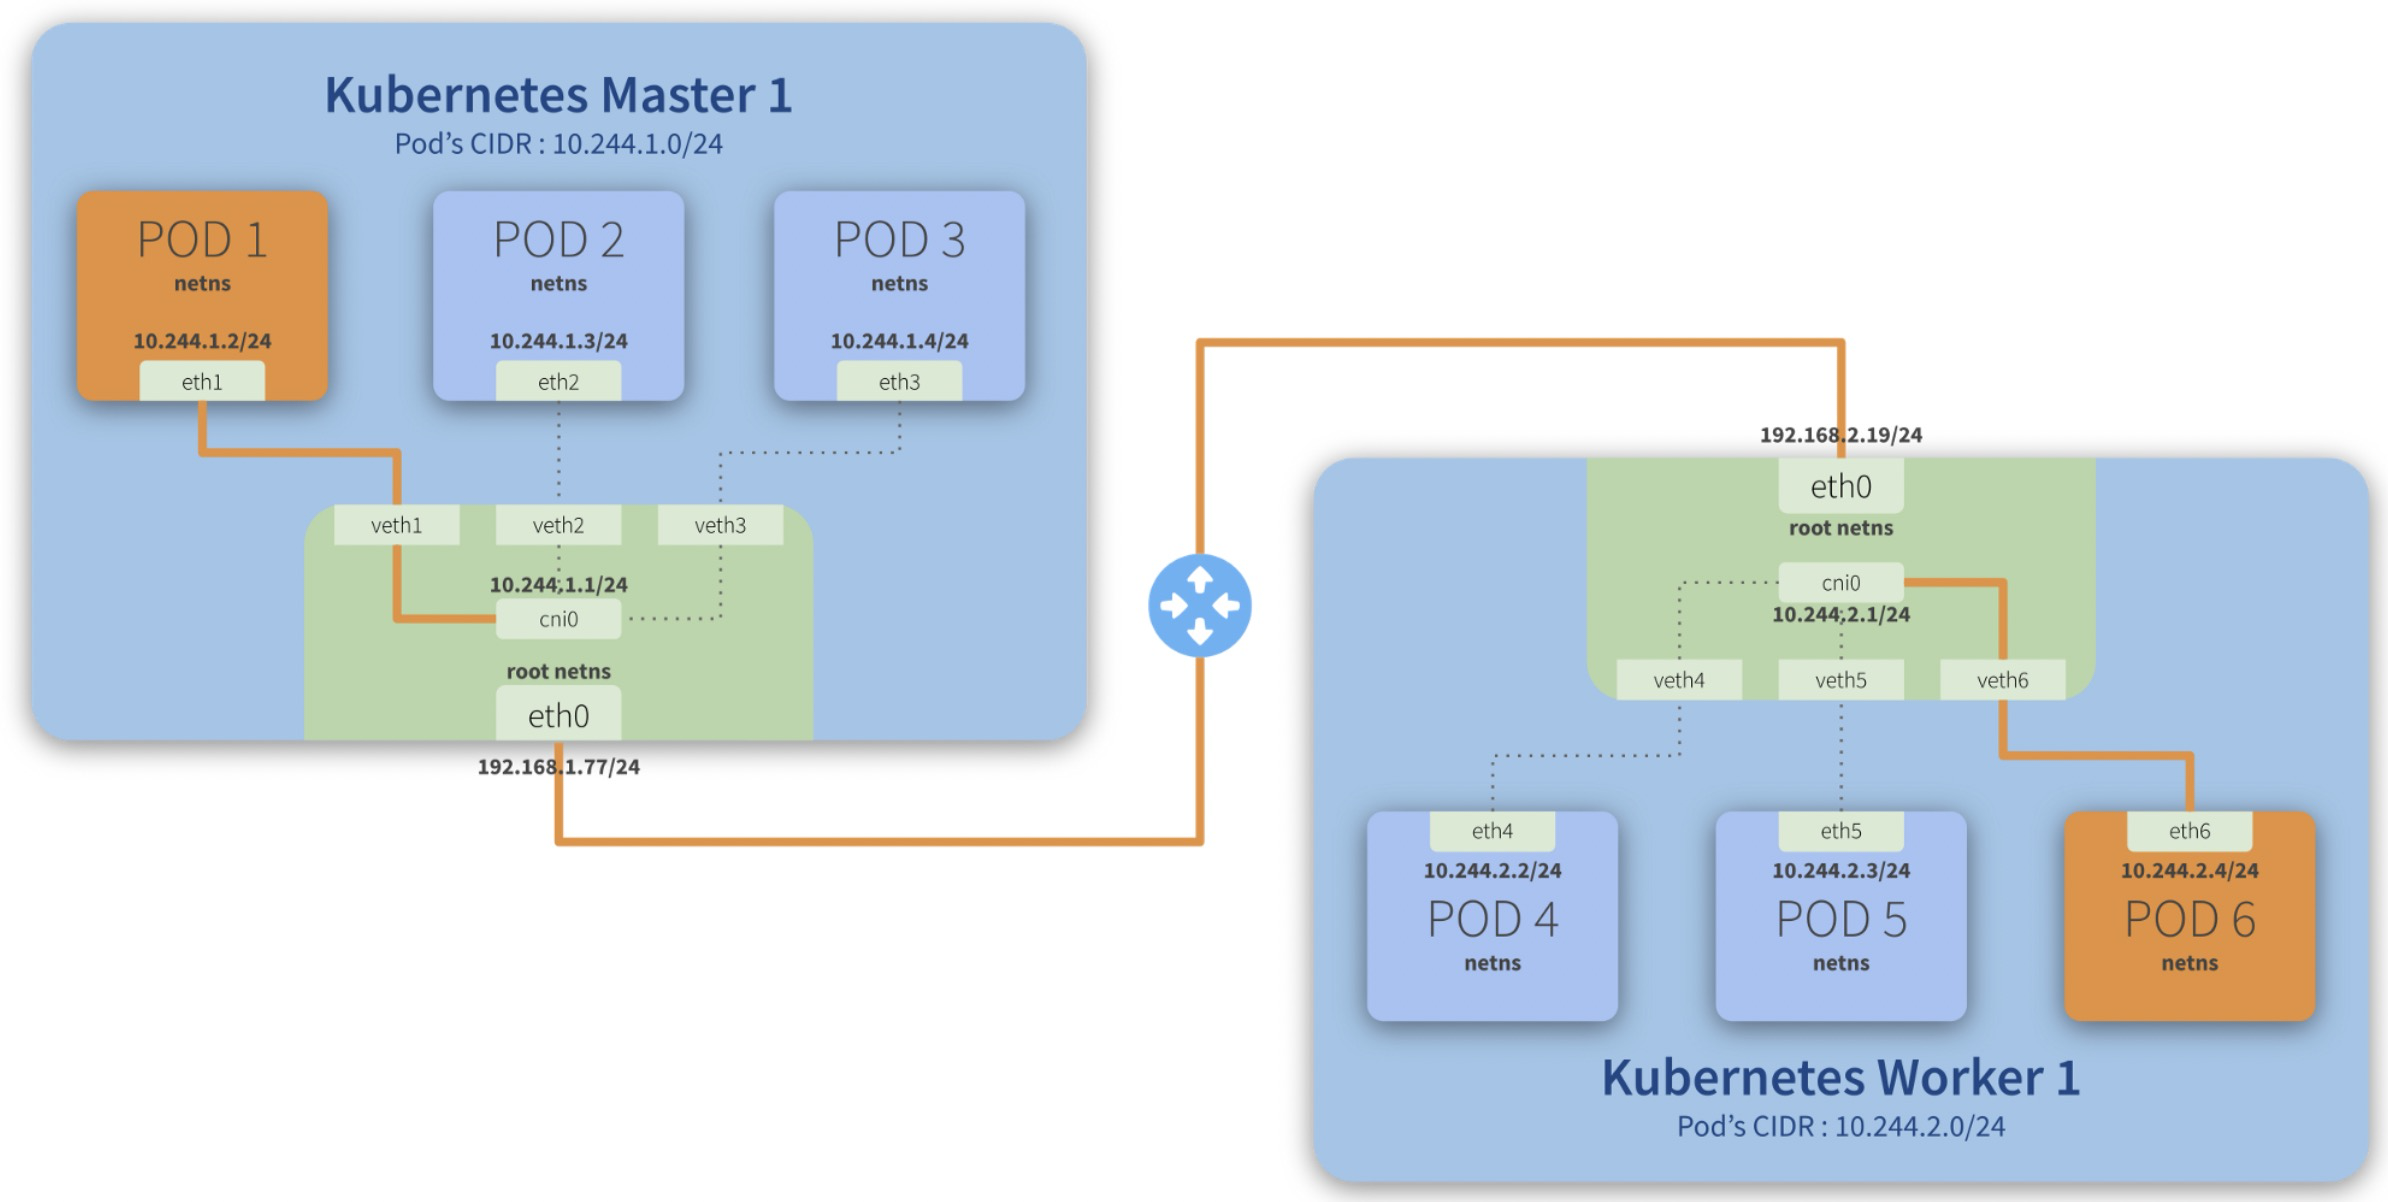
cni0 is a Linux network bridge device, all veth devices will connect to this bridge, so all Pods on the same node can communicate with each other, as explained in Kubernetes Network Model and the hotel analogy above.

默认cni 网络是没法跨宿主机的,跨宿主机需要走overlay(比如flannel的vxlan)或者仅限宿主机全在一个二层网络可达(比如用flannel的host-gw模式)
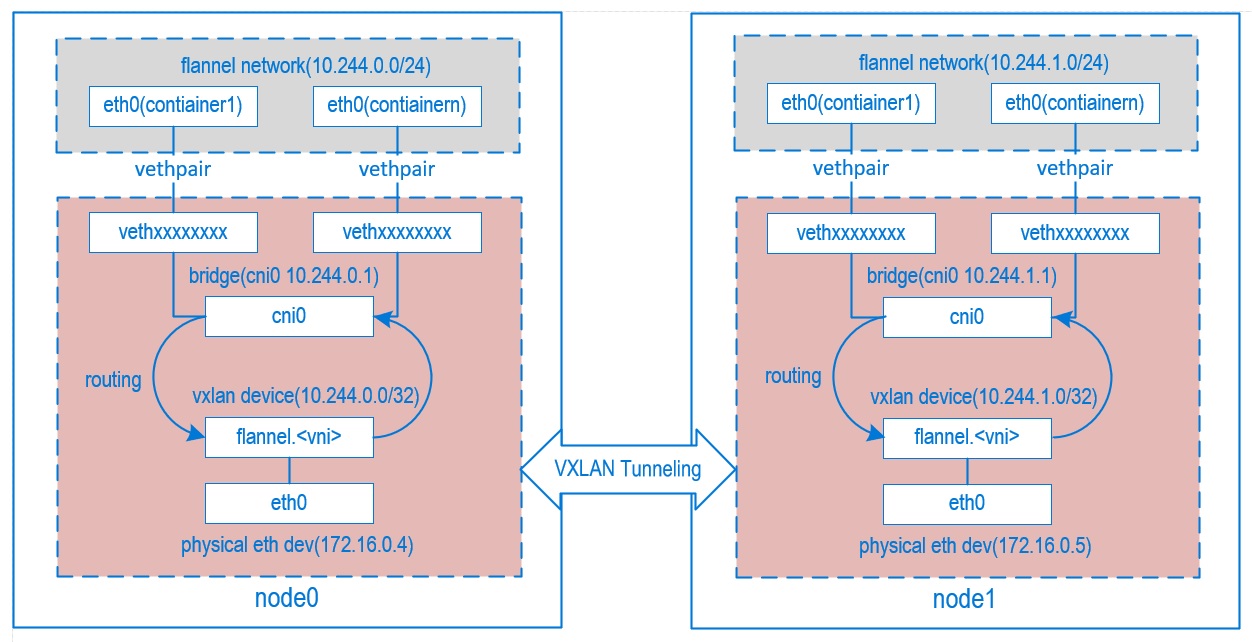
flannel vxlan网络

什么是 flannel

Flannel is a simple and easy way to configure a layer 3 network fabric designed for Kubernetes.

Flannel 工作原理

Flannel runs a small, single binary agent called flanneld on each host, and is responsible for allocating a subnet lease to each host out of a larger, preconfigured address space. Flannel uses either the Kubernetes API or etcd directly to store the network configuration, the allocated subnets, and any auxiliary data (such as the host’s public IP). Packets are forwarded using one of several backend mechanisms including VXLAN and various cloud integrations.

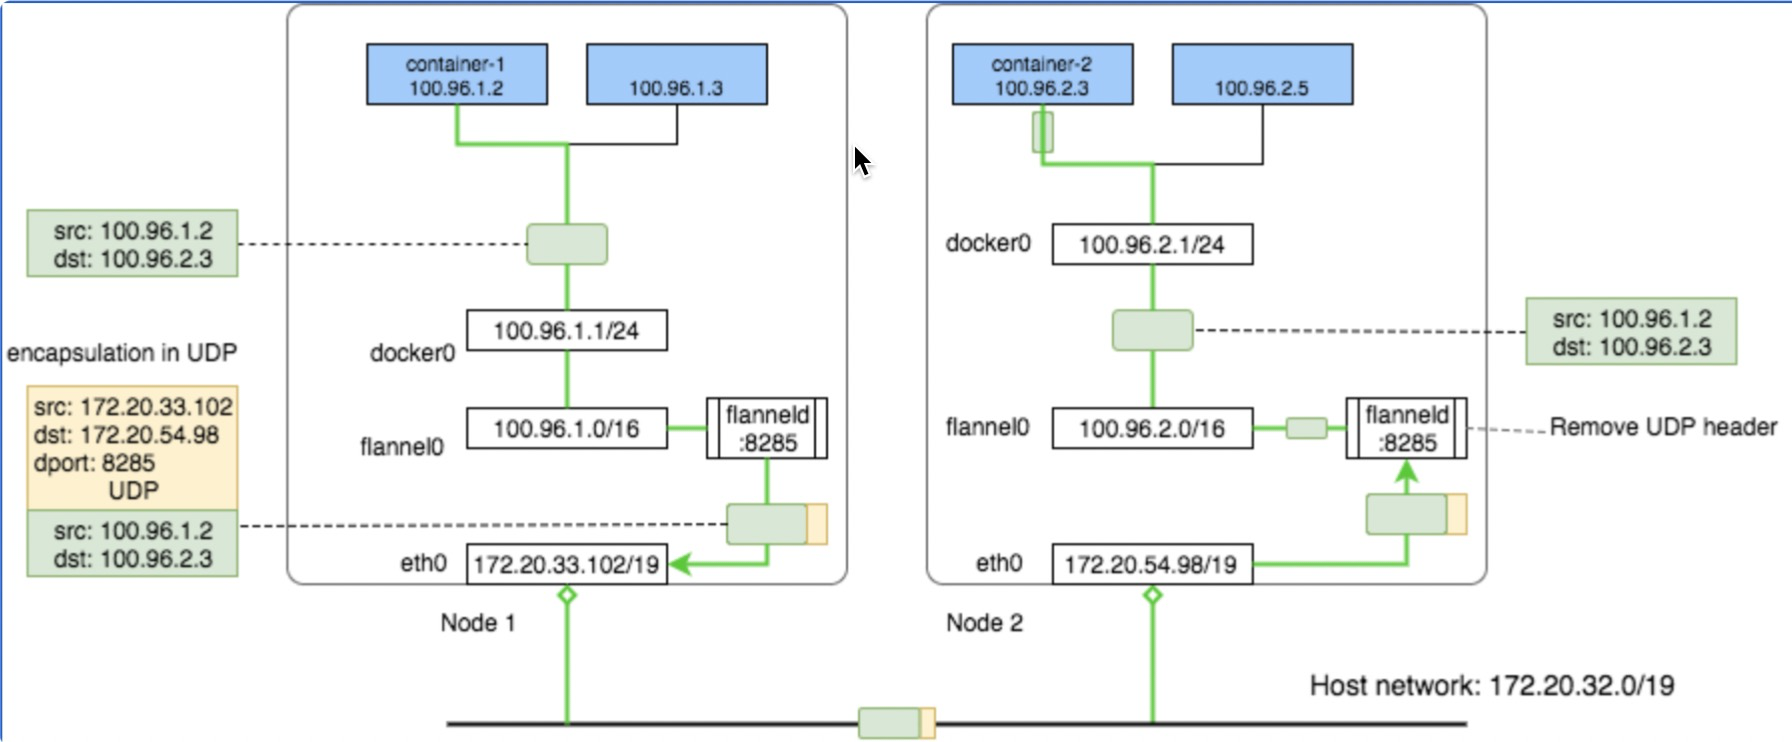
核心原理就是将pod网络包通过vxlan协议封装成一个udp包,udp包的ip是数据ip,内层是pod原始网络通信包。

假如POD1访问POD4:

  1. 从POD1中出来的包先到Bridge cni0上(因为POD1对应的veth挂在了cni0上),目标mac地址是cni0的Mac
  2. 然后进入到宿主机网络,宿主机有路由 10.244.2.0/24 via 10.244.2.0 dev flannel.1 onlink ,也就是目标ip 10.244.2.3的包交由 flannel.1 来处理,目标mac地址是POD4所在机器的flannel.1的Mac
  3. flanneld 进程将包封装成vxlan 丢到eth0从宿主机1离开(封装后的目标ip是192.168.2.91,现在都是由内核来完成flanneld这个封包过程,性能好)
  4. 这个封装后的vxlan udp包正确路由到宿主机2
  5. 然后经由 flanneld 解包成 10.244.2.3 ,命中宿主机2上的路由:10.244.2.0/24 dev cni0 proto kernel scope link src 10.244.2.1 ,交给cni0(这里会过宿主机iptables
  6. cni0将包送给POD4

img

flannel容器启动的时候会给自己所在的node注入一些信息:

1
2
3
4
5
6
7
#kubectl describe node hygon4 |grep -i flannel
Annotations: flannel.alpha.coreos.com/backend-data: {"VNI":1,"VtepMAC":"66:c6:ba:a2:8f:a1"}
flannel.alpha.coreos.com/backend-type: vxlan
flannel.alpha.coreos.com/kube-subnet-manager: true
flannel.alpha.coreos.com/public-ip: 10.176.4.245 ---宿主机ip,vxlan封包所用
"VtepMAC":"66:c6:ba:a2:8f:a1"----宿主机网卡 flannel.1的mac

flannel.1 知道如何通过物理网卡打包网络包到目标地址,flanneld 会在每个host 添加 arp,以及将本机的 vxlan fdb 添加到新的 host上

1
2
3
4
5
6
7
8
9
10
11
12
13
14
15
16
17
18
19
20
21
22
23
24
25
26
27
//这个 flannel 集群有四个 host,这是其中一个host
//4e:95:a9:e2:ed:28是对方 host 上 flannel.1 的 mac
#ip neigh show dev flannel.1
172.19.2.0 lladdr 4e:95:a9:e2:ed:28 PERMANENT
172.19.3.0 lladdr 2e:8b:65:d7:54:3e PERMANENT
172.19.1.0 lladdr 6a:78:f3:db:b1:9e PERMANENT
#bridge fdb show flannel.1
01:00:5e:00:00:01 dev enp125s0f0 self permanent
01:00:5e:00:00:01 dev enp125s0f1 self permanent
01:00:5e:00:00:01 dev enp125s0f2 self permanent
01:00:5e:00:00:01 dev enp125s0f3 self permanent
33:33:00:00:00:01 dev enp125s0f3 self permanent
33:33:ff:8e:d6:ac dev enp125s0f3 self permanent
01:00:5e:00:00:01 dev enp2s0f0 self permanent
01:00:5e:00:00:01 dev enp2s0f1 self permanent
33:33:00:00:00:01 dev cni0 self permanent
01:00:5e:00:00:01 dev cni0 self permanent
f2:64:e3:49:4c:c8 dev cni0 vlan 1 master cni0 permanent
f2:64:e3:49:4c:c8 dev cni0 master cni0 permanent
72:d6:f3:54:7d:d6 dev vethe54b12b5 master cni0
# ip neigh show dev flannel.1 //另一个host
172.19.2.0 lladdr 4e:95:a9:e2:ed:28 PERMANENT
172.19.3.0 lladdr 2e:8b:65:d7:54:3e PERMANENT
172.19.0.0 lladdr 92:5c:b2:af:37:62 PERMANENT

包流程:

image-20220915113511706

ARP 和 FDB:

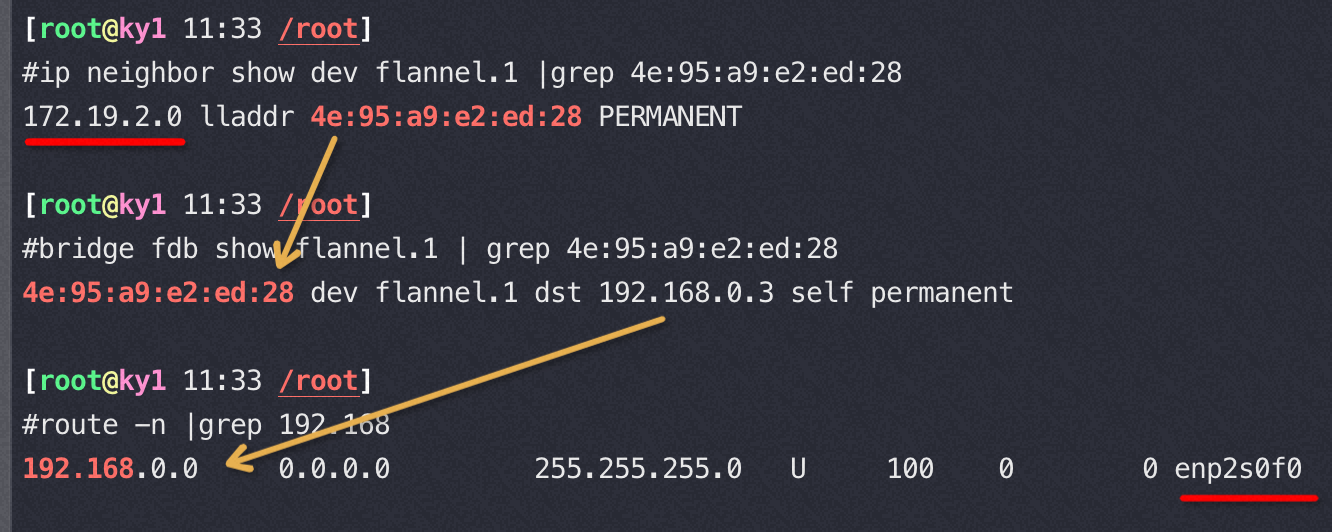
ARP (Address Resolution Protocol) table is used by a Layer 3 device (router, switch, server, desktop) to store the IP address to MAC address entries for a specific network device.

The FDB (forwarding database) table is used by a Layer 2 device (switch/bridge) to store the MAC addresses that have been learned and which ports that MAC address was learned on. The MAC addresses are learned through transparent bridging on switches and dedicated bridges.
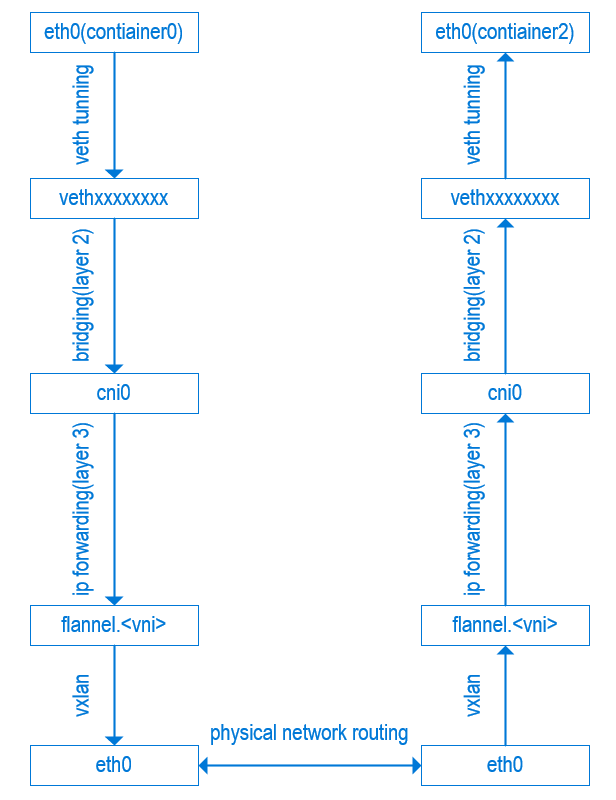
抓包演示packet流转以及封包解包

一次完整的抓包过程演示包的流转,从hygon3上的pod 192.168.0.4(22:d8:63:6c:e8:96) 访问 hygon4上的pod 192.168.2.56(52:e6:8e:02:80:35)

1
2
3
4
5
6
7
8
9
10
11
12
13
14
15
16
17
18
19
20
21
22
23
24
25
26
27
28
29
30
31
32
33
34
35
36
37
38
39
40
41
42
43
44
45
46
47
48
49
50
51
52
53
54
55
56
57
58
59
60
61
62
63
64
65
66
67
68
69
70
71
72
73
74
75
76
77
78
79
80
81
82
83
84
85
86
//hygon3上的pod 192.168.0.4(22:d8:63:6c:e8:96) 访问 hygon4上的pod 192.168.2.56(52:e6:8e:02:80:35),在cni0(a2:99:4f:dc:9d:5c)上抓包,跨机不走peer veth
[root@hygon3 11:08 /root]
#tcpdump -i cni0 host 192.168.2.56 -nnetvv
dropped privs to tcpdump
tcpdump: listening on cni0, link-type EN10MB (Ethernet), capture size 262144 bytes
22:d8:63:6c:e8:96 > a2:99:4f:dc:9d:5c, ethertype IPv4 (0x0800), length 614: (tos 0x0, ttl 64, id 53303, offset 0, flags [DF], proto TCP (6), length 600)
192.168.0.4.40712 > 192.168.2.56.3100: Flags [P.], cksum 0x85d7 (incorrect -> 0x801a), seq 150533649:150534197, ack 3441674662, win 507, options [nop,nop,TS val 1239838869 ecr 2297983667], length 548
//hygon3上的pod 192.168.0.4 访问 hygon4上的pod 192.168.2.56,在本机flannel.1(a2:06:5e:83:44:78)上抓包
[root@hygon3 10:53 /root]
#tcpdump -i flannel.1 host 192.168.0.4 -nnetvv
dropped privs to tcpdump
tcpdump: listening on flannel.1, link-type EN10MB (Ethernet), capture size 262144 bytes
a2:06:5e:83:44:78 > 66:c6:ba:a2:8f:a1, ethertype IPv4 (0x0800), length 729: (tos 0x0, ttl 63, id 52997, offset 0, flags [DF], proto TCP (6), length 715)
192.168.0.4.40712 > 192.168.2.56.3100: Flags [P.], cksum 0x864a (incorrect -> 0x02ae), seq 150429115:150429778, ack 3441664870, win 507, options [nop,nop,TS val 1239381169 ecr 2297525566], length 663
[root@hygon3 11:13 /root] //通过arp 可以看到对端 flannel.1 的mac地址被缓存到了本地
#arp -n |grep 66:c6:ba:a2:8f:a1
192.168.2.0 ether 66:c6:ba:a2:8f:a1 CM flannel.1
#ip route
default via 10.176.3.247 dev p1p1
172.17.0.0/16 dev docker0 proto kernel scope link src 172.17.0.1
192.168.0.0/24 dev cni0 proto kernel scope link src 192.168.0.1
192.168.1.0/24 via 192.168.1.0 dev flannel.1 onlink
192.168.2.0/24 via 192.168.2.0 dev flannel.1 onlink
192.168.3.0/24 via 192.168.3.0 dev flannel.1 onlink
#ip a
18: flannel.1: <BROADCAST,MULTICAST,UP,LOWER_UP> mtu 1450 qdisc noqueue state UNKNOWN group default
link/ether a2:06:5e:83:44:78 brd ff:ff:ff:ff:ff:ff
inet 192.168.0.0/32 brd 192.168.0.0 scope global flannel.1
valid_lft forever preferred_lft forever
19: cni0: <BROADCAST,MULTICAST,UP,LOWER_UP> mtu 1450 qdisc noqueue state UP group default qlen 1000
link/ether a2:99:4f:dc:9d:5c brd ff:ff:ff:ff:ff:ff
inet 192.168.0.1/24 brd 192.168.0.255 scope global cni0
valid_lft forever preferred_lft forever
//宿主机物理网卡抓包,被封成了udp的vxlan包
[root@hygon3 11:12 /root]
#tcpdump -i p1p1 udp and port 8472 -nnetvv
0c:42:a1:db:b1:a8 > 88:66:39:89:9b:cc, ethertype IPv4 (0x0800), length 967: (tos 0x0, ttl 64, id 33722, offset 0, flags [none], proto UDP (17), length 953)
10.176.3.245.45173 > 10.176.4.245.8472: [bad udp cksum 0x88c6 -> 0xe4db!] OTV, flags [I] (0x08), overlay 0, instance 1
a2:06:5e:83:44:78 > 66:c6:ba:a2:8f:a1, ethertype IPv4 (0x0800), length 917: (tos 0x0, ttl 63, id 53539, offset 0, flags [DF], proto TCP (6), length 903)
192.168.0.4.40712 > 192.168.2.56.3100: Flags [P.], cksum 0x8706 (incorrect -> 0xe31b), seq 150613328:150614179, ack 3441682214, win 507, options [nop,nop,TS val 1240166469 ecr 2298311268], length 851
---------跨机分割线--------
[root@hygon4 11:15 /root] //udp ttl为61,经过了3跳(icmp ttl为63),不过这些都和vxlan内容无关了
#tcpdump -i p1p1 udp and port 8472 -nnetvv
88:66:39:2b:3f:ec > 0c:42:a1:e9:77:2c, ethertype IPv4 (0x0800), length 736: (tos 0x0, ttl 61, id 49748, offset 0, flags [none], proto UDP (17), length 722)
10.176.3.245.45173 > 10.176.4.245.8472: [udp sum ok] OTV, flags [I] (0x08), overlay 0, instance 1
a2:06:5e:83:44:78 > 66:c6:ba:a2:8f:a1, ethertype IPv4 (0x0800), length 686: (tos 0x0, ttl 63, id 53631, offset 0, flags [DF], proto TCP (6), length 672)
192.168.0.4.40712 > 192.168.2.56.3100: Flags [P.], cksum 0x7f0c (correct), seq 150646020:150646640, ack 3441685158, win 507, options [nop,nop,TS val 1240301769 ecr 2298444568], length 620
0c:42:a1:e9:77:2c > 88:66:39:2b:3f:ec, ethertype IPv4 (0x0800), length 180: (tos 0x0, ttl 64, id 57062, offset 0, flags [none], proto UDP (17), length 166)
10.176.4.245.41515 > 10.176.3.245.8472: [bad udp cksum 0x9a23 -> 0x8e11!] OTV, flags [I] (0x08), overlay 0, instance 1
66:c6:ba:a2:8f:a1 > a2:06:5e:83:44:78, ethertype IPv4 (0x0800), length 130: (tos 0x0, ttl 63, id 12391, offset 0, flags [DF], proto TCP (6), length 116)
192.168.2.56.3100 > 192.168.0.4.40712: Flags [P.], cksum 0x83f3 (incorrect -> 0x77e1), seq 1:65, ack 620, win 501, options [nop,nop,TS val 2298447868 ecr 1240301769], length 64
//到对端hygon4上抓包, 因为途中都是vxlan,所以ttl、mac地址都不变
[root@hygon4 10:55 /root]
#tcpdump -i flannel.1 host 192.168.2.56 -nnetvv
dropped privs to tcpdump
tcpdump: listening on flannel.1, link-type EN10MB (Ethernet), capture size 262144 bytes
a2:06:5e:83:44:78 > 66:c6:ba:a2:8f:a1, ethertype IPv4 (0x0800), length 933: (tos 0x0, ttl 63, id 52807, offset 0, flags [DF], proto TCP (6), length 919)
192.168.0.4.40712 > 192.168.2.56.3100: Flags [P.], cksum 0x8d0d (correct), seq 150361706:150362573, ack 3441658790, win 507, options [nop,nop,TS val 1239073069 ecr 2297216169], length 867
#ip a //only for flannel.1 and cni0
10: flannel.1: <BROADCAST,MULTICAST,UP,LOWER_UP> mtu 1450 qdisc noqueue state UNKNOWN group default
link/ether 66:c6:ba:a2:8f:a1 brd ff:ff:ff:ff:ff:ff
inet 192.168.2.0/32 brd 192.168.2.0 scope global flannel.1
valid_lft forever preferred_lft forever
11: cni0: <BROADCAST,MULTICAST,UP,LOWER_UP> mtu 1450 qdisc noqueue state UP group default qlen 1000
link/ether 16:97:3a:7b:53:00 brd ff:ff:ff:ff:ff:ff
inet 192.168.2.1/24 brd 192.168.2.255 scope global cni0
valid_lft forever preferred_lft forever
[root@hygon4 11:24 /root]
#arp -n | grep 44:78
192.168.0.0 ether a2:06:5e:83:44:78 CM flannel.1
//mac地址替换,ttl减1
[root@hygon4 10:55 /root]
#tcpdump -i cni0 host 192.168.2.56 -nnetvv
dropped privs to tcpdump
tcpdump: listening on cni0, link-type EN10MB (Ethernet), capture size 262144 bytes
16:97:3a:7b:53:00 > 52:e6:8e:02:80:35, ethertype IPv4 (0x0800), length 935: (tos 0x0, ttl 62, id 52829, offset 0, flags [DF], proto TCP (6), length 921)
192.168.0.4.40712 > 192.168.2.56.3100: Flags [P.], cksum 0x7aa8 (correct), seq 150369440:150370309, ack 3441659494, win 507, options [nop,nop,TS val 1239115869 ecr 2297259166], length 869

这个流转流程如下图:

flannel-network-flow

对应宿主机查询到的ip、路由信息(和上图不是对应的)

1
2
3
4
5
6
7
8
9
10
11
12
13
#ip -d -4 addr show cni0
475: cni0: <BROADCAST,MULTICAST,UP,LOWER_UP> mtu 1450 qdisc noqueue state UP group default qlen 1000
link/ether 8e:34:ba:e2:a4:c6 brd ff:ff:ff:ff:ff:ff promiscuity 0 minmtu 68 maxmtu 65535
bridge forward_delay 1500 hello_time 200 max_age 2000 ageing_time 30000 stp_state 0 priority 32768 vlan_filtering 0 vlan_protocol 802.1Q bridge_id 8000.8e:34:ba:e2:a4:c6 designated_root 8000.8e:34:ba:e2:a4:c6 root_port 0 root_path_cost 0 topology_change 0 topology_change_detected 0 hello_timer 0.00 tcn_timer 0.00 topology_change_timer 0.00 gc_timer 161.46 vlan_default_pvid 1 vlan_stats_enabled 0 group_fwd_mask 0 group_address 01:80:c2:00:00:00 mcast_snooping 1 mcast_router 1 mcast_query_use_ifaddr 0 mcast_querier 0 mcast_hash_elasticity 4 mcast_hash_max 512 mcast_last_member_count 2 mcast_startup_query_count 2 mcast_last_member_interval 100 mcast_membership_interval 26000 mcast_querier_interval 25500 mcast_query_interval 12500 mcast_query_response_interval 1000 mcast_startup_query_interval 3124 mcast_stats_enabled 0 mcast_igmp_version 2 mcast_mld_version 1 nf_call_iptables 0 nf_call_ip6tables 0 nf_call_arptables 0 numtxqueues 1 numrxqueues 1 gso_max_size 65536 gso_max_segs 65535
inet 192.168.3.1/24 brd 192.168.3.255 scope global cni0
valid_lft forever preferred_lft forever
#ip -d -4 addr show flannel.1 //vxlan id 1 local 10.133.2.252 dev bond0 --指定了物理网卡
474: flannel.1: <BROADCAST,MULTICAST,UP,LOWER_UP> mtu 1450 qdisc noqueue state UNKNOWN group default
link/ether fe:49:64:ae:36:af brd ff:ff:ff:ff:ff:ff promiscuity 0 minmtu 68 maxmtu 65535
vxlan id 1 local 10.133.2.252 dev bond0 srcport 0 0 dstport 8472 nolearning ttl auto ageing 300 udpcsum noudp6zerocsumtx noudp6zerocsumrx numtxqueues 1 numrxqueues 1 gso_max_size 65536 gso_max_segs 65535
inet 192.168.3.0/32 brd 192.168.3.0 scope global flannel.1
valid_lft forever preferred_lft forever

包流转示意图

image-20220119114929034

flannel网络不通排查案例

当网络不通时,可以根据以上演示的包流转路径在不同的网络设备上抓包来定位哪个环节不通

firewalld

在麒麟系统的物理机上通过kubeadm setup集群,发现有的环境flannel网络不通,在宿主机上ping 其它物理机flannel.0网卡的ip,通过在对端宿主机抓包发现icmp收到后被防火墙扔掉了,抓包中可以看到错误信息:icmp unreachable - admin prohibited

下图中正常的icmp是直接ping 物理机ip

image-20211228203650921

The “admin prohibited filter” seen in the tcpdump output means there is a firewall blocking a connection. It does it by sending back an ICMP packet meaning precisely that: the admin of that firewall doesn’t want those packets to get through. It could be a firewall at the destination site. It could be a firewall in between. It could be iptables on the Linux system.

发现有问题的环境中宿主机的防火墙设置报错了:

1
2
12月 28 23:35:08 hygon253 firewalld[10493]: WARNING: COMMAND_FAILED: '/usr/sbin/iptables -w10 -t filter -X DOCKER-ISOLATION-STAGE-1' failed: iptables: No chain/target/match by that name.
12月 28 23:35:08 hygon253 firewalld[10493]: WARNING: COMMAND_FAILED: '/usr/sbin/iptables -w10 -t filter -F DOCKER-ISOLATION-STAGE-2' failed: iptables: No chain/target/match by that name.

应该是因为启动docker的时候 firewalld 是运行着的

Do you have firewalld enabled, and was it (re)started after docker was started? If so, then it’s likely that firewalld wiped docker’s IPTables rules. Restarting the docker daemon should re-create those rules.

停掉 firewalld 服务可以解决这个问题,k8s集群

flannel网络不通

Starting from Docker 1.13 default iptables policy for FORWARDING is DROP

flannel能收到包,但是cni0收不到包,说明包进到了目标宿主机,但是从flannel解开udp转送到cni的时候出了问题,大概率是iptables 拦截了包

1
2
3
4
5
6
7
8
9
10
11
12
13
14
It seems docker version >=1.13 will add iptables rule like below,and it make this issue happen:
iptables -P FORWARD DROP
All you need to do is add a rule below:
iptables -P FORWARD ACCEPT //将FORWARD 默认规则(没有匹配到其它规则的话)改成ACCEPT
//flannel 会检查 forward chain并将之改成 accept?以下是flannel 容器日志
I0913 07:52:30.965060 1 main.go:698] Using interface with name enp2s0f0 and address 192.168.0.1
I0913 07:52:30.965128 1 main.go:720] Defaulting external address to interface address (192.168.0.1)
I0913 07:52:30.965134 1 main.go:733] Defaulting external v6 address to interface address (<nil>)
I0913 07:52:30.965243 1 vxlan.go:137] VXLAN config: VNI=1 Port=0 GBP=false Learning=false DirectRouting=false
I0913 07:52:30.966878 1 kube.go:339] Setting NodeNetworkUnavailable
I0913 07:52:30.977942 1 main.go:340] Setting up masking rules
I0913 07:52:31.332105 1 main.go:361] Changing default FORWARD chain policy to ACCEPT

宿主机多 ip 下 flannel 网络不通

宿主机有两个ip,flannel组网ip是192.168,但是默认路由在1.1.网络下,此时能 ping 通,但是curl不通端口

1
2
3
4
5
6
7
8
9
10
11
12
13
14
15
16
17
18
19
20
#tcpdump -i enp2s0f0 -nettvv host 192.168.0.3 and udp
tcpdump: listening on enp2s0f0, link-type EN10MB (Ethernet), capture size 262144 bytes
//握手请求syn包,udp src ip:192.168.0.1
1660897108.334556 0c:42:a1:4f:d1:e2 > 0c:42:a1:4f:d1:ee, ethertype IPv4 (0x0800), length 124: (tos 0x0, ttl 64, id 32118, offset 0, flags [none], proto UDP (17), length 110)
192.168.0.1.56773 > 192.168.0.3.otv: [bad udp cksum 0x81c0 -> 0x459f!] OTV, flags [I] (0x08), overlay 0, instance 1
56:fa:69:e3:dc:6b > 4e:95:a9:e2:ed:28, ethertype IPv4 (0x0800), length 74: (tos 0x0, ttl 63, id 41108, offset 0, flags [DF], proto TCP (6), length 60)
172.19.0.6.35118 > 172.19.2.39.http: Flags [S], cksum 0x10c8 (correct), seq 582983385, win 64860, options [mss 1410,sackOK,TS val 2648241865 ecr 0,nop,wscale 7], length 0
//对端回复syn包, 注意udp的目标ip:1.1.1.198,应该是 192.168.0.1 才对,mac是192.168.0.1 的,mac和ip不匹配,所以被内核扔掉(但是icmp不会被扔,原因未知)
1660897108.334738 0c:42:a1:4f:d1:ee > 0c:42:a1:4f:d1:e2, ethertype IPv4 (0x0800), length 124: (tos 0x0, ttl 64, id 41433, offset 0, flags [none], proto UDP (17), length 110)
192.168.0.3.38086 > 1.1.1.198.otv: [bad udp cksum 0x5aff -> 0x1769!] OTV, flags [I] (0x08), overlay 0, instance 1
4e:95:a9:e2:ed:28 > 56:fa:69:e3:dc:6b, ethertype IPv4 (0x0800), length 74: (tos 0x0, ttl 63, id 0, offset 0, flags [DF], proto TCP (6), length 60)
172.19.2.39.http > 172.19.0.6.35118: Flags [S.], cksum 0x8027 (correct), seq 3633913151, ack 582983386, win 64308, options [mss 1410,sackOK,TS val 3514485603 ecr 2648241865,nop,wscale 7], length 0
//没有回复第三次握手,继续发syn,因为收到syn+ack后被扔掉了
1660897109.363382 0c:42:a1:4f:d1:e2 > 0c:42:a1:4f:d1:ee, ethertype IPv4 (0x0800), length 124: (tos 0x0, ttl 64, id 32123, offset 0, flags [none], proto UDP (17), length 110)
192.168.0.1.60933 > 192.168.0.3.otv: [bad udp cksum 0x81c0 -> 0x355f!] OTV, flags [I] (0x08), overlay 0, instance 1
56:fa:69:e3:dc:6b > 4e:95:a9:e2:ed:28, ethertype IPv4 (0x0800), length 74: (tos 0x0, ttl 63, id 41109, offset 0, flags [DF], proto TCP (6), length 60)
172.19.0.6.35118 > 172.19.2.39.http: Flags [S], cksum 0x0cc3 (correct), seq 582983385, win 64860, options [mss 1410,sackOK,TS val 2648242894 ecr 0,nop,wscale 7], length 0

多ip宿主机的网卡及路由

1
2
3
4
5
6
7
8
9
10
11
12
13
14
15
16
17
18
19
5: enp125s0f3: <BROADCAST,MULTICAST,UP,LOWER_UP> mtu 1500 qdisc fq_codel state UP group default qlen 1000
link/ether 64:2c:ac:e9:78:3d brd ff:ff:ff:ff:ff:ff
inet 1.1.1.198/25 brd 1.1.1.255 scope global dynamic noprefixroute enp125s0f3
valid_lft 12463sec preferred_lft 12463sec
inet6 fe80::859a:7861:378e:d6ac/64 scope link noprefixroute
valid_lft forever preferred_lft forever
6: enp2s0f0: <BROADCAST,MULTICAST,UP,LOWER_UP> mtu 1500 qdisc mq state UP group default qlen 1000
link/ether 0c:42:a1:4f:d1:e2 brd ff:ff:ff:ff:ff:ff
inet 192.168.0.1/24 brd 192.168.0.255 scope global noprefixroute enp2s0f0
valid_lft forever preferred_lft forever
#ip route
default via 1.1.1.254 dev enp125s0f3 proto dhcp metric 101
1.1.1.128/25 dev enp125s0f3 proto kernel scope link src 1.1.1.198 metric 101
172.17.0.0/16 dev docker0 proto kernel scope link src 172.17.0.1 linkdown
172.19.0.0/24 dev cni0 proto kernel scope link src 172.19.0.1
172.19.2.0/24 via 172.19.2.0 dev flannel.1 onlink
172.19.3.0/24 via 172.19.3.0 dev flannel.1 onlink
192.168.0.0/24 dev enp2s0f0 proto kernel scope link src 192.168.0.1 metric 100

解决办法:真正生效的是 flannel.1 中的地址

1
2
3
4
5
//比如 flannel 选用了以下公网ip(默认路由上的ip)导致flannel网络不通,应该选内网ip
#ip -details link show flannel.1
29: flannel.1: <BROADCAST,MULTICAST,UP,LOWER_UP> mtu 1450 qdisc noqueue state UNKNOWN mode DEFAULT group default
link/ether 96:ad:e2:29:29:09 brd ff:ff:ff:ff:ff:ff promiscuity 0 minmtu 68 maxmtu 65535
vxlan id 1 local 30.1.1.1 dev eno1 srcport 0 0 dstport 8472 nolearning ttl auto ageing 300 udpcsum noudp6zerocsumtx noudp6zerocsumrx addrgenmode eui64 numtxqueues 1 numrxqueues 1 gso_max_size 65536 gso_max_segs 65535

解决办法得先删掉 flannel 网络,然后在 flannel.yaml 中指定内网网卡:

1
2
3
4
5
6
7
8
9
10
11
12
13
14
15
16
17
containers:
- name: kube-flannel
image: registry:5000/quay.io/coreos/flannel:v0.14.0
command:
- /opt/bin/flanneld
args:
- --ip-masq
- --kube-subnet-mgr
#指定网卡, enp33s0f0 为内网网卡,不是默认路由
#- --iface=enp33s0f0
#— --iface-regex=[enp0s8|enp0s9]
//然后会看到 flannel.1 的地址用的是 enp33s0f0(192.168.0.1)
#ip -details link show flannel.1
40: flannel.1: <BROADCAST,MULTICAST,UP,LOWER_UP> mtu 1450 qdisc noqueue state UNKNOWN mode DEFAULT group default
link/ether 92:5c:b2:af:37:62 brd ff:ff:ff:ff:ff:ff promiscuity 0 minmtu 68 maxmtu 65535
vxlan id 1 local 192.168.0.1 dev enp2s0f0 srcport 0 0 dstport 8472 nolearning ttl auto ageing 300 udpcsum noudp6zerocsumtx noudp6zerocsumrx addrgenmode eui64 numtxqueues 1 numrxqueues 1 gso_max_size 65536 gso_max_segs 65535

If you happen to have different interfaces to be matched, you can match it on a regex pattern. Let’s say the worker nodes could’ve enp0s8 or enp0s9 configured, then the flannel args would be — --iface-regex=[enp0s8|enp0s9]

修改node的annotation中flannel的 public-ip。如果因为 public-ip 不对导致网络不通,在annotation中修改public-ip没用,这个值是 flannel 读取underlay 网络配置后写进来的,同时也写到了 flannel.1 的 config 中

1
2
kubectl annotate node ky1 flannel.alpha.coreos.com/public-ip-
kubectl annotate node ky1 flannel.alpha.coreos.com/public-ip=192.168.0.1

抓包和调试 – nsenter

1
2
3
4
5
6
7
8
9
10
11
12
13
14
15
16
17
18
19
20
21
22
23
24
25
26
27
28
29
30
31
32
33
34
35
36
37
38
39
40
获取pid:docker inspect -f {{.State.Pid}} c8f874efea06
进入namespace:nsenter --net --pid --target 17277
nsenter --net --pid --target `docker inspect -f {{.State.Pid}} c8f874efea06`
//只进入network namespace,这样看到的文件还是宿主机的,能直接用tcpdump,但是看到的网卡是容器的
nsenter --target 17277 --net
// ip netns 获取容器网络信息
1022 [2021-04-14 15:53:06] docker inspect -f '{{.State.Pid}}' ab4e471edf50 //获取容器进程id
1023 [2021-04-14 15:53:30] ls /proc/79828/ns/net
1024 [2021-04-14 15:53:57] ln -sfT /proc/79828/ns/net /var/run/netns/ab4e471edf50 //link 以便ip netns List能访问
// 宿主机上查看容器ip
1026 [2021-04-14 15:54:11] ip netns list
1028 [2021-04-14 15:55:19] ip netns exec ab4e471edf50 ifconfig
//nsenter调试网络
Get the pause container's sandboxkey:
root@worker01:~# docker inspect k8s_POD_ubuntu-5846f86795-bcbqv_default_ea44489d-3dd4-11e8-bb37-02ecc586c8d5_0 | grep SandboxKey
"SandboxKey": "/var/run/docker/netns/82ec9e32d486",
root@worker01:~#
Now, using nsenter you can see the container's information.
root@worker01:~# nsenter --net=/var/run/docker/netns/82ec9e32d486 ip addr show
1: lo: <LOOPBACK,UP,LOWER_UP> mtu 65536 qdisc noqueue state UNKNOWN group default qlen 1
link/loopback 00:00:00:00:00:00 brd 00:00:00:00:00:00
inet 127.0.0.1/8 scope host lo
valid_lft forever preferred_lft forever
3: eth0@if7: <BROADCAST,MULTICAST,UP,LOWER_UP> mtu 1450 qdisc noqueue state UP group default
link/ether 0a:58:0a:f4:01:02 brd ff:ff:ff:ff:ff:ff link-netnsid 0
inet 10.244.1.2/24 scope global eth0
valid_lft forever preferred_lft forever
Identify the peer_ifindex, and finally you can see the veth pair endpoint in root namespace.
root@worker01:~# nsenter --net=/var/run/docker/netns/82ec9e32d486 ethtool -S eth0
NIC statistics:
peer_ifindex: 7
root@worker01:~#
root@worker01:~# ip -d link show | grep '7: veth'
7: veth5e43ca47@if3: <BROADCAST,MULTICAST,UP,LOWER_UP> mtu 1450 qdisc noqueue master cni0 state UP mode DEFAULT group default
root@worker01:~#

nsenter相当于在setns的示例程序之上做了一层封装,使我们无需指定命名空间的文件描述符,而是指定进程号即可,详细case

1
2
3
4
5
6
7
8
9
10
11
12
13
14
15
16
17
18
19
#docker inspect cb7b05d82153 | grep -i SandboxKey //根据 pause 容器id找network namespace
"SandboxKey": "/var/run/docker/netns/d6b2ef3cf886",
[root@hygon252 19:00 /root]
#nsenter --net=/var/run/docker/netns/d6b2ef3cf886 ip addr show
3: eth0@if496: <BROADCAST,MULTICAST,UP,LOWER_UP> mtu 1450 qdisc noqueue state UP group default //496对应宿主机上的veth编号
link/ether 1e:95:dd:d9:88:bd brd ff:ff:ff:ff:ff:ff link-netnsid 0
inet 192.168.3.22/24 brd 192.168.3.255 scope global eth0
valid_lft forever preferred_lft forever
#nsenter --net=/var/run/docker/netns/d6b2ef3cf886 ethtool -S eth0
NIC statistics:
peer_ifindex: 496
#ip -d -4 addr show cni0
475: cni0: <BROADCAST,MULTICAST,UP,LOWER_UP> mtu 1450 qdisc noqueue state UP group default qlen 1000
link/ether 8e:34:ba:e2:a4:c6 brd ff:ff:ff:ff:ff:ff promiscuity 0 minmtu 68 maxmtu 65535
bridge forward_delay 1500 hello_time 200 max_age 2000 ageing_time 30000 stp_state 0 priority 32768 vlan_filtering 0 vlan_protocol 802.1Q bridge_id 8000.8e:34:ba:e2:a4:c6 designated_root 8000.8e:34:ba:e2:a4:c6 root_port 0 root_path_cost 0 topology_change 0 topology_change_detected 0 hello_timer 0.00 tcn_timer 0.00 topology_change_timer 0.00 gc_timer 43.31 vlan_default_pvid 1 vlan_stats_enabled 0 group_fwd_mask 0 group_address 01:80:c2:00:00:00 mcast_snooping 1 mcast_router 1 mcast_query_use_ifaddr 0 mcast_querier 0 mcast_hash_elasticity 4 mcast_hash_max 512 mcast_last_member_count 2 mcast_startup_query_count 2 mcast_last_member_interval 100 mcast_membership_interval 26000 mcast_querier_interval 25500 mcast_query_interval 12500 mcast_query_response_interval 1000 mcast_startup_query_interval 3124 mcast_stats_enabled 0 mcast_igmp_version 2 mcast_mld_version 1 nf_call_iptables 0 nf_call_ip6tables 0 nf_call_arptables 0 numtxqueues 1 numrxqueues 1 gso_max_size 65536 gso_max_segs 65535
inet 192.168.3.1/24 brd 192.168.3.255 scope global cni0
valid_lft forever preferred_lft forever

清理

cni信息

1
2
3
4
5
6
7
8
/etc/cni/net.d/*
/var/lib/cni/ 下存放有ip分配信息
#cat /run/flannel/subnet.env
FLANNEL_NETWORK=192.168.0.0/16
FLANNEL_SUBNET=192.168.0.1/24
FLANNEL_MTU=1450
FLANNEL_IPMASQ=true

calico创建的tunl0网卡是个tunnel,可以通过 ip tunnel show来查看,清理不掉(重启可以清理掉tunl0)

1
2
3
4
5
ip link set dev tunl0 name tunl0_fallback
或者
/sbin/ip link set eth1 down
/sbin/ip link set eth1 name eth123
/sbin/ip link set eth123 up

清理和创建flannel网络

查看容器网卡和宿主机上的虚拟网卡veth pair:

1
2
ip link //宿主机上执行
cat /sys/class/net/eth0/iflink //容器中执行

清理

1
2
ip link delete cni0
ip link delete flannel.1

创建

1
2
3
4
5
6
7
8
9
ip link add cni0 type bridge
ip addr add dev cni0 172.30.0.0/24
查看A simpler solution:
ip -details link show
ls -l /sys/class/net/ - virtual ones will show all in virtual and lan is on the PCI bus.
brctl show cni0
brctl addif cni0 veth1 veth2 veth3 //往cni bridge添加多个容器peer 网卡

完全可以手工创建cni0、flannel.1等网络设备,然后将 veth添加到cni0网桥上,再在宿主机配置ip route,基本一个纯手工版本打造的flannel vxlan网络就实现了,深入理解到此任何flannel网络问题都可以解决了。

flannel ip在多个node之间分配错乱

当铲掉重新部署的时候可能cni等网络有残留,导致下一次部署会报ip已存在的错误

1
(combined from similar events): Failed create pod sandbox: rpc error: code = Unknown desc = failed to set up sandbox container "f7aa44bf81b27bf0ff6c02339df2d2743cf952c1519fead4c563892d2d41a979" network for pod "nginx-deployment-6c8c86b759-f8fb7": NetworkPlugin cni failed to set up pod "nginx-deployment-6c8c86b759-f8fb7_default" network: failed to set bridge addr: "cni0" already has an IP address different from 172.19.2.1/24

可以铲掉网卡重新分配,或者给cni重新分配错误信息提示的ip

1
ifconfig cni0 172.19.2.1/24

or

1
2
3
ip link set cni0 down && ip link set flannel.1 down
ip link delete cni0 && ip link delete flannel.1
systemctl restart containerd && systemctl restart kubelet

host-gw

实现超级简单,就是在宿主机上配置路由规则,把其它宿主机ip当成其上所有pod的下一跳,不用封包解包,所以性能奇好,但是要求所有宿主机在一个2层网络,因为ip路由规则要求是直达其它宿主机。

手工配置实现就是vxlan的超级精简版,略!

netns 操作

以下case创建一个名为 ren 的netns,然后在里面增加一对虚拟网卡veth1 veth1_p, veth1放置在ren里面,veth1_p 放在物理机上,给他们配置上ip并up就能通了。

1
2
3
4
5
6
7
8
9
10
11
12
13
14
15
16
17
18
19
20
21
22
23
24
25
26
27
28
29
30
31
32
33
34
35
36
37
38
39
40
41
42
43
44
45
46
47
48
49
50
51
52
53
1004 [2021-10-27 10:49:08] ip netns add ren
1005 [2021-10-27 10:49:12] ip netns show
1006 [2021-10-27 10:49:22] ip netns exec ren route //为空
1007 [2021-10-27 10:49:29] ip netns exec ren iptables -L
1008 [2021-10-27 10:49:55] ip link add veth1 type veth peer name veth1_p //此时宿主机上能看到这两块网卡
1009 [2021-10-27 10:50:07] ip link set veth1 netns ren //将veth1从宿主机默认网络空间挪到ren中,宿主机中看不到veth1了
1010 [2021-10-27 10:50:18] ip netns exec ren route
1011 [2021-10-27 10:50:25] ip netns exec ren iptables -L
1012 [2021-10-27 10:50:39] ifconfig
1013 [2021-10-27 10:50:51] ip link list
1014 [2021-10-27 10:51:29] ip netns exec ren ip link list
1017 [2021-10-27 10:53:27] ip netns exec ren ip addr add 172.19.0.100/24 dev veth1
1018 [2021-10-27 10:53:31] ip netns exec ren ip link list
1019 [2021-10-27 10:53:39] ip netns exec ren ifconfig
1020 [2021-10-27 10:53:42] ip netns exec ren ifconfig -a
1021 [2021-10-27 10:54:13] ip netns exec ren ip link set dev veth1 up
1022 [2021-10-27 10:54:16] ip netns exec ren ifconfig
1023 [2021-10-27 10:54:22] ping 172.19.0.100
1024 [2021-10-27 10:54:35] ifconfig -a
1025 [2021-10-27 10:55:03] ip netns exec ren ip addr add 172.19.0.101/24 dev veth1_p
1026 [2021-10-27 10:55:10] ip addr add 172.19.0.101/24 dev veth1_p
1027 [2021-10-27 10:55:16] ifconfig veth1_p
1028 [2021-10-27 10:55:30] ip link set dev veth1_p up
1029 [2021-10-27 10:55:32] ifconfig veth1_p
1030 [2021-10-27 10:55:38] ping 172.19.0.101
1031 [2021-10-27 10:55:43] ping 172.19.0.100
1032 [2021-10-27 10:55:53] ip link set dev veth1_p down
1033 [2021-10-27 10:55:54] ping 172.19.0.100
1034 [2021-10-27 10:55:58] ping 172.19.0.101
1035 [2021-10-27 10:56:08] ifconfig veth1_p
1036 [2021-10-27 10:56:32] ping 172.19.0.101
1037 [2021-10-27 10:57:04] ip netns exec ren route
1038 [2021-10-27 10:57:52] ip netns exec ren ping 172.19.0.101
1039 [2021-10-27 10:57:58] ip link set dev veth1_p up
1040 [2021-10-27 10:57:59] ip netns exec ren ping 172.19.0.101
1041 [2021-10-27 10:58:06] ip netns exec ren ping 172.19.0.100
1042 [2021-10-27 10:58:14] ip netns exec ren ifconfig
1043 [2021-10-27 10:58:19] ip netns exec ren route
1044 [2021-10-27 10:58:26] ip netns exec ren ping 172.19.0.100 -I veth1
1045 [2021-10-27 10:58:58] ifconfig veth1_p
1046 [2021-10-27 10:59:10] ping 172.19.0.100
1047 [2021-10-27 10:59:26] ip netns exec ren ping 172.19.0.101 -I veth1
把网卡加入到docker0的bridge下
1160 [2021-10-27 12:17:37] brctl show
1161 [2021-10-27 12:18:05] ip link set dev veth3_p master docker0
1162 [2021-10-27 12:18:09] ip link set dev veth1_p master docker0
1163 [2021-10-27 12:18:13] ip link set dev veth2 master docker0
1164 [2021-10-27 12:18:15] brctl show
brctl showmacs br0
brctl show cni0
brctl addif cni0 veth1 veth2 veth3 //往cni bridge添加多个容器peer 网卡

Linux 上存在一个默认的网络命名空间,Linux 中的 1 号进程初始使用该默认空间。Linux 上其它所有进程都是由 1 号进程派生出来的,在派生 clone 的时候如果没有额外特别指定,所有的进程都将共享这个默认网络空间。

所有的网络设备刚创建出来都是在宿主机默认网络空间下的。可以通过 ip link set 设备名 netns 网络空间名 将设备移动到另外一个空间里去,socket也是归属在某一个网络命名空间下的,由创建socket进程所在的netns来决定socket所在的netns

1
2
3
4
5
6
7
8
9
10
11
12
//file: net/socket.c
int sock_create(int family, int type, int protocol, struct socket **res)
{
return __sock_create(current->nsproxy->net_ns, family, type, protocol, res, 0);
}
//file: include/net/sock.h
static inline
void sock_net_set(struct sock *sk, struct net *net)
{
write_pnet(&sk->sk_net, net);
}

内核提供了三种操作命名空间的方式,分别是 clone、setns 和 unshare。ip netns add 使用的是 unshare,原理和 clone 是类似的。

Image

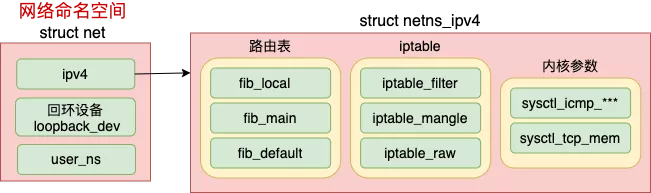
每个 net 下都包含了自己的路由表、iptable 以及内核参数配置等等

etcd 中存储的 flannel 配置

1
2
3
4
5
6
7
8
9
10
11
12
13
14
15
16
17
18
19
20
21
22
23
24
25
26
27
28
29
30
31
32
kubectl exec -it etcd-uos21 -n=kube-system -- /bin/sh
然后:
ETCDCTL_API=3 etcdctl --key /etc/kubernetes/pki/etcd/peer.key --cert /etc/kubernetes/pki/etcd/peer.crt --cacert /etc/kubernetes/pki/etcd/ca.crt --endpoints=https://localhost:2379 get /registry/configmaps/kube-system/kube-flannel-cfg
cni-conf.json�{
"name": "cbr0",
"cniVersion": "0.3.1",
"plugins": [
{
"type": "flannel",
"delegate": {
"hairpinMode": true,
"isDefaultGateway": true
}
},
{
"type": "portmap",
"capabilities": {
"portMappings": true
}
}
]
}
Z
net-conf.jsonI{
"Network": "172.19.0.0/18",
"Backend": {
"Type": "vxlan"
}
}
"

总结

通过无论是对flannel还是calico的学习,不管是使用vxlan还是host-gw发现这些所谓的overlay网络不过是披着一层udp的皮而已,只要我们对ip route/mac地址足够了解,这些新技术剖析下来仍然逃不过 RFC1180 描述的几个最基础的知识点(基础知识的力量)的使用而已,这一切硬核的基础知识无比简单,只要你多看看我这篇旧文《就是要你懂网络–一个网络包的旅程》

参考资料

https://morven.life/notes/networking-3-ipip/

https://www.cnblogs.com/bakari/p/10564347.html

https://www.cnblogs.com/goldsunshine/p/10701242.html

手工拉起flannel网络

《就是要你懂网络–一个网络包的旅程》