-D Set the Don’t Fragment bit. -s packetsize Specify the number of data bytes to be sent. The default is 56, which translates into 64 ICMP data bytes when combined with the 8 bytes of ICMP header data. This option cannot be used with ping sweeps.
ping 测试
1
2
3
4
5
6
7
8
9
10
11
12
13
14
✘ ren@mac ~/Downloads ping -c 1 -D -s 1500 www.baidu.com PING www.a.shifen.com (110.242.68.4): 1500 data bytes ping: sendto: Message too long ^C --- www.a.shifen.com ping statistics --- 1 packets transmitted, 0 packets received, 100.0% packet loss ✘ ren@mac ~/Downloads ping -c 1 -D -s 1400 www.baidu.com PING www.a.shifen.com (110.242.68.4): 1400 data bytes 1408 bytes from 110.242.68.4: icmp_seq=0 ttl=49 time=21.180 ms
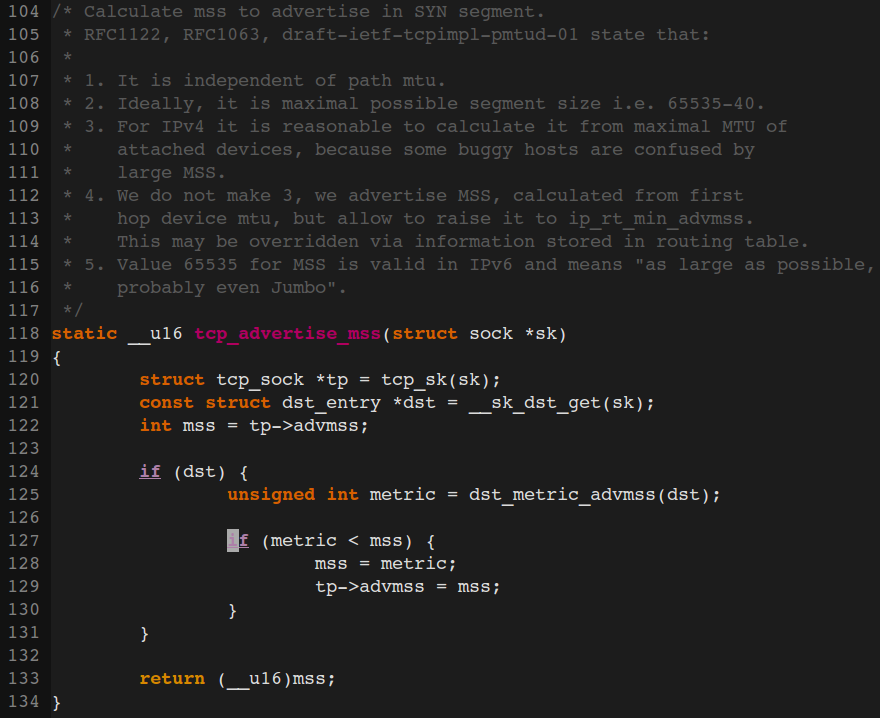
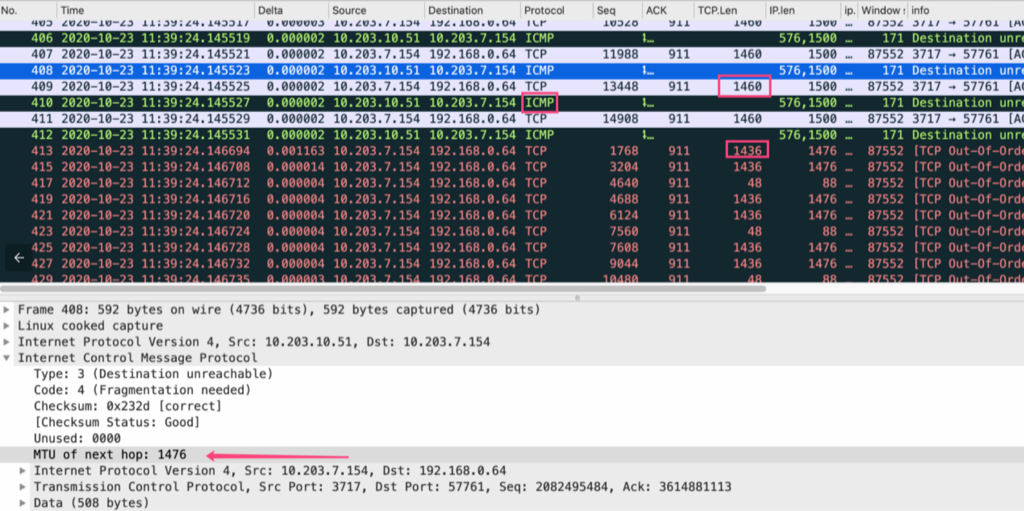
当然这里TCP协商MSS的时候应该经过 PMTUD( This process is called “Path MTU discovery”.) 来确认整个路由上的所有最小MTU,但是有些路由器会因为安全的原因过滤掉ICMP,导致PMTUD不可靠,所以这里的PMTUD形同虚设,比如在我们的三次握手中会协商一个MSS,这只是基于Client和Server两方的MTU来确定的,链路上如果还有比Client和Server的MTU更小的那么就会出现包超过MTU的大小,同时设置了DF标志而不再进行分片被丢掉。
# show router information $ route -ne $ ip route show 192.168.11.0/24 dev ens33 proto kernel scope link src 192.168.11.111 metric 100 # modify route table $ sudo ip route change 192.168.11.0/24 dev ens33 proto kernel scope link src 192.168.11.111 metric 100 advmss 48
rotating pattern: /var/log/myapp/*.log weekly (4 rotations) empty log files are rotated, old logs are removed considering log /var/log/myapp/default.log
error: skipping "/var/log/myapp/default.log" because parent directory has insecure permissions (It's world writable or writable by group which is not "root") Set "su" directive in config file to tell logrotate which user/group should be used for rotation
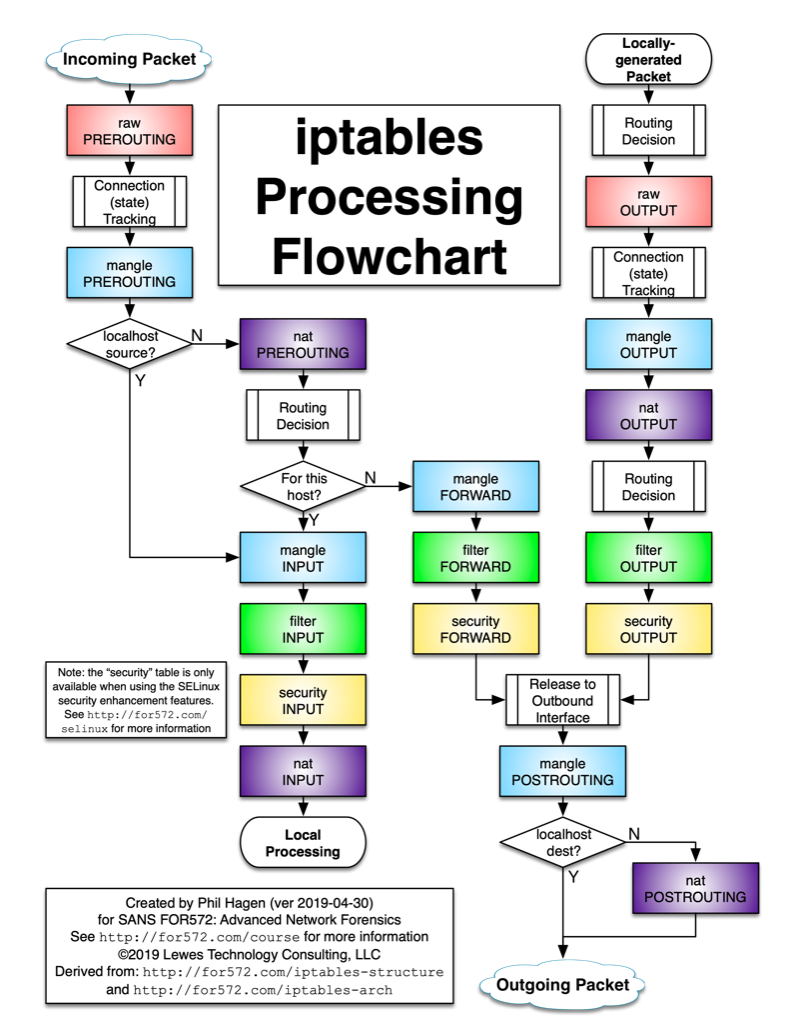
ipset is an extension to iptables that allows you to create firewall rules that match entire “sets” of addresses at once. Unlike normal iptables chains, which are stored and traversed linearly, IP sets are stored in indexed data structures, making lookups very efficient, even when dealing with large sets.
If you would rather deny all connections and manually specify which ones you want to allow to connect, you should change the default policy of your chains to drop. Doing this would probably only be useful for servers that contain sensitive information and only ever have the same IP addresses connect to them.
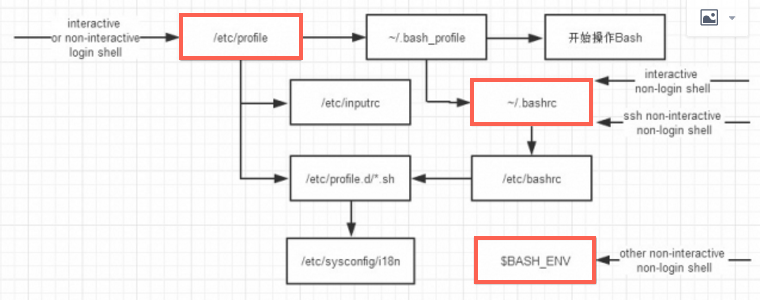
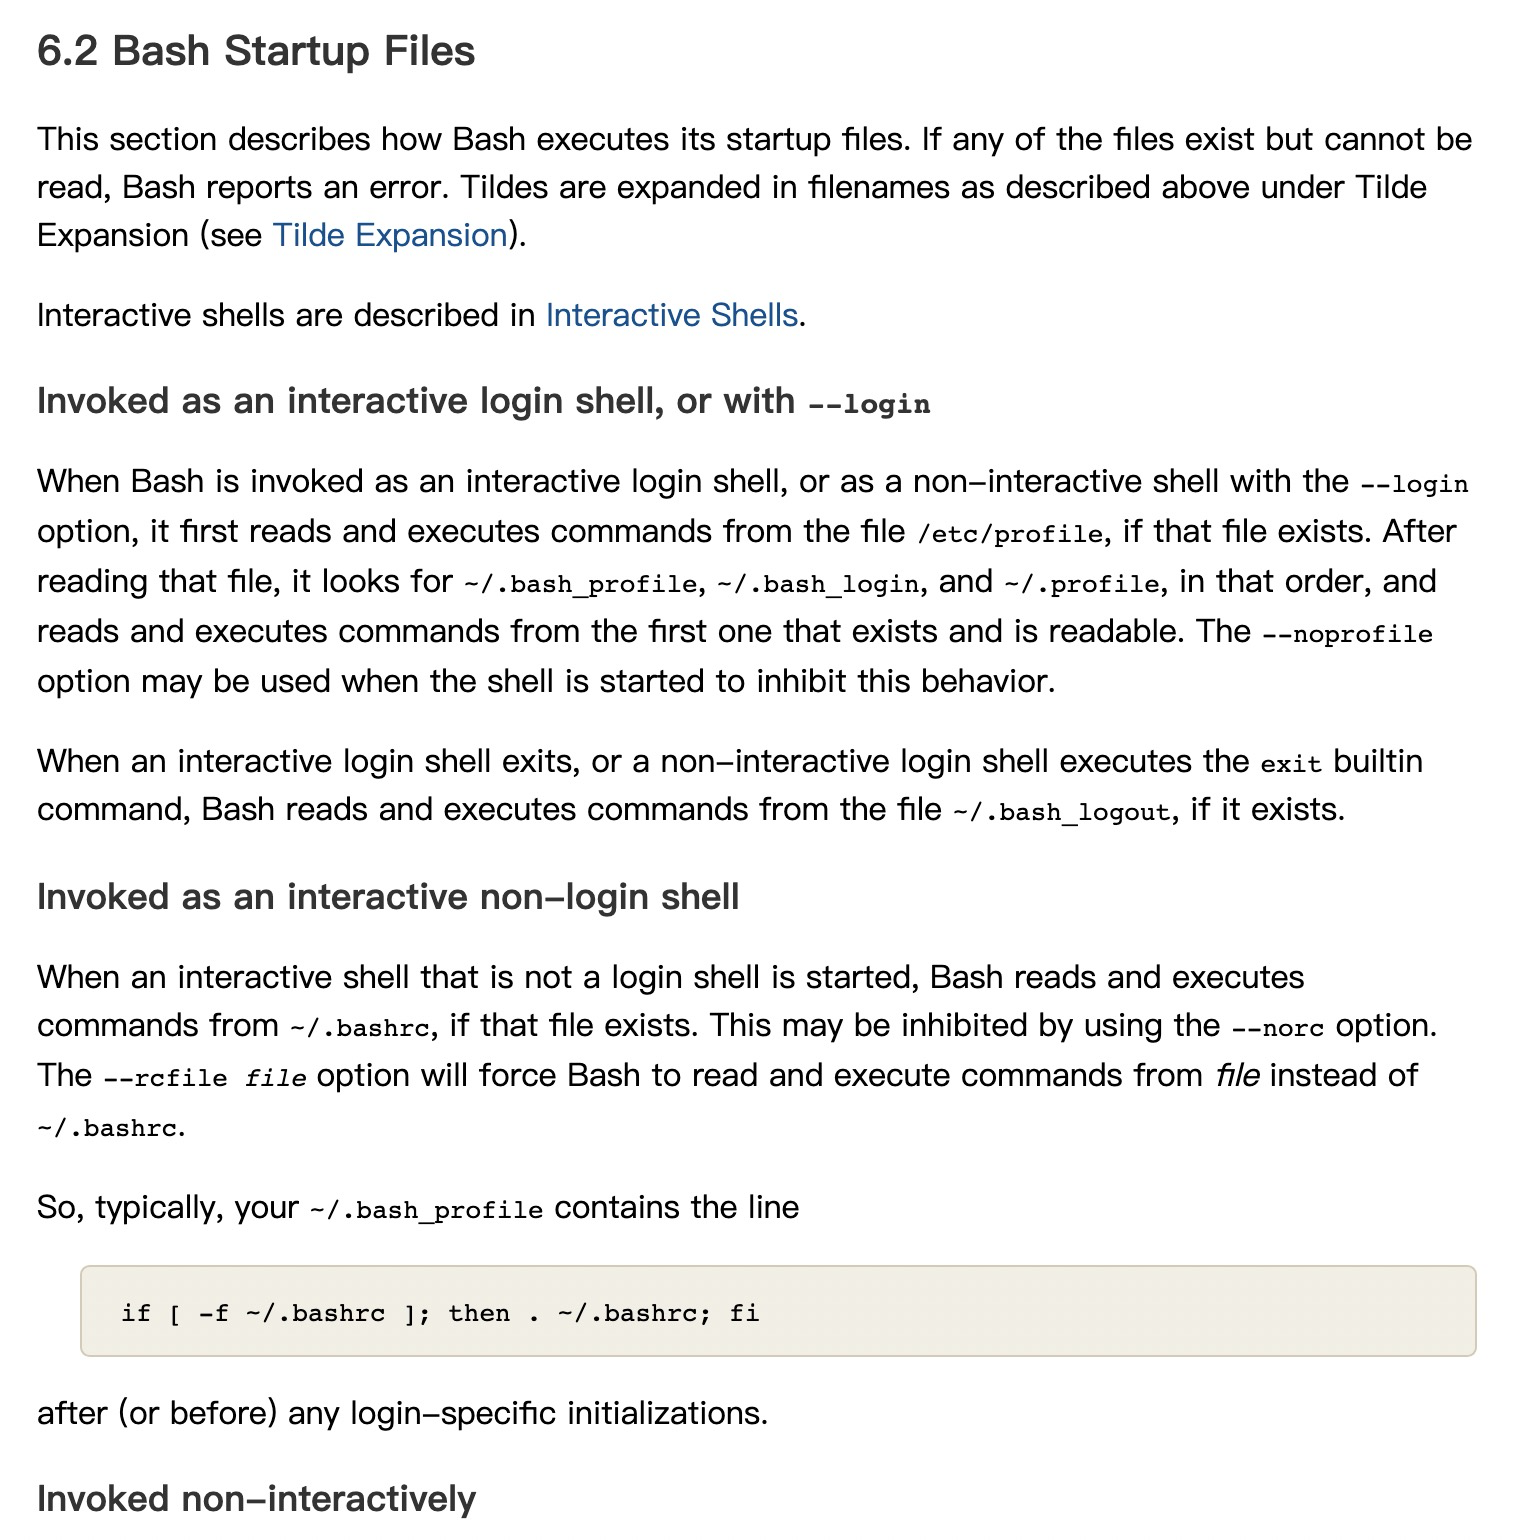
login shell加载环境变量的顺序是:① /etc/profile ② ~/.bash_profile ③ ~/.bashrc ④ /etc/bashrc
而non-login shell加载环境变量的顺序是: ① ~/.bashrc ② /etc/bashrc
也就是nog-login少了前面两步,我们先看后面两步。
下面是一个 .bashrc 的内容:
$ cat .bashrc
# .bashrc
# Source global definitions
if [ -f /etc/bashrc ]; then
. /etc/bashrc
fi
基本没有什么内容,它主要是去加载 /etc/bashrc 而他里面也没有看到sbin相关的东西
那我们再看non-login少的两步: ① /etc/profile ② ~/.bash_profile
cat /etc/profile : if [ “$EUID” = “0” ]; then pathmunge /usr/sbin pathmunge /usr/local/sbin else pathmunge /usr/local/sbin after pathmunge /usr/sbin after fi
Read and execute commands from the filename argument in the current shell context. If filename does not contain a slash, the PATH variable is used to find filename. When Bash is not in POSIX mode, the current directory is searched if filename is not found in $PATH. If any arguments are supplied, they become the positional parameters when filename is executed. Otherwise the positional parameters are unchanged. If the -T option is enabled, source inherits any trap on DEBUG; if it is not, any DEBUG trap string is saved and restored around the call to source, and source unsets the DEBUG trap while it executes. If -T is not set, and the sourced file changes the DEBUG trap, the new value is retained when source completes. The return status is the exit status of the last command executed, or zero if no commands are executed. If filename is not found, or cannot be read, the return status is non-zero. This builtin is equivalent to source.
set +o histexpand (! 是history展开符号, histexpand 可以打开或者关闭这个展开符) alias 之后,想要用原来的命令:+alias (命令前加)
bash程序执行,当“$0”是“sh”的时候,则要求下面的代码遵循一定的规范,当不符合规范的语法存在时,则会报错,所以可以这样理解,“sh”并不是一个程序,而是一种标准(POSIX),这种标准,在一定程度上(具体区别见下面的“Things bash has that sh does not”)保证了脚本的跨系统性(跨UNIX系统)
Linux 分 shell变量(set),用户变量(env), shell变量包含用户变量,export是一种命令工具,是显式那些通过export命令把shell变量中包含的用户变量导入给用户变量的那些变量.
比如: su admin 会重新加载 ~/.bashrc ,但是不会切换到admin 的home目录。 但是 su - admin 不会重新加载 ~/.bashrc ,但是会切换admin的home目录。
The su command is used to become another user during a login session. Invoked without a username, su defaults to becoming the superuser. The optional argument - may be used to provide an environment similar to what the user would expect had the user logged in directly.
-Xproxy_version Requests that nc should use the specified protocol when talking to the proxy server. Supported protocols are ‘’4’’ (SOCKS v.4), ‘’5’’ (SOCKS v.5) and ‘’connect’’ (HTTPS proxy). If the protocol is not specified, SOCKS version 5 is used.
Jan 22 17:21:43 l57f12112.sqa.nu8 dockerd[68317]: time="2021-01-22T17:21:43.991179104+08:00" level=warning msg="failed to load plugin io.containerd.snapshotter.v1.aufs" error="modprobe aufs failed: "modprobe: FATAL: Module aufs not found.\n": exit status 1" Jan 22 17:21:43 l57f12112.sqa.nu8 dockerd[68317]: time="2021-01-22T17:21:43.991371956+08:00" level=warning msg="could not use snapshotter btrfs in metadata plugin" error="path /var/lib/docker/containerd/daemon/io.containerd.snapshotter.v1.btrfs must be a btrfs filesystem to be used with the btrfs snapshotter" Jan 22 17:21:43 l57f12112.sqa.nu8 dockerd[68317]: time="2021-01-22T17:21:43.991381620+08:00" level=warning msg="could not use snapshotter aufs in metadata plugin" error="modprobe aufs failed: "modprobe: FATAL: Module aufs not found.\n": exit status 1" Jan 22 17:21:43 l57f12112.sqa.nu8 dockerd[68317]: time="2021-01-22T17:21:43.991388991+08:00" level=warning msg="could not use snapshotter zfs in metadata plugin" error="path /var/lib/docker/containerd/daemon/io.containerd.snapshotter.v1.zfs must be a zfs filesystem to be used with the zfs snapshotter: skip plugin" Jan 22 17:21:44 l57f12112.sqa.nu8 systemd[1]: Stopping Docker Application Container Engine... Jan 22 17:21:45 l57f12112.sqa.nu8 dockerd[68317]: failed to start daemon: Error initializing network controller: list bridge addresses failed: PredefinedLocalScopeDefaultNetworks List: [172.17.0.0/16 172.18.0.0/16 172.19.0.0/16 172.20.0.0/16 172.21.0.0/16 172.22.0.0/16 172.23.0.0/16 172.24.0.0/16 172.25.0.0/16 172.26.0.0/16 172.27.0.0/16 172.28.0.0/16 172.29.0.0/16 172.30.0.0/16 172.31.0.0/16 192.168.0.0/20 192.168.16.0/20 192.168.32.0/20 192.168.48.0/20 192.168.64.0/20 192.168.80.0/20 192.168.96.0/20 192.168.112.0/20 192.168.128.0/20 192.168.144.0/20 192.168.160.0/20 192.168.176.0/20 192.168.192.0/20 192.168.208.0/20 192.168.224.0/20 192.168.240.0/20]: no available network Jan 22 17:21:45 l57f12112.sqa.nu8 systemd[1]: docker.service: main process exited, code=exited, status=1/FAILURE Jan 22 17:21:45 l57f12112.sqa.nu8 systemd[1]: Stopped Docker Application Container Engine. Jan 22 17:21:45 l57f12112.sqa.nu8 systemd[1]: Unit docker.service entered failed state. Jan 22 17:21:45 l57f12112.sqa.nu8 systemd[1]: docker.service failed.
where the 192.168.y.x is the MAIN machine IP and /24 that ip netmask. Docker will use this network range for building the bridge and firewall riles. The –debug is not really needed, but might help if something else fails.
After starting once, you can kill the docker and start as usual. AFAIK, docker have created a cache config for that –bip and should work now without it. Of course, if you clean the docker cache, you may need to do this again.
UNIT LOAD PATH Unit files are loaded from a set of paths determined during compilation, described in the two tables below. Unit files found in directories listed earlier override files with the same name in directories lower in the list.
Table 1. Load path when running in system mode (--system). ┌────────────────────────┬─────────────────────────────┐ │Path │ Description │ ├────────────────────────┼─────────────────────────────┤ │/etc/systemd/system │ Local configuration │ ├────────────────────────┼─────────────────────────────┤ │/run/systemd/system │ Runtime units │ ├────────────────────────┼─────────────────────────────┤ │/usr/lib/systemd/system │ Units of installed packages │ └────────────────────────┴─────────────────────────────┘
// ip netns 获取容器网络信息 1022 [2021-04-14 15:53:06] docker inspect -f '{{.State.Pid}}' ab4e471edf50 //获取容器进程id 1023 [2021-04-14 15:53:30] ls /proc/79828/ns/net 1024 [2021-04-14 15:53:57] ln -sfT /proc/79828/ns/net /var/run/netns/ab4e471edf50 //link 以便ip netns List能访问 // 宿主机上查看容器ip 1026 [2021-04-14 15:54:11] ip netns list 1028 [2021-04-14 15:55:19] ip netns exec ab4e471edf50 ifconfig //nsenter调试网络 Get the pause container's sandboxkey: root@worker01:~# docker inspect k8s_POD_ubuntu-5846f86795-bcbqv_default_ea44489d-3dd4-11e8-bb37-02ecc586c8d5_0 | grep SandboxKey "SandboxKey": "/var/run/docker/netns/82ec9e32d486", root@worker01:~# Now, using nsenter you can see the container's information. root@worker01:~# nsenter --net=/var/run/docker/netns/82ec9e32d486 ip addr show 1: lo: <LOOPBACK,UP,LOWER_UP> mtu 65536 qdisc noqueue state UNKNOWN group default qlen 1 link/loopback 00:00:00:00:00:00 brd 00:00:00:00:00:00 inet 127.0.0.1/8 scope host lo valid_lft forever preferred_lft forever 3: eth0@if7: <BROADCAST,MULTICAST,UP,LOWER_UP> mtu 1450 qdisc noqueue state UP group default link/ether 0a:58:0a:f4:01:02 brd ff:ff:ff:ff:ff:ff link-netnsid 0 inet 10.244.1.2/24 scope global eth0 valid_lft forever preferred_lft forever Identify the peer_ifindex, and finally you can see the veth pair endpoint in root namespace. root@worker01:~# nsenter --net=/var/run/docker/netns/82ec9e32d486 ethtool -S eth0 NIC statistics: peer_ifindex: 7 root@worker01:~# root@worker01:~# ip -d link show | grep '7: veth' 7: veth5e43ca47@if3: <BROADCAST,MULTICAST,UP,LOWER_UP> mtu 1450 qdisc noqueue master cni0 state UP mode DEFAULT group default root@worker01:~#
To make this interface you'd first need to make sure that you have the dummy kernel module loaded. You can do this like so: $ sudo lsmod | grep dummy $ sudo modprobe dummy $ sudo lsmod | grep dummy dummy 12960 0 With the driver now loaded you can create what ever dummy network interfaces you like:
$ sudo ip link add eth10 type dummy
修改网卡名字
1 2 3 4 5 6 7 8 9
ip link set ens33 down
ip link set ens33 name eth0
ip link set eth0 up

mv /etc/sysconfig/network-scripts/ifcfg-{ens33,eth0}
sed -ire "s/NAME=\"ens33\"/NAME=\"eth0\"/" /etc/sysconfig/network-scripts/ifcfg-eth0
sed -ire "s/DEVICE=\"ens33\"/DEVICE=\"eth0\"/" /etc/sysconfig/network-scripts/ifcfg-eth0
MAC=$(cat /sys/class/net/eth0/address)
echo -n 'HWADDR="'$MAC\" >> /etc/sysconfig/network-scripts/ifcfg-eth0
OS版本
搞Docker就得上el7, 6的性能太差了 Docker 对 Linux 内核版本的最低要求是3.10,如果内核版本低于 3.10 会缺少一些运行 Docker 容器的功能。这些比较旧的内核,在一定条件下会导致数据丢失和频繁恐慌错误。
[13155344.231942] EXT4-fs warning (device sdd): ext4_dx_add_entry:2461: Directory (ino: 3145729) index full, reach max htree level :2
[13155344.231944] EXT4-fs warning (device sdd): ext4_dx_add_entry:2465: Large directory feature is not enabled on this filesystem
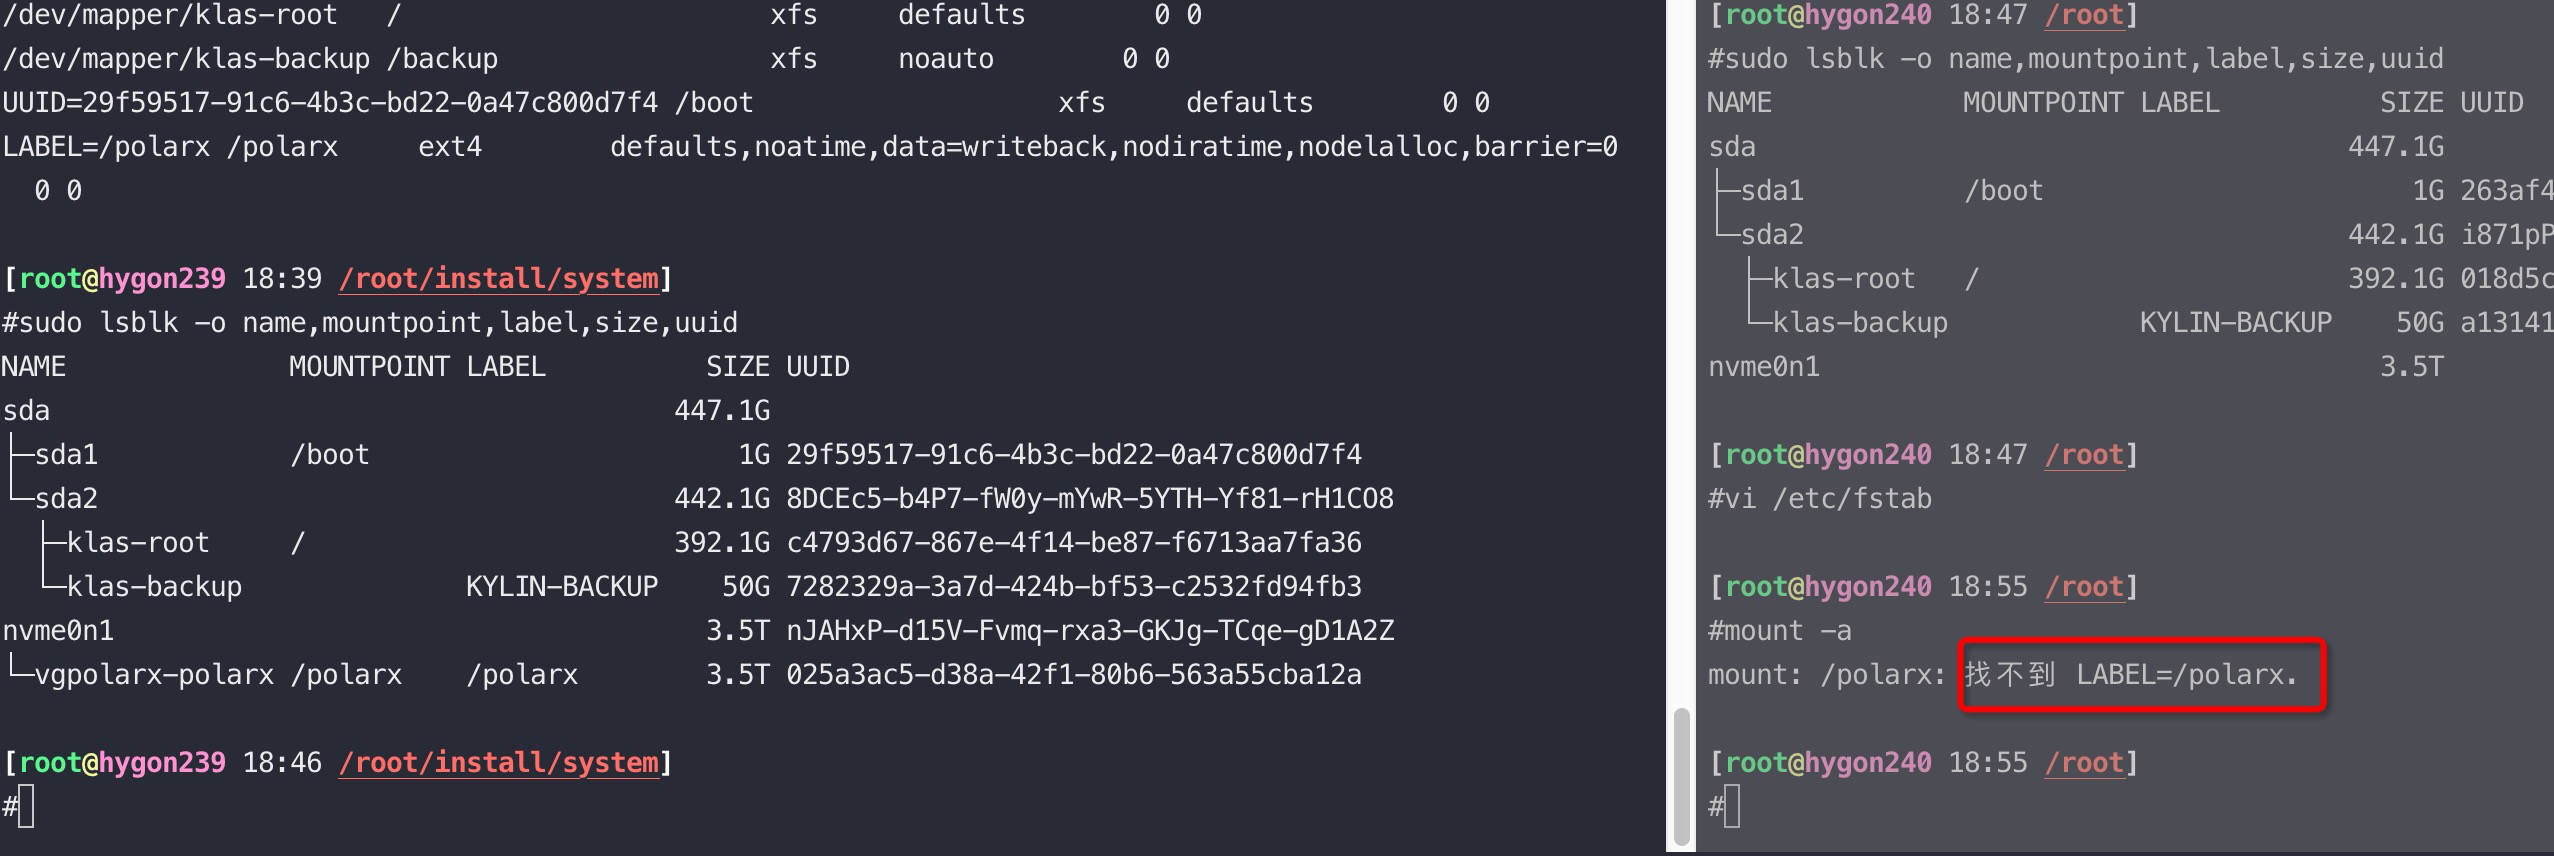
[root@ky3 ~]# mount -o lazytime,remount /polarx/  //增加lazytime参数
[root@ky3 ~]# mount -t ext4
/dev/mapper/vgpolarx-polarx on /polarx type ext4 (rw,noatime,nodiratime,lazytime,nodelalloc,nobarrier,stripe=128,data=writeback)
[root@ky3 ~]# mount -o rw,remount /polarx/  //去掉刚加的lazytime 参数
[root@ky3 ~]# mount -t ext4
/dev/mapper/vgpolarx-polarx on /polarx type ext4 (rw,noatime,nodiratime,nodelalloc,nobarrier,stripe=128,data=writeback)
remount 时要特别小心,会大量回收 slab 等导致sys CPU 100% 打挂整机,remount会导致slab回收等,请谨慎执行