cat /etc/resolv.conf # # macOS Notice # # This file is not consulted for DNS hostname resolution, address # resolution, or the DNS query routing mechanism used by most # processes on this system. # # To view the DNS configuration used by this system, use: # scutil --dns
A scoped DNS query can use only specified network interfaces (e.g. Ethernet or WiFi), while non-scoped can use any available interface.
More verbosely, an application that wants to resolve a name, sends a request (either scoped or non-scoped) to a resolver (usually a DNS client application), if the resolver does not have the answer cached, it sends a DNS query to a particular nameserver (and this goes through one interface, so it is always “scoped”).
In your example resolver #1 “for scoped queries” can use only en0 interface (Ethernet).
$networksetup -listallnetworkservices //列出网卡service, 比如 wifi ,以下是我的 macOS 输出 An asterisk (*) denotes that a network service is disabled. USB 10/100/1000 LAN Apple USB Ethernet Adapter Wi-Fi Bluetooth PAN Thunderbolt Bridge $sudo networksetup -setdnsservers 'Wi-Fi' 202.106.196.115 202.106.0.20 114.114.114.114 //修改nameserver $networksetup -getdnsservers Wi-Fi //查看对应的nameserver, 跟 scutil --dns 类似
如上, 只要是你的nameserver工作正常那么DNS就肯定回复了
删掉所有DNS nameserver:
One note to anyone wanting to remove the DNS, just write “empty” (without the quotes) instead of the DNS: sudo networksetup -setdnsservers <networkservice> empty
$networksetup -listallnetworkservices An asterisk (*) denotes that a network service is disabled. USB 10/100/1000 LAN Apple USB Ethernet Adapter Wi-Fi Bluetooth PAN Thunderbolt Bridge Thunderbolt Bridge 2 #查看网卡配置 $networksetup -getinfo "USB 10/100/1000 LAN" DHCP Configuration IP address: 30.25.25.195 Subnet mask: 255.255.255.128 Router: 30.25.25.254 Client ID: IPv6 IP address: none IPv6 Router: none Ethernet Address: 44:67:52:02:16:d4 $networksetup -listallhardwareports Hardware Port: USB 10/100/1000 LAN Device: en7 Ethernet Address: 44:67:52:02:16:d4
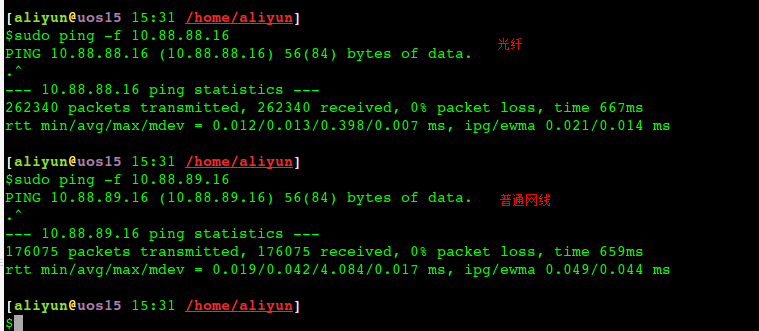
[aliyun@uos15 11:00 /home/aliyun] 以下88都是光口、89都是电口。 $ping -c 10 10.88.88.16 //光纤 PING 10.88.88.16 (10.88.88.16) 56(84) bytes of data. 64 bytes from 10.88.88.16: icmp_seq=1 ttl=64 time=0.058 ms 64 bytes from 10.88.88.16: icmp_seq=2 ttl=64 time=0.049 ms 64 bytes from 10.88.88.16: icmp_seq=3 ttl=64 time=0.053 ms 64 bytes from 10.88.88.16: icmp_seq=4 ttl=64 time=0.040 ms 64 bytes from 10.88.88.16: icmp_seq=5 ttl=64 time=0.053 ms 64 bytes from 10.88.88.16: icmp_seq=6 ttl=64 time=0.043 ms 64 bytes from 10.88.88.16: icmp_seq=7 ttl=64 time=0.038 ms 64 bytes from 10.88.88.16: icmp_seq=8 ttl=64 time=0.050 ms 64 bytes from 10.88.88.16: icmp_seq=9 ttl=64 time=0.043 ms 64 bytes from 10.88.88.16: icmp_seq=10 ttl=64 time=0.064 ms
--- 10.88.88.16 ping statistics --- 10 packets transmitted, 10 received, 0% packet loss, time 159ms rtt min/avg/max/mdev = 0.038/0.049/0.064/0.008 ms
[aliyun@uos15 11:01 /home/aliyun] $ping -c 10 10.88.89.16 //电口 PING 10.88.89.16 (10.88.89.16) 56(84) bytes of data. 64 bytes from 10.88.89.16: icmp_seq=1 ttl=64 time=0.087 ms 64 bytes from 10.88.89.16: icmp_seq=2 ttl=64 time=0.053 ms 64 bytes from 10.88.89.16: icmp_seq=3 ttl=64 time=0.095 ms 64 bytes from 10.88.89.16: icmp_seq=4 ttl=64 time=0.391 ms 64 bytes from 10.88.89.16: icmp_seq=5 ttl=64 time=0.051 ms 64 bytes from 10.88.89.16: icmp_seq=6 ttl=64 time=0.343 ms 64 bytes from 10.88.89.16: icmp_seq=7 ttl=64 time=0.045 ms 64 bytes from 10.88.89.16: icmp_seq=8 ttl=64 time=0.341 ms 64 bytes from 10.88.89.16: icmp_seq=9 ttl=64 time=0.054 ms 64 bytes from 10.88.89.16: icmp_seq=10 ttl=64 time=0.066 ms
--- 10.88.89.16 ping statistics --- 10 packets transmitted, 10 received, 0% packet loss, time 149ms rtt min/avg/max/mdev = 0.045/0.152/0.391/0.136 ms
Mode 4 (802.3ad): This mode creates aggregation groups that share the same speed and duplex settings, and it requires a switch that supports an IEEE 802.3ad dynamic link. Mode 4 uses all interfaces in the active aggregation group. For example, you can aggregate three 1 GB per second (GBPS) ports into a 3 GBPS trunk port. This is equivalent to having one interface with 3 GBPS speed. It provides fault tolerance and load balancing.
#ethtool bond0 Settings for bond0: Supported ports: [ ] Supported link modes: Not reported Supported pause frame use: No Supports auto-negotiation: No Advertised link modes: Not reported Advertised pause frame use: No Advertised auto-negotiation: No Speed: 20000Mb/s Duplex: Full Port: Other PHYAD: 0 Transceiver: internal Auto-negotiation: off Link detected: yes
CPU 进入节能模式之前,设定可空闲的 CPU 数量。如果有大于阀值数量的 CPU 是大于一个标准的偏差,该差值低于平均软中断工作负载,以及没有 CPU 是大于一个标准偏差,且该偏差高出平均,并有多于一个的 irq 分配给它们,一个 CPU 将处于节能模式。在节能模式中,CPU 不是 irqbalance 的一部分,所以它在有必要时才会被唤醒。
cat /etc/sysconfig/irqbalance # IRQBALANCE_BANNED_CPUS # 64 bit bitmask which allows you to indicate which cpu's should # be skipped when reblancing irqs. Cpu numbers which have their # corresponding bits set to one in this mask will not have any # irq's assigned to them on rebalance #绑定软中断到8-15core, 每位表示4core #IRQBALANCE_BANNED_CPUS=ffffffff,ffff00ff #绑定软中断到8-15core和第65core IRQBALANCE_BANNED_CPUS=ffffffff,fffffdff,ffffffff,ffff00ff
#!/bin/bash # This is the default setting of networking multiqueue and irq affinity # 1. enable multiqueue if available # 2. irq affinity optimization # 3. stop irqbalance service # set and check multiqueue
function set_check_multiqueue() { eth=$1 log_file=$2 queue_num=$(ethtool -l $eth | grep -ia5 'pre-set' | grep -i combined | awk {'print $2'}) if [ $queue_num -gt 1 ]; then # set multiqueue ethtool -L $eth combined $queue_num # check multiqueue setting cur_q_num=$(ethtool -l $eth | grep -iA5 current | grep -i combined | awk {'print $2'}) if [ "X$queue_num" != "X$cur_q_num" ]; then echo "Failed to set $eth queue size to $queue_num" >> $log_file echo "after setting, pre-set queue num: $queue_num , current: $cur_q_num" >> $log_file return 1 else echo "OK. set $eth queue size to $queue_num" >> $log_file fi else echo "only support $queue_num queue; no need to enable multiqueue on $eth" >> $log_file fi } #set irq affinity function set_irq_smpaffinity() { log_file=$1 node_dir=/sys/devices/system/node for i in $(ls -d $node_dir/node*); do i=${i/*node/} done echo "max node :$i" >> $log_file node_cpumax=$(cat /sys/devices/system/node/node${i}/cpulist |awk -F- '{print $NF}') irqs=($(cat /proc/interrupts |grep virtio |grep put | awk -F: '{print $1}')) core=0 for irq in ${irqs[@]};do VEC=$core if [ $VEC -ge 32 ];then let "IDX = $VEC / 32" MASK_FILL="" MASK_ZERO="00000000" for ((i=1; i<=$IDX;i++)) do MASK_FILL="${MASK_FILL},${MASK_ZERO}" done let "VEC -= 32 * $IDX" MASK_TMP=$((1<<$VEC)) MASK=$(printf "%X%s" $MASK_TMP $MASK_FILL) else MASK_TMP=$((1<<$VEC)) MASK=$(printf "%X" $MASK_TMP) fi echo $MASK > /proc/irq/$irq/smp_affinity echo "mask:$MASK, irq:$irq" >> $log_file core=$(((core+1)%(node_cpumax+1))) done } # stop irqbalance service function stop_irqblance() { log_file=$1 ret=0 if [ "X" != "X$(ps -ef | grep irqbalance | grep -v grep)" ]; then if which systemctl;then systemctl stop irqbalance else service irqbalance stop fi if [ $? -ne 0 ]; then echo "Failed to stop irqbalance" >> $log_file ret=1 fi else echo "OK. irqbalance stoped." >> $log_file fi return $ret } # main logic function main() { ecs_network_log=/var/log/ecs_network_optimization.log ret_value=0 echo "running $0" > $ecs_network_log echo "======== ECS network setting starts $(date +'%Y-%m-%d %H:%M:%S') ========" >> $ecs_network_log # we assume your NIC interface(s) is/are like eth* eth_dirs=$(ls -d /sys/class/net/eth*) if [ "X$eth_dirs" = "X" ]; then echo "ERROR! can not find any ethX in /sys/class/net/ dir." >> $ecs_network_log ret_value=1 fi for i in $eth_dirs do cur_eth=$(basename $i) echo "optimize network performance: current device $cur_eth" >> $ecs_network_log # only optimize virtio_net device driver=$(basename $(readlink $i/device/driver)) if ! echo $driver | grep -q virtio; then echo "ignore device $cur_eth with driver $driver" >> $ecs_network_log continue fi echo "set and check multiqueue on $cur_eth" >> $ecs_network_log set_check_multiqueue $cur_eth $ecs_network_log if [ $? -ne 0 ]; then echo "Failed to set multiqueue on $cur_eth" >> $ecs_network_log ret_value=1 fi done stop_irqblance $ecs_network_log set_irq_smpaffinity $ecs_network_log echo "======== ECS network setting END $(date +'%Y-%m-%d %H:%M:%S') ========" >> $ecs_network_log return $ret_value } # program starts here main exit $?
查询的rps绑定情况的脚本 get_rps.sh
1 2 3 4 5 6
#!/bin/bash # 获取当前rps情况 for i in $(ls /sys/class/net/eth0/queues/rx-*/rps_cpus); do echo $i cat $i done
RSS 和 RPS
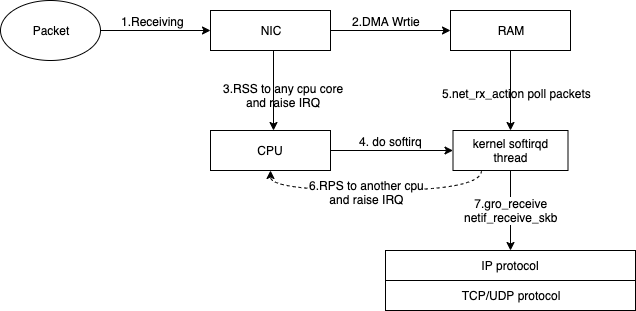
RSS:即receive side steering,利用网卡的多队列特性,将每个核分别跟网卡的一个首发队列绑定,以达到网卡硬中断和软中断均衡的负载在各个CPU上。他要求网卡必须要支持多队列特性。
default dev bond0 ---默认路由,后面的可以省略 10.0.0.0/8 via 11.158.239.247 dev bond0 11.0.0.0/8 via 11.158.239.247 dev bond0 30.0.0.0/8 via 11.158.239.247 dev bond0 172.16.0.0/12 via 11.158.239.247 dev bond0 192.168.0.0/16 via 11.158.239.247 dev bond0 100.64.0.0/10 via 11.158.239.247 dev bond0 33.0.0.0/8 via 11.158.239.247 dev bond0
或者用sed在文件第一行添加
1 2
sed -i '/default /d' /etc/sysconfig/network-scripts/route-bond0 //先删除默认路由(如果有) sed -i '1 i\default dev bond0' /etc/sysconfig/network-scripts/route-bond0 //添加
Centos 7的话需要在 /etc/sysconfig/network 中添加创建默认路由的命令
1 2 3
# cat /etc/sysconfig/network # Created by anaconda ip route add default dev eth0
kernel: ixgbe 0000:3b:00.1 eth1: renamed from enp59s0f1 kernel: i40e 0000:88:00.0 eth7: renamed from enp136s0
同时network service 会启动,进而遍历etc/sysconfig/network-scripts下面的脚本,我们配置的bond0, 默认路由,通常会在这个阶段运行,创建
1 2 3 4 5 6 7 8 9 10
kernel: bond0: Enslaving eth0 as a backup interface with a down link kernel: ixgbe 0000:3b:00.0 eth0: detected SFP+: 5 kernel: power_meter ACPI000D:00: Found ACPI power meter. kernel: power_meter ACPI000D:00: Ignoring unsafe software power cap! kernel: ixgbe 0000:3b:00.1: registered PHC device on eth1 kernel: ixgbe 0000:3b:00.0 eth0: NIC Link is Up 10 Gbps, Flow Control: RX/TX kernel: bond0: Enslaving eth1 as a backup interface with a down link kernel: bond0: Warning: No 802.3ad response from the link partner for any adapters in the bond kernel: bond0: link status definitely up for interface eth0, 10000 Mbps full duplex kernel: bond0: first active interface up!
A rule in /usr/lib/udev/rules.d/60-net.rules instructs the udev helper utility, /lib/udev/rename_device, to look into all /etc/sysconfig/network-scripts/ifcfg-*suffix* files. If it finds an ifcfg file with a HWADDR entry matching the MAC address of an interface it renames the interface to the name given in the ifcfg file by the DEVICE directive.(根据提前定义好的ifcfg-网卡名来命名网卡–依赖mac匹配,如果网卡的ifconfig文件中未加入HWADDR,则rename脚本并不会根据配置文件去重命名网卡)
A rule in /usr/lib/udev/rules.d/71-biosdevname.rules instructs biosdevname to rename the interface according to its naming policy, provided that it was not renamed in a previous step, biosdevname is installed, and biosdevname=0 was not given as a kernel command on the boot command line.
A rule in /lib/udev/rules.d/75-net-description.rules instructs udev to fill in the internal udev device property values ID_NET_NAME_ONBOARD, ID_NET_NAME_SLOT, ID_NET_NAME_PATH, ID_NET_NAME_MAC by examining the network interface device. Note, that some device properties might be undefined.
A rule in /usr/lib/udev/rules.d/80-net-name-slot.rules instructs udev to rename the interface, provided that it was not renamed in step 1 or 2, and the kernel parameter net.ifnames=0 was not given, according to the following priority: ID_NET_NAME_ONBOARD, ID_NET_NAME_SLOT, ID_NET_NAME_PATH. It falls through to the next in the list, if one is unset. If none of these are set, then the interface will not be renamed.
The following is an excerpt from Chapter 11 of the RHEL 7 “Networking Guide”:
Scheme 1: Names incorporating Firmware or BIOS provided index numbers for on-board devices (example: eno1), are applied if that information from the firmware or BIOS is applicable and available, else falling back to scheme 2.
Scheme 2: Names incorporating Firmware or BIOS provided PCI Express hotplug slot index numbers (example: ens1) are applied if that information from the firmware or BIOS is applicable and available, else falling back to scheme 3.
Scheme 3: Names incorporating physical location of the connector of the hardware (example: enp2s0), are applied if applicable, else falling directly back to scheme 5 in all other cases.
Scheme 4: Names incorporating interface’s MAC address (example: enx78e7d1ea46da), is not used by default, but is available if the user chooses.
Scheme 5: The traditional unpredictable kernel naming scheme, is used if all other methods fail (example: eth0).
o<index> on-board device index number s<slot> hotplug slot index number x<MAC> MAC address p<bus>s<slot> PCI geographical location p<bus>s<slot> USB port number chain
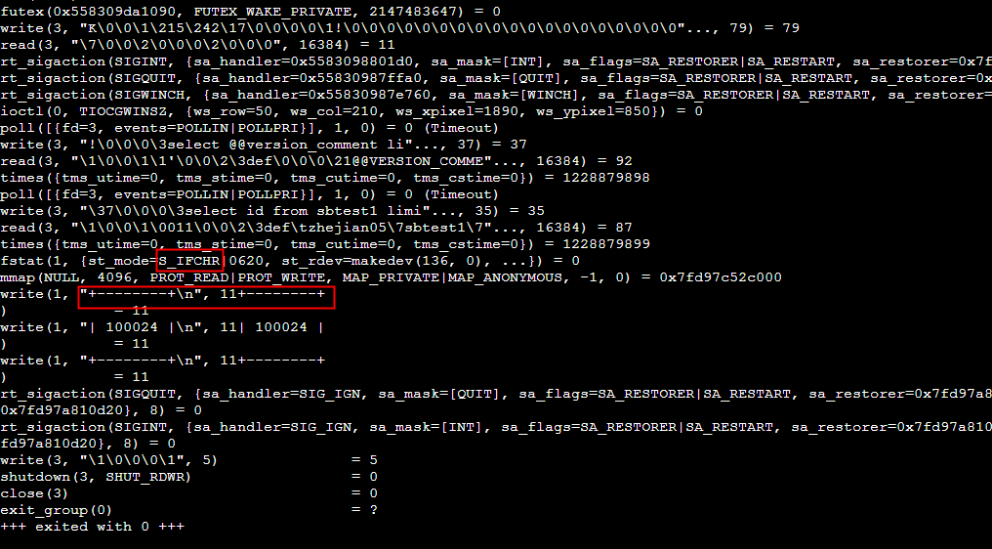
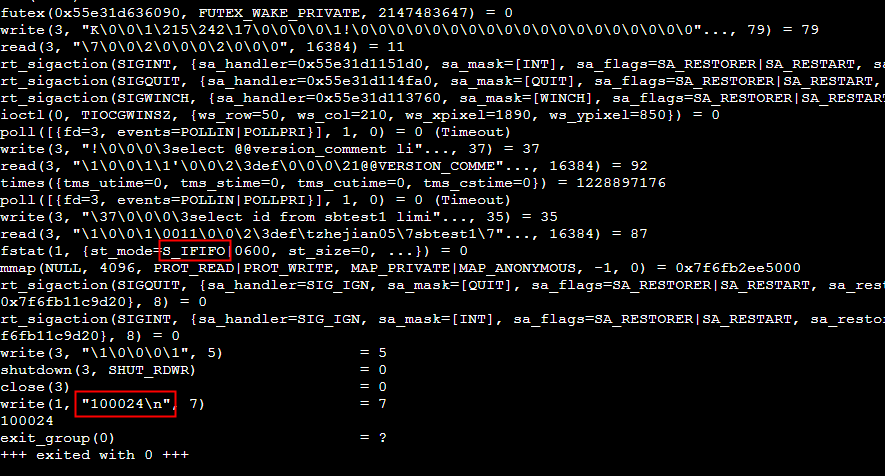
#include <stdio.h> #include <io.h> ... if (isatty(fileno(stdout))) printf( "stdout is a terminal\n" ); // 输出制表符 else printf( "stdout is a file or a pipe\n"); // 不输出制表符
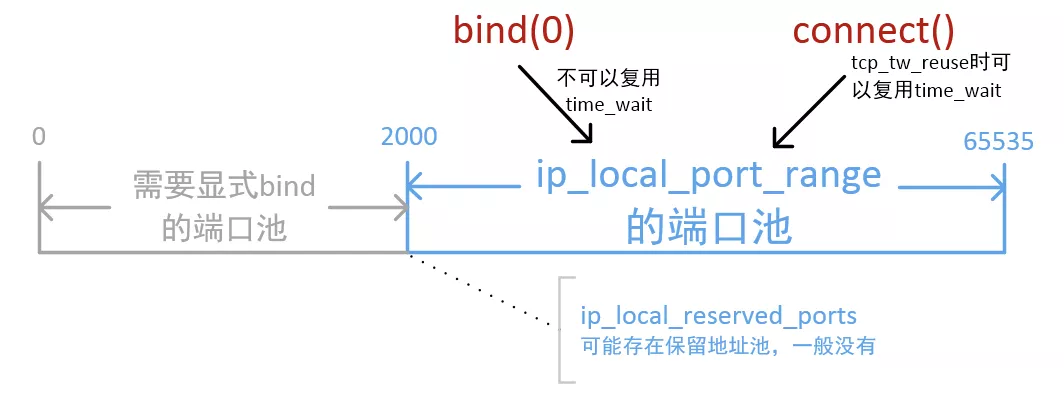
Linux 4.2后的内核增加了IP_BIND_ADDRESS_NO_PORT 这个socket option来解决这个问题,将src port的选择延后到connect的时候
IP_BIND_ADDRESS_NO_PORT (since Linux 4.2) Inform the kernel to not reserve an ephemeral port when using bind(2) with a port number of 0. The port will later be automatically chosen at connect(2) time, in a way that allows sharing a source port as long as the 4-tuple is unique.
SO_REUSEADDR Indicates that the rules used in validating addresses supplied in a bind(2) call should allow reuse of local addresses. For AF_INET sockets this means that a socket may bind, except when there is an active listening socket bound to the address. When the listening socket is bound to INADDR_ANY with a specific port then it is not possible to bind to this port for any local address. Argument is an integer boolean flag.
SO_REUSEADDR 还可以重用TIME_WAIT状态的port, 在程序崩溃后之前的TCP连接会进入到TIME_WAIT状态,需要一段时间才能释放,如果立即重启就会抛出Address Already in use的错误导致启动失败。这时候可以通过在调用bind函数之前设置SO_REUSEADDR来解决。
What exactly does SO_REUSEADDR do?
This socket option tells the kernel that even if this port is busy (in the TIME_WAIT state), go ahead and reuse it anyway. If it is busy, but with another state, you will still get an address already in use error. It is useful if your server has been shut down, and then restarted right away while sockets are still active on its port. You should be aware that if any unexpected data comes in, it may confuse your server, but while this is possible, it is not likely.
It has been pointed out that “A socket is a 5 tuple (proto, local addr, local port, remote addr, remote port). SO_REUSEADDR just says that you can reuse local addresses. The 5 tuple still must be unique!” This is true, and this is why it is very unlikely that unexpected data will ever be seen by your server. The danger is that such a 5 tuple is still floating around on the net, and while it is bouncing around, a new connection from the same client, on the same system, happens to get the same remote port.
By setting SO_REUSEADDR user informs the kernel of an intention to share the bound port with anyone else, but only if it doesn’t cause a conflict on the protocol layer. There are at least three situations when this flag is useful:
Normally after binding to a port and stopping a server it’s neccesary to wait for a socket to time out before another server can bind to the same port. With SO_REUSEADDR set it’s possible to rebind immediately, even if the socket is in a TIME_WAIT state.
When one server binds to INADDR_ANY, say 0.0.0.0:1234, it’s impossible to have another server binding to a specific address like 192.168.1.21:1234. With SO_REUSEADDR flag this behaviour is allowed.
When using the bind before connect trick only a single connection can use a single outgoing source port. With this flag, it’s possible for many connections to reuse the same source port, given that they connect to different destination addresses.
SO_REUSEPORT is also useful for eliminating the try-10-times-to-bind hack in ftpd’s data connection setup routine. Without SO_REUSEPORT, only one ftpd thread can bind to TCP (lhost, lport, INADDR_ANY, 0) in preparation for connecting back to the client. Under conditions of heavy load, there are more threads colliding here than the try-10-times hack can accomodate. With SO_REUSEPORT, things work nicely and the hack becomes unnecessary.
(a) on Linux SO_REUSEPORT is meant to be used purely for load balancing multiple incoming UDP packets or incoming TCP connection requests across multiple sockets belonging to the same app. ie. it’s a work around for machines with a lot of cpus, handling heavy load, where a single listening socket becomes a bottleneck because of cross-thread contention on the in-kernel socket lock (and state).
(b) set IP_BIND_ADDRESS_NO_PORT socket option for tcp sockets before binding to a specific source ip with port 0 if you’re going to use the socket for connect() rather then listen() this allows the kernel to delay allocating the source port until connect() time at which point it is much cheaper
Ephemeral Port Range就是我们前面所说的Port Range(/proc/sys/net/ipv4/ip_local_port_range)
A TCP/IPv4 connection consists of two endpoints, and each endpoint consists of an IP address and a port number. Therefore, when a client user connects to a server computer, an established connection can be thought of as the 4-tuple of (server IP, server port, client IP, client port).
Usually three of the four are readily known – client machine uses its own IP address and when connecting to a remote service, the server machine’s IP address and service port number are required.
What is not immediately evident is that when a connection is established that the client side of the connection uses a port number. Unless a client program explicitly requests a specific port number, the port number used is an ephemeral port number.
Ephemeral ports are temporary ports assigned by a machine’s IP stack, and are assigned from a designated range of ports for this purpose. When the connection terminates, the ephemeral port is available for reuse, although most IP stacks won’t reuse that port number until the entire pool of ephemeral ports have been used.
So, if the client program reconnects, it will be assigned a different ephemeral port number for its side of the new connection.
#date; ./client && echo "+++++++" ; ./client && sleep 0.1 ; echo "-------" && ./client && sleep 10; date; ./client && echo "+++++++" ; ./client && sleep 0.1 && echo "******"; ./client; Fri Nov 27 10:52:52 CST 2020 local port: 17448 local port: 17449 local port: 17451 local port: 17452 local port: 17453 +++++++ local port: 17455 local port: 17456 local port: 17457 local port: 17458 local port: 17460 ------- local port: 17475 local port: 17476 local port: 17477 local port: 17478 local port: 17479 Fri Nov 27 10:53:02 CST 2020 local port: 17997 local port: 17998 local port: 17999 local port: 18000 local port: 18001 +++++++ local port: 18002 local port: 18003 local port: 18004 local port: 18005 local port: 18006 ****** local port: 18010 local port: 18011 local port: 18012 local port: 18013 local port: 18014
$date; ./client && echo "+++++++" ; ./client && sleep 0.1 ; echo "-------" && ./client && sleep 10; date; ./client && echo "+++++++" ; ./client && sleep 0.1 && echo "******"; ./client; Fri Nov 27 14:10:47 CST 2020 local port: 7890 local port: 7892 local port: 7894 local port: 7896 local port: 7898 +++++++ local port: 7900 local port: 7902 local port: 7904 local port: 7906 local port: 7908 ------- local port: 7910 local port: 7912 local port: 7914 local port: 7916 local port: 7918 Fri Nov 27 14:10:57 CST 2020 local port: 7966 local port: 7968 local port: 7970 local port: 7972 local port: 7974 +++++++ local port: 7976 local port: 7978 local port: 7980 local port: 7982 local port: 7984 ****** local port: 7988 local port: 7990 local port: 7992 local port: 7994 local port: 7996
$./client local port: 1033 local port: 1025 local port: 1027 local port: 1029 local port: 1031 local port: 1033 local port: 1025 local port: 1027 local port: 1029 local port: 1031 local port: 1033 local port: 1025
tcp_max_tw_buckets - INTEGER Maximal number of timewait sockets held by system simultaneously.If this number is exceeded time-wait socket is immediately destroyed and warning is printed. This limit exists only to prevent simple DoS attacks, you must not lower the limit artificially, but rather increase it (probably, after increasing installed memory), if network conditions require more than default value.
This option specifies how the close function operates for a connection-oriented protocol (for TCP, but not for UDP). By default, close returns immediately, but ==if there is any data still remaining in the socket send buffer, the system will try to deliver the data to the peer==.
A进程选择某个端口当local port 来connect,并设置了 reuseaddr opt(表示其它进程还能继续用这个端口),这时B进程选了这个端口,并且bind了,B进程用完后把这个bind的端口释放了,但是如果 A 进程一直不释放这个端口对应的连接,那么这个端口会一直在内核中记录被bind用掉了(能bind的端口 是65535个,四元组不重复的连接你理解可以无限多),这样的端口越来越多后,剩下可供 A 进程发起连接的本地随机端口就越来越少了(也就是本来A进程选择端口是按四元组的,但因为前面所说的原因,导致不按四元组了,只按端口本身这个一元组来排重),这时会造成新建连接的时候这个四元组高概率重复,一般这个时候对端大概率还在 time_wait 状态,会忽略掉握手 syn 包并回复 ack ,进而造成建连接卡顿的现象;超频繁的端口复用在LVS 场景下会产生问题,导致建连异常;或者syn包被 RST 触发1秒钟重传 syn
#netstat -anpo |grep 18181 0.0.0.0:18181 0.0.0.0:* LISTEN 2732449/nc off (0.00/0/0) 172.17.151.5:18181 19.12.59.7:56166 ESTABLISHED 2732449/nc off (0.00/0/0) (stream2) 172.17.151.5:18181 110.242.68.66:80 ESTABLISHED 2732445/python keepalive (4.96/0/0)(stream1) 172.17.151.5:18181 10.143.33.49:123 ESTABLISHED 624/chronyd off (0.00/0/0)
然而我们观察到一个现象:由于这些长期存活的持久连接,API Server 之间的负载出现了不均衡。这会导致某些 API Server 承受不成比例的负载,并对系统可靠性产生级联影响。当我们对控制平面节点执行滚动更新时——这是更新控制平面 组件或修改配置时的常规操作——这种不均衡现象尤为明显。
为了解决客户端”粘性”问题,我们决定配置 Kubernetes API Server 的 –goaway-chance 参数。该参数在 k8s 1.18 中引入,是一个 API Server HTTP 过滤器,它以一定概率向 HTTP/2 客户端发送 RST_STREAM,强制客户端在新建立的 TCP 连接上重新发起请求。通过启用此设置,我们实现了显著改善的连接均衡和负载分发。
W1215 09:45:02.898142 1 reflector.go:441] k8s.io/client-go/informers/factory.go:134: watch of *v1.Lease ended with: an error on the server (“unable to decode an event from the watch stream: http2: client connection lost”) has prevented the request from succeeding
client connection lost 是什么意思,它又是如何导致 informer 超过 40 秒未收到任何更新的呢?
func readIdleTimeoutSeconds() int { ret := 30 if s := os.Getenv(“HTTP2_READ_IDLE_TIMEOUT_SECONDS”); len(s) > 0 { i, err := strconv.Atoi(s) if err != nil { klog.Warningf(“Illegal HTTP2_READ_IDLE_TIMEOUT_SECONDS(%q): %v.”+ “ Default value %d is used”, s, err, ret) return ret } ret = i } return ret }
func pingTimeoutSeconds() int { ret := 15 if s := os.Getenv(“HTTP2_PING_TIMEOUT_SECONDS”); len(s) > 0 { i, err := strconv.Atoi(s) if err != nil { klog.Warningf(“Illegal HTTP2_PING_TIMEOUT_SECONDS(%q): %v.”+ “ Default value %d is used”, s, err, ret) return ret } ret = i } return ret }
每个集群都有一个 NLB 对 API Server 的连接进行负载均衡。这些 NLB 配置了客户端 IP 保留(client-ip preservation)和跨 AZ 负载均衡(cross zone load balancing)。启用客户端 IP 保留,是为了让通过 NLB 的并发连接数能够超过 NLB 约 65000 个的临时端口范围限制。启用跨 AZ 负载均衡,则是为了提升可靠性并增强对部分控制平面故障的抗风险能力。
API Server 与 kube-controller-manager
我们使用 kOps(一款 Kubernetes 集群管理工具)来引导集群的创建。每个集群有 5 个控制平面节点。kube-controller-manager、kube-scheduler 等所有控制平面组件都运行在控制平面节点上,并配置为通过 NLB 与 API Server 通信。
我们为 API Server 前置的 NLB 启用了一项名为客户端 IP 保留的功能。该功能实质上是将 TCP 数据包的源 IP 和端口替换为发送方的真实 IP 和端口,而不是 NLB 自身的。这使目标端能够接受更多连接,同时保留了 IP 信息,便于追踪和审计等用途。除客户端 IP 保留外,我们还启用了跨 AZ 负载均衡,允许 NLB 路由至任意后端目标。
总结: 启用了客户端 IP 保留与跨 AZ 负载均衡,节点设置了 tcp_tw_reuse=1,同一客户端(相同的源 IP 和源端口)通过不同的 NLB IP 路由后,落到了同一目标(相同的目标 IP 和目标端口)。这导致负载均衡目标节点在已建立的 TCP 连接上收到了意外的 SYN,并发送了 Challenge ACK;客户端回复 RST,将服务器端的连接切断。这使现有的长连接 HTTP/2 流(例如 informer Watch 连接)在超时 45 秒后收到 client connection lost 错误。
NLB 官方文档
但这不就是 NLB 的 bug 吗?其实,这与其说是 bug,不如说是 NLB 启用客户端 IP 保留与跨 AZ 负载均衡后的一个既定特性。正如 AWS 在其 NLB “要求和注意事项”中所述:
当启用客户端 IP 保留时,不支持 NAT 回路(也称为 hairpinning)。启用后,当客户端或其前端的 NAT 设备在同时连接多个负载均衡器节点时使用相同的源 IP 地址和源端口,您可能会遇到与目标节点上的 socket 复用相关的 TCP/IP 连接限制。如果负载均衡器将这些连接路由到同一目标,目标节点会认为它们来自相同的源 socket,从而导致连接错误。如果发生这种情况,客户端可以重试(如果连接失败)或重新连接(如果连接中断)。您可以 通过增加源端临时端口数或增加负载均衡器目标数来减少此类连接错误。也可以通过禁用客户端 IP 保留或禁用跨 AZ 负载均衡来完全避免此类连接错误。
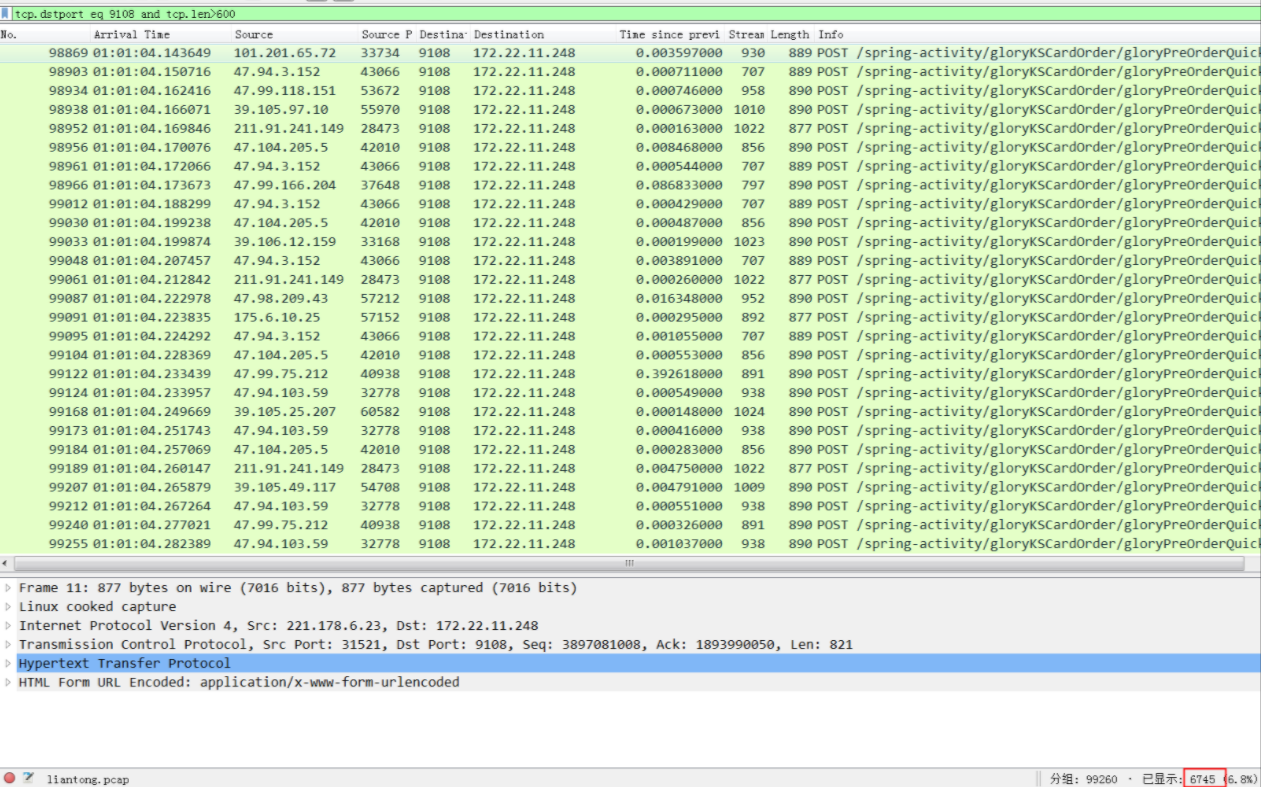
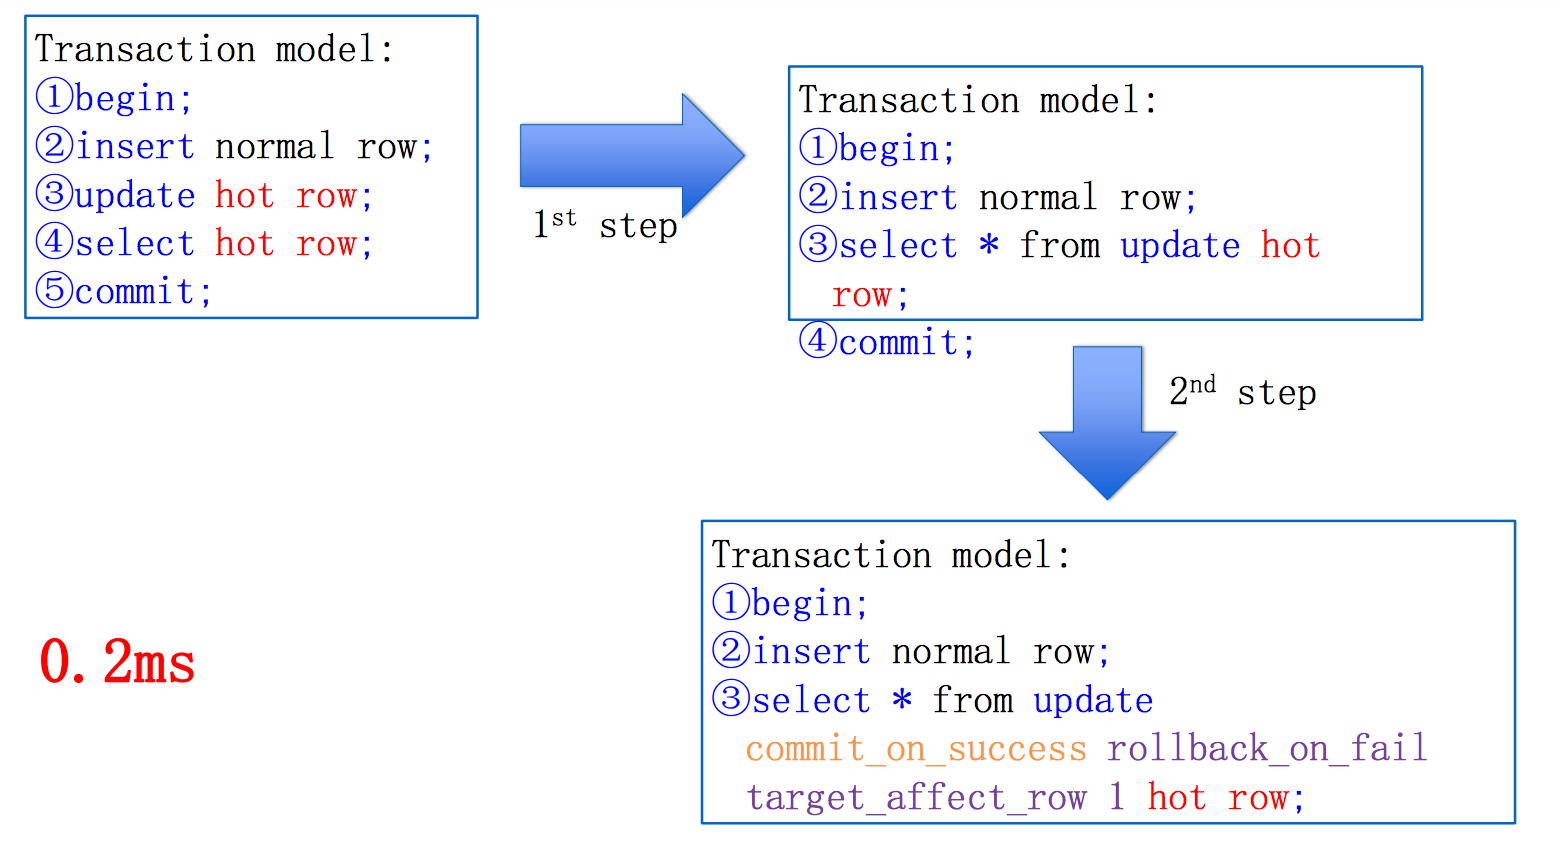
首先,在应用端进行排队,因为很多商品都是有sku的,当sku库存变化时item的库存也要做相应变化,所以需要根据itemId来进行排队,相同itemId的减库存操作会进入串行化排队处理逻辑,不过应用端的排队只能做到单机内存排队,当应用服务器数量过多时,落到db的并发请求仍然很多,所以最好的办法是在db端也加上排队策略,今年库存中心db部署了两个的排队patch,一个叫“并发控制”,是做在InnoDB层的,另一个叫“queue on pk”,是做在mysql的server层的,两个patch各有优缺点,前者不需要应用修改代码,db自动判断,后者需要应用程序写特殊的sql hint,前者控制的全局的sql,后者是根据hint来控制指定sql,两个patch的本质和应用端的排队逻辑是一致的,具体实现不同。双十一库存中心使用的是“并发控制”的patch。
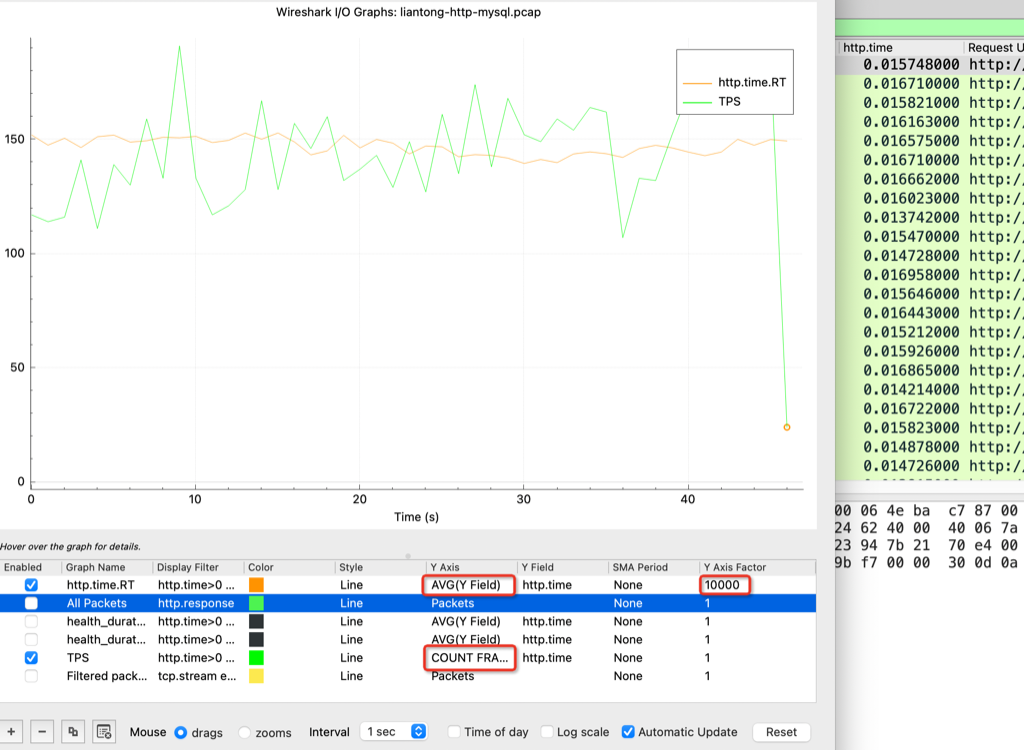
2013年的单减库存TPS最高记录是1381次每秒。
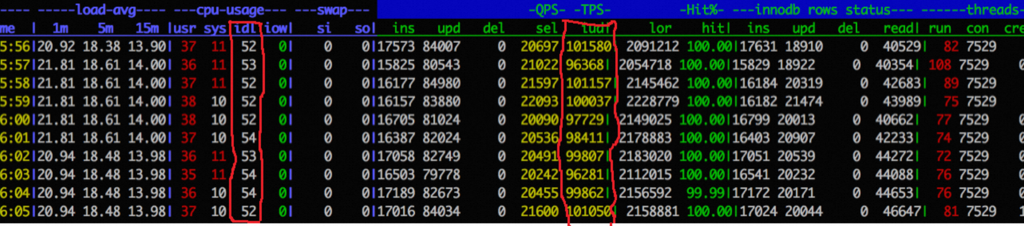
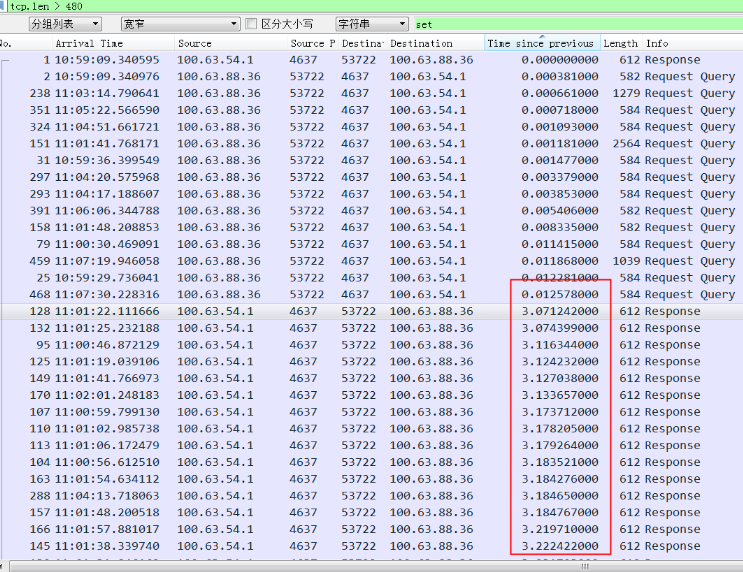
对于秒杀热点场景,官方版本500tps每秒,问题在于同时涌入的请求太多,每次取锁都要检查其它等锁的线程(防止死锁),这个线程队列太长的话导致这个检查时间太长; 继续在前面增加能够进入到后面的并发数的控制,通过增加线程池、控制并发能到1400(no deadlock list check);
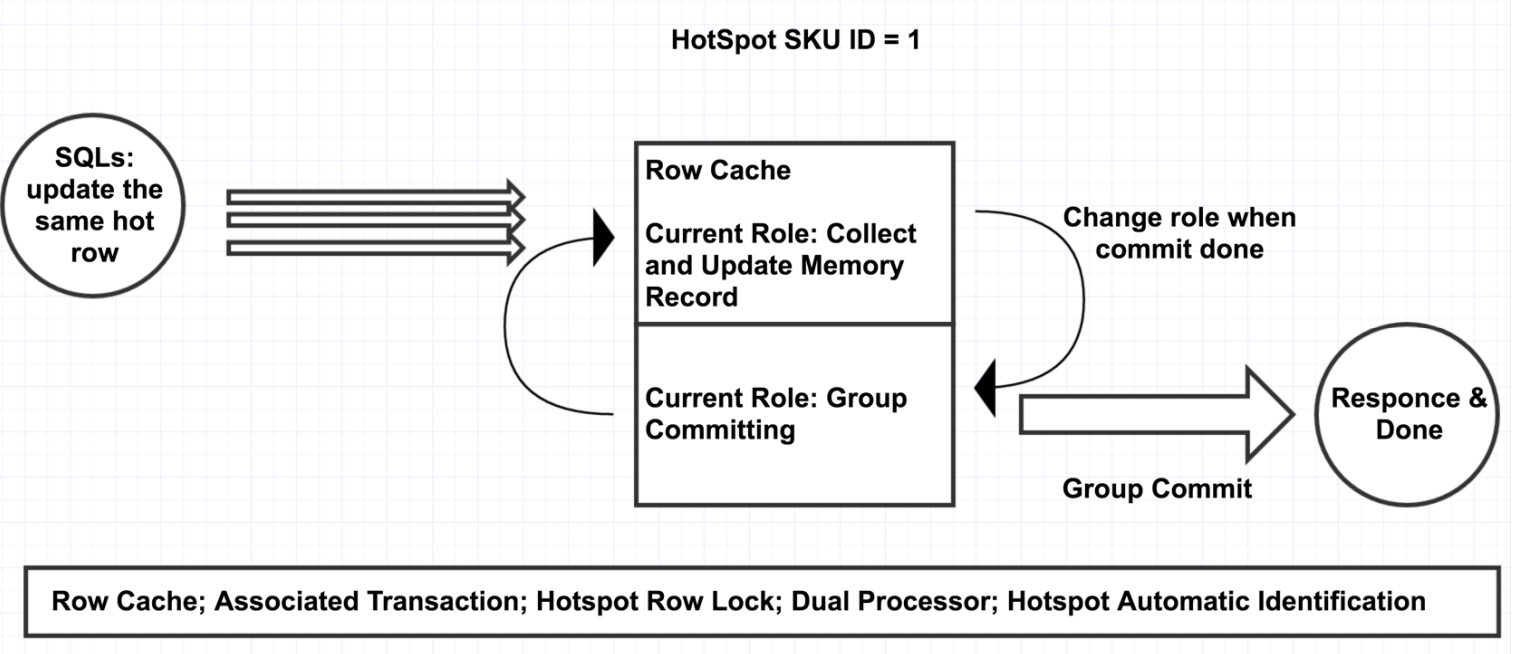
热点的自动识别:前面已经讲过了,库存的扣减SQL都会有commit on success标记。mysql内部分为普通通道和热点扣减通道。普通通道里是正常的事务。热点通道里收集带有commit on success标记的事务。在一定的时间区间段内(0.1ms),将收集到的热点按照主键或者唯一键进行hash; hash到同一个桶中为相同的sku; 分批组提交这0.1ms收集到的热点商品。
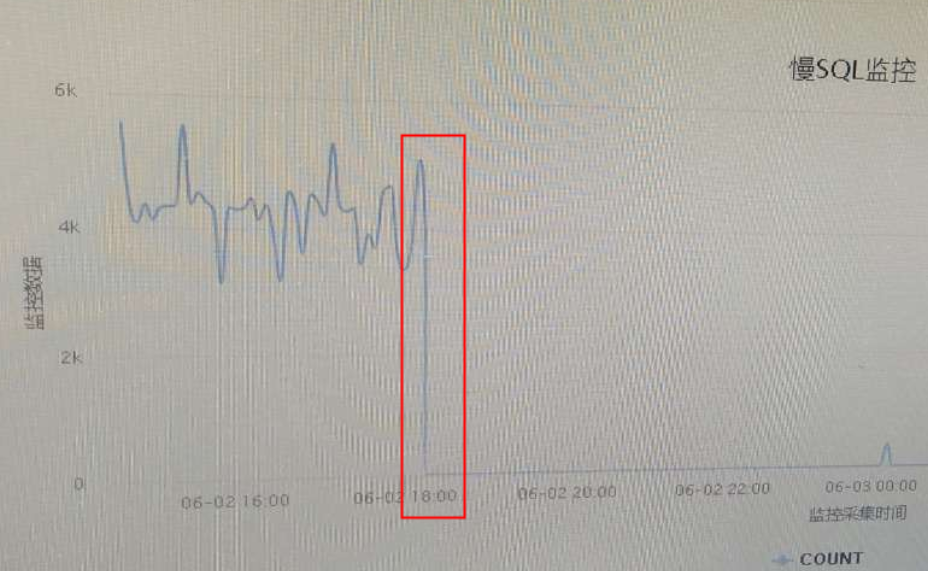
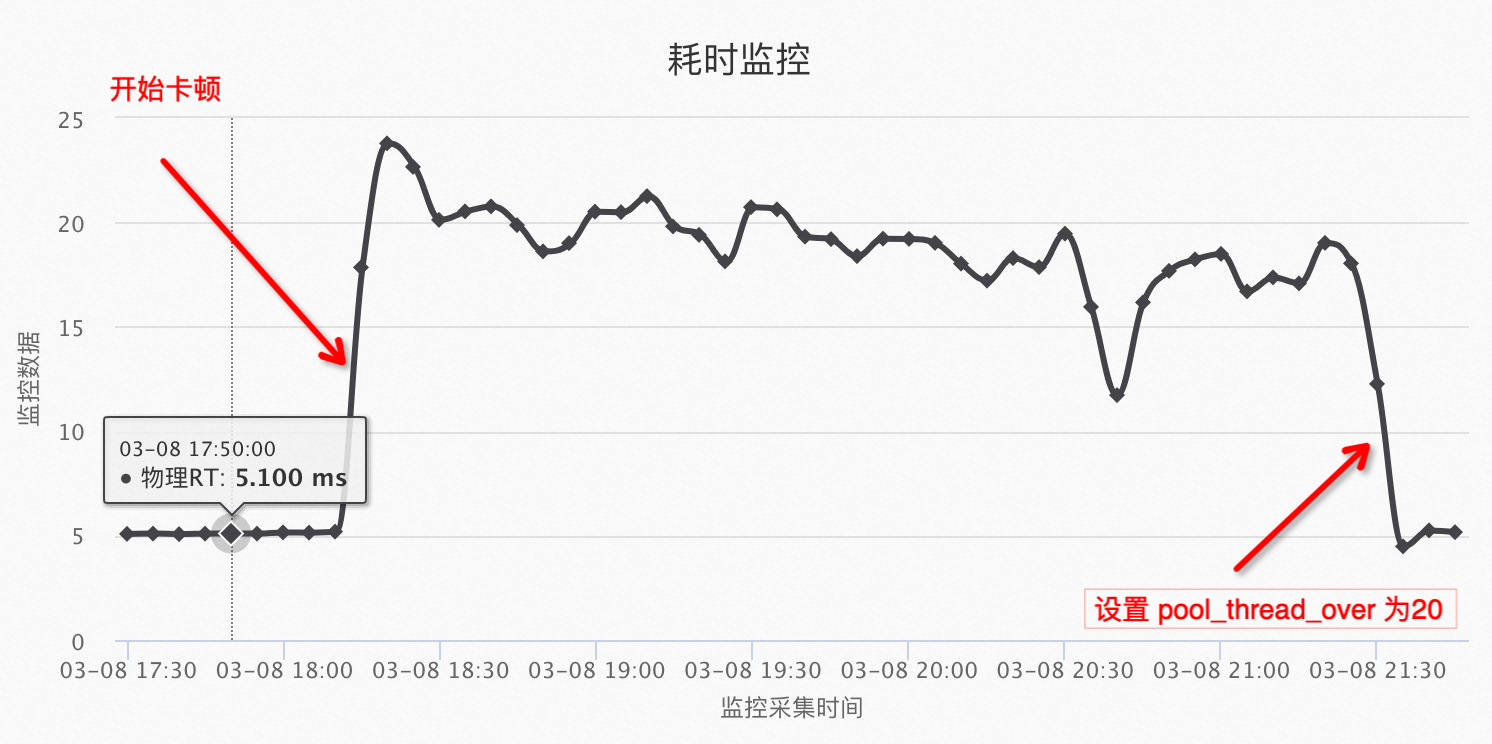
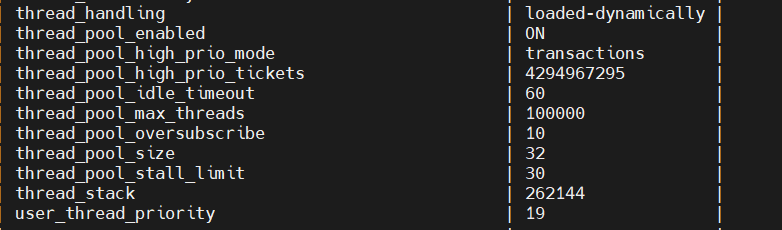
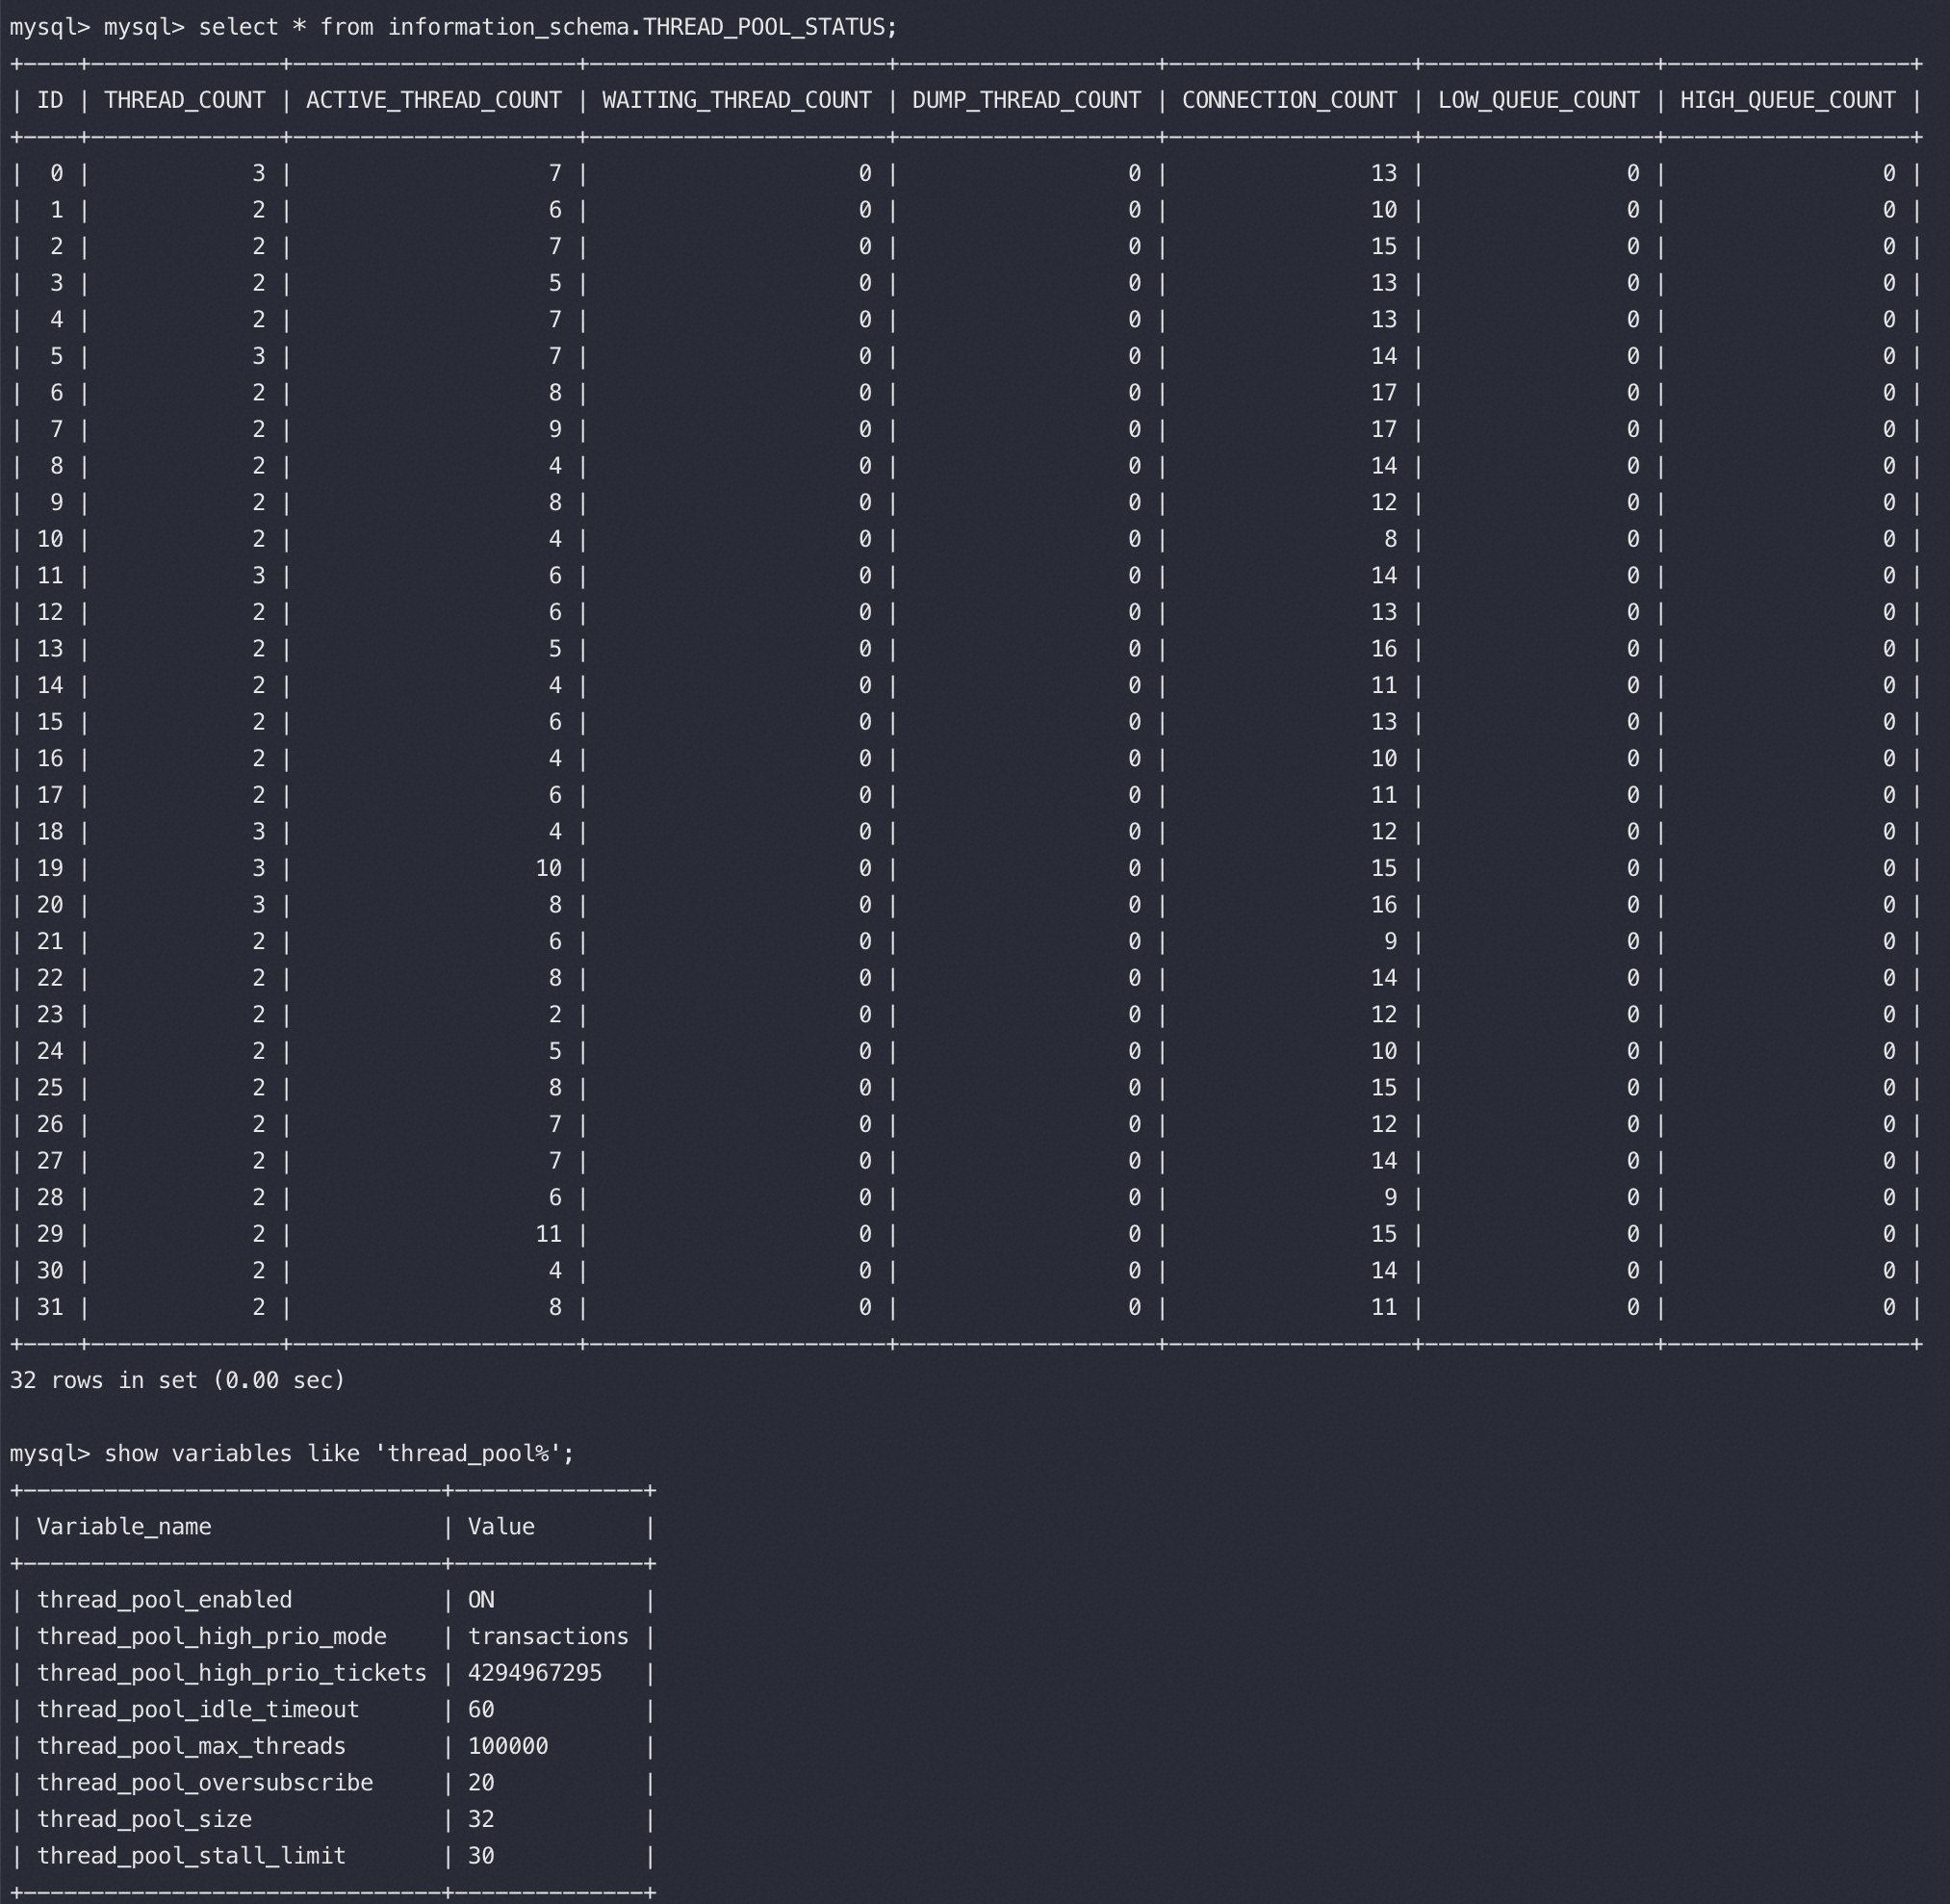
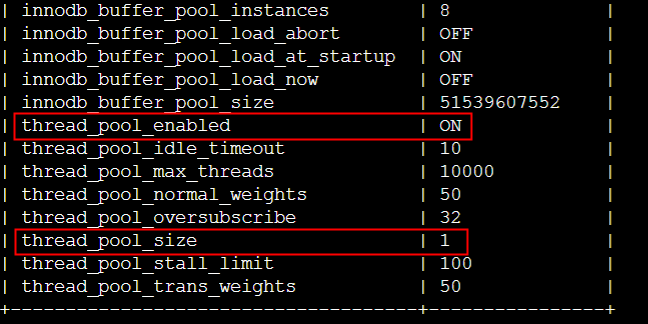
The thread_pool_stall_limit affects executing statements. The value is the amount of time a statement has to finish after starting to execute before it becomes defined as stalled, at which point the thread pool permits the thread group to begin executing another statement. The value is measured in 10 millisecond units, so the default of 6 means 60ms. Short wait values permit threads to start more quickly. Short values are also better for avoiding deadlock situations. Long wait values are useful for workloads that include long-running statements, to avoid starting too many new statements while the current ones execute.
类似案例
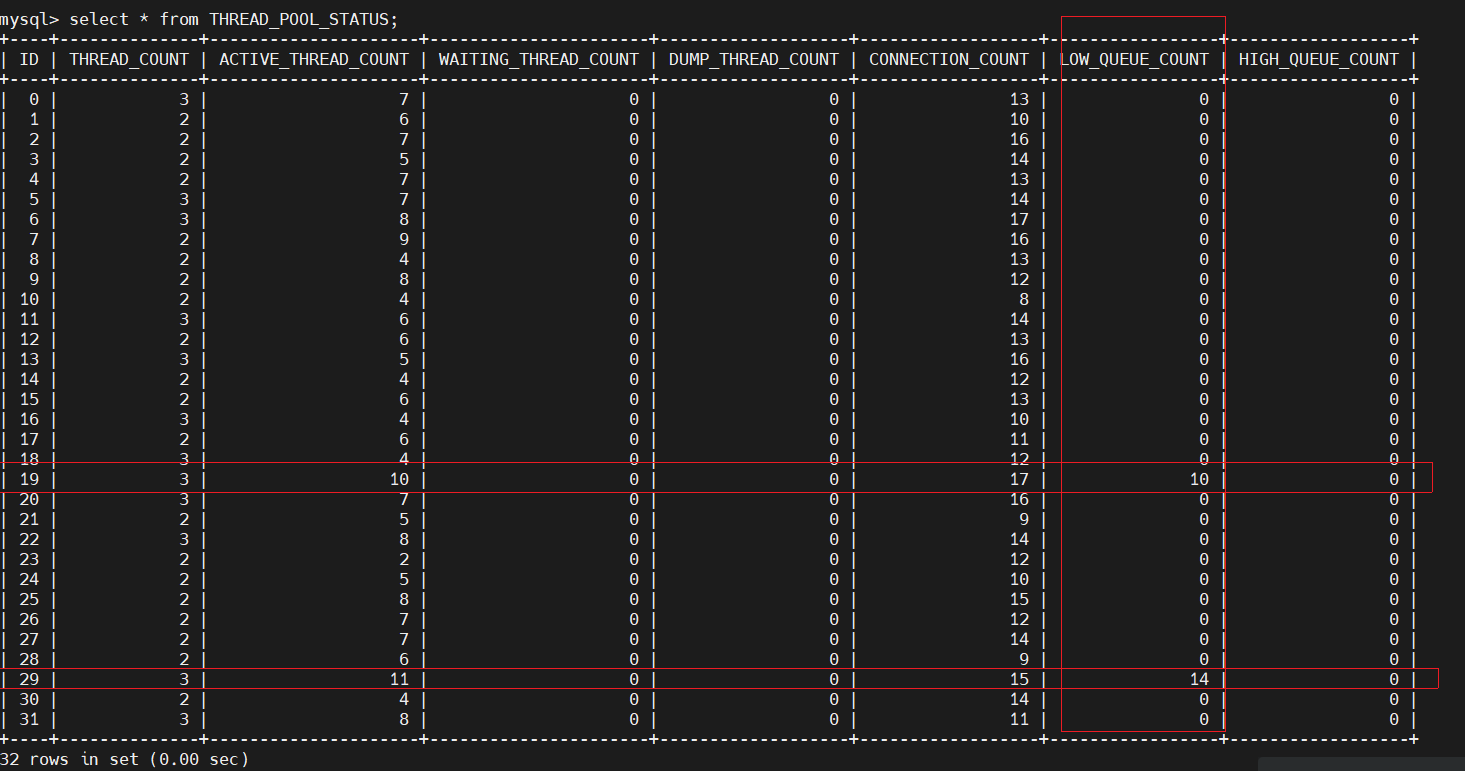
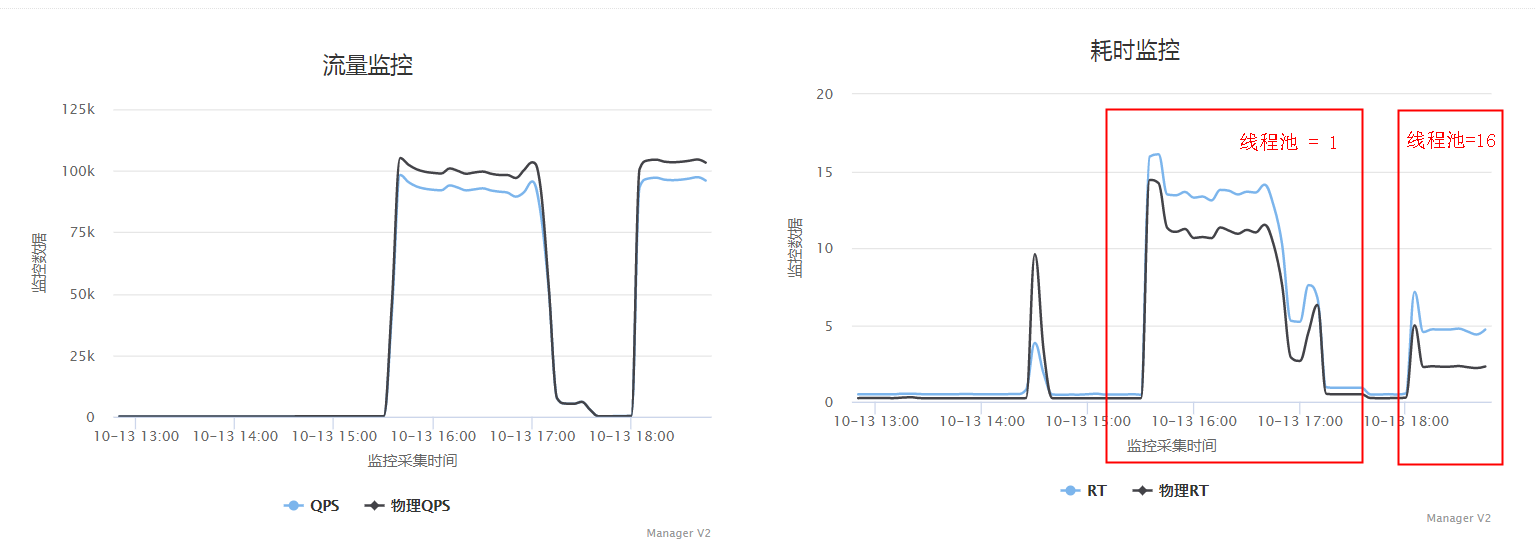
一个其它客户同样的问题的解决过程,最终发现是因为thread pool group中的active thread count 计数有泄漏,导致达到thread_pool_oversubscribe 的上限(实际没有任何线程运行)
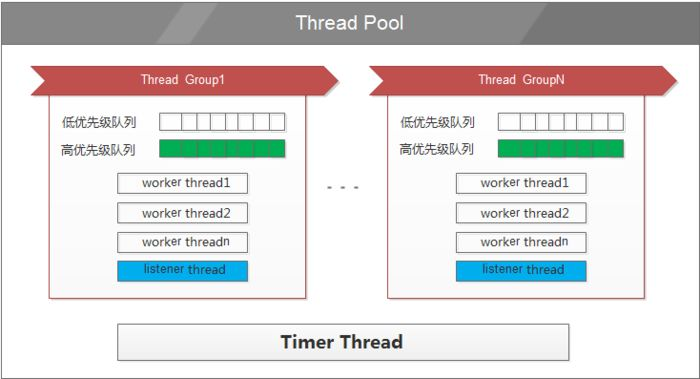
MySQL Thread Pool之所以分成多个小的Thread Group Pool而不是一个大的Pool,是为了分解锁(每个group中都有队列,队列需要加锁。类似ConcurrentHashMap提高并发的原理),提高并发效率。另外如果对每个Pool的 Worker做CPU 亲和性绑定也会对cache更友好、效果更高
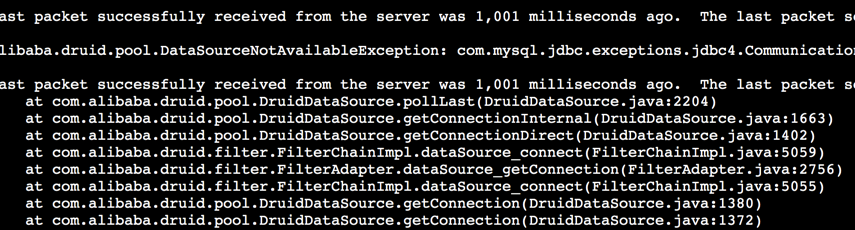
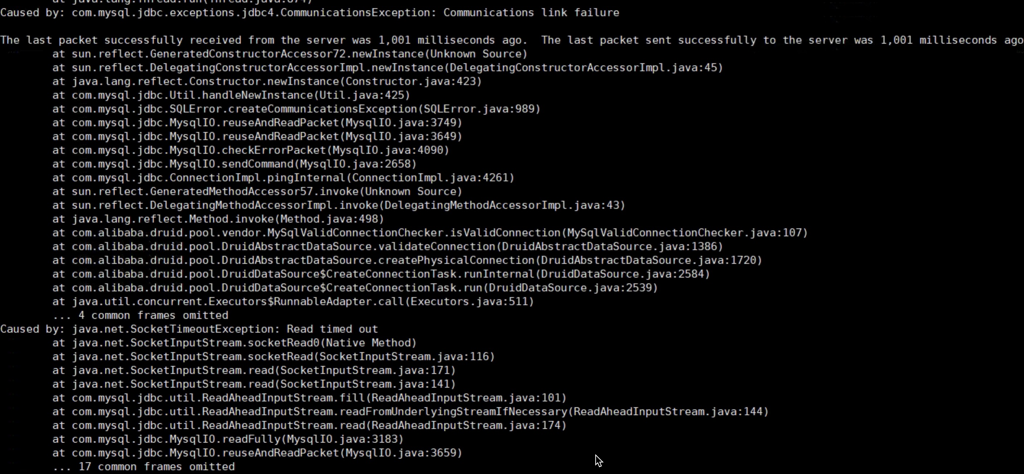
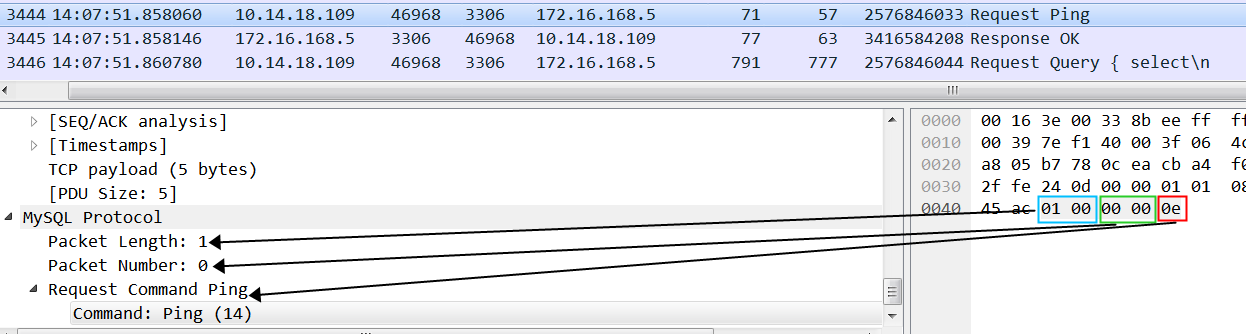
Ping use the JDBC method Connection.isValid(int timeoutInSecs). Digging into the MySQL Connector/J source, the actual implementation uses com.mysql.jdbc.ConnectionImpl.pingInternal() to send a simple ping packet to the DB and returns true as long as a valid response is returned.
MySQL ping protocol是发送了一个 0e 的byte标识给Server,整个包加上2byte的Packet Length(内容为:1),2byte的Packet Number(内容为:0),总长度为5 byte。Druid、DRDS默认都会 testOnBorrow,所以每个连接使用前都会先做ping。
1 2 3 4 5 6 7 8 9 10 11 12
public class MySQLPingPacket implements CommandPacket {
    private final WriteBuffer buffer = new WriteBuffer();
    public MySQLPingPacket() {
        buffer.writeByte((byte) 0x0e);
    }
    public int send(final OutputStream os) throws IOException {
        os.write(buffer.getLengthWithPacketSeq((byte) 0)); // Packet Number
        os.write(buffer.getBuffer(),0,buffer.getLength()); // Packet Length 固定为1
        os.flush();
        return 0;
    }
}
"ManagerExecutor-1-thread-1" #47 daemon prio=5 os_prio=0 tid=0x00007fe924004000 nid=0x15c runnable [0x00007fe9034f4000]
   java.lang.Thread.State: RUNNABLE
    at java.net.SocketInputStream.socketRead0(Native Method)
    at java.net.SocketInputStream.socketRead(SocketInputStream.java:116)
    at java.net.SocketInputStream.read(SocketInputStream.java:171)
    at java.net.SocketInputStream.read(SocketInputStream.java:141)
    at com.mysql.jdbc.util.ReadAheadInputStream.fill(ReadAheadInputStream.java:101)
    at com.mysql.jdbc.util.ReadAheadInputStream.readFromUnderlyingStreamIfNecessary(ReadAheadInputStream.java:144)
    at com.mysql.jdbc.util.ReadAheadInputStream.read(ReadAheadInputStream.java:174)
    - locked <0x0000000722538b60> (a com.mysql.jdbc.util.ReadAheadInputStream)
    at com.mysql.jdbc.MysqlIO.readFully(MysqlIO.java:3005)
    at com.mysql.jdbc.MysqlIO.reuseAndReadPacket(MysqlIO.java:3466)
    at com.mysql.jdbc.MysqlIO.reuseAndReadPacket(MysqlIO.java:3456)
    at com.mysql.jdbc.MysqlIO.checkErrorPacket(MysqlIO.java:3897)
    at com.mysql.jdbc.MysqlIO.sendCommand(MysqlIO.java:2524)
    at com.mysql.jdbc.MysqlIO.sqlQueryDirect(MysqlIO.java:2677)
    at com.mysql.jdbc.ConnectionImpl.execSQL(ConnectionImpl.java:2545)
    - locked <0x00000007432e19c8> (a com.mysql.jdbc.JDBC4Connection)
    at com.mysql.jdbc.ConnectionImpl.execSQL(ConnectionImpl.java:2503)
    at com.mysql.jdbc.StatementImpl.executeQuery(StatementImpl.java:1369)
    - locked <0x00000007432e19c8> (a com.mysql.jdbc.JDBC4Connection)
    at com.alibaba.druid.pool.ValidConnectionCheckerAdapter.isValidConnection(ValidConnectionCheckerAdapter.java:44)
    at com.alibaba.druid.pool.DruidAbstractDataSource.testConnectionInternal(DruidAbstractDataSource.java:1298)
    at com.alibaba.druid.pool.DruidDataSource.getConnectionDirect(DruidDataSource.java:1057)
    at com.alibaba.druid.pool.DruidDataSource.getConnection(DruidDataSource.java:997)
    at com.alibaba.druid.pool.DruidDataSource.getConnection(DruidDataSource.java:987)
    at com.alibaba.druid.pool.DruidDataSource.getConnection(DruidDataSource.java:103)
    at com.taobao.tddl.atom.AbstractTAtomDataSource.getConnection(AbstractTAtomDataSource.java:32)
    at com.alibaba.cobar.ClusterSyncManager$1.run(ClusterSyncManager.java:60)
    at java.util.concurrent.Executors$RunnableAdapter.call(Executors.java:511)
    at java.util.concurrent.FutureTask.run(FutureTask.java:266)
    at java.util.concurrent.Executors$RunnableAdapter.call(Executors.java:511)
    at java.util.concurrent.FutureTask.run(FutureTask.java:266)
    at java.util.concurrent.ThreadPoolExecutor.runWorker(ThreadPoolExecutor.java:1152)
    at java.util.concurrent.ThreadPoolExecutor$Worker.run(ThreadPoolExecutor.java:627)
    at java.lang.Thread.run(Thread.java:882)
X 应用通过线程池来接收一个逻辑SQL并处理,如果需要查询1024分片的sort merge join,相当于派生了1024个子任务,每个子任务占用一个线程,父任务等待子任务执行后返回数据。如果这样的逻辑SQL同时来一批并发,就会出现父任务都在等子任务,子任务又因为父任务占用了线程,导致子任务也在等着从线程池中取线程,这样父子任务就进入了死锁
publicstaticfinal ServerThreadPool create(String name, int poolSize, int deadLockCheckPeriod, int bucketSize) { returnnewServerThreadPool(name, poolSize, deadLockCheckPeriod, bucketSize); //bucketSize可以设置 }
publicServerThreadPool(String poolName, int poolSize, int deadLockCheckPeriod, int bucketSize) { this.poolName = poolName; this.deadLockCheckPeriod = deadLockCheckPeriod;
This is an entry in the TLB that points to a HugePage (a large/big page larger than regular 4K and predefined in size). HugePages are implemented via hugetlb entries, i.e. we can say that a HugePage is handled by a “hugetlb page entry”. The ‘hugetlb” term is also (and mostly) used synonymously with a HugePage.
Linux 中的 HugePages 都被锁定在内存中,所以哪怕是在系统内存不足时,它们也不会被 Swap 到磁盘上,这也就能从根源上杜绝了重要内存被频繁换入和换出的可能。
Transparent Hugepages are similar to standard HugePages. However, while standard HugePages allocate memory at startup, Transparent Hugepages memory uses the khugepaged thread in the kernel to allocate memory dynamically during runtime, using swappable HugePages.
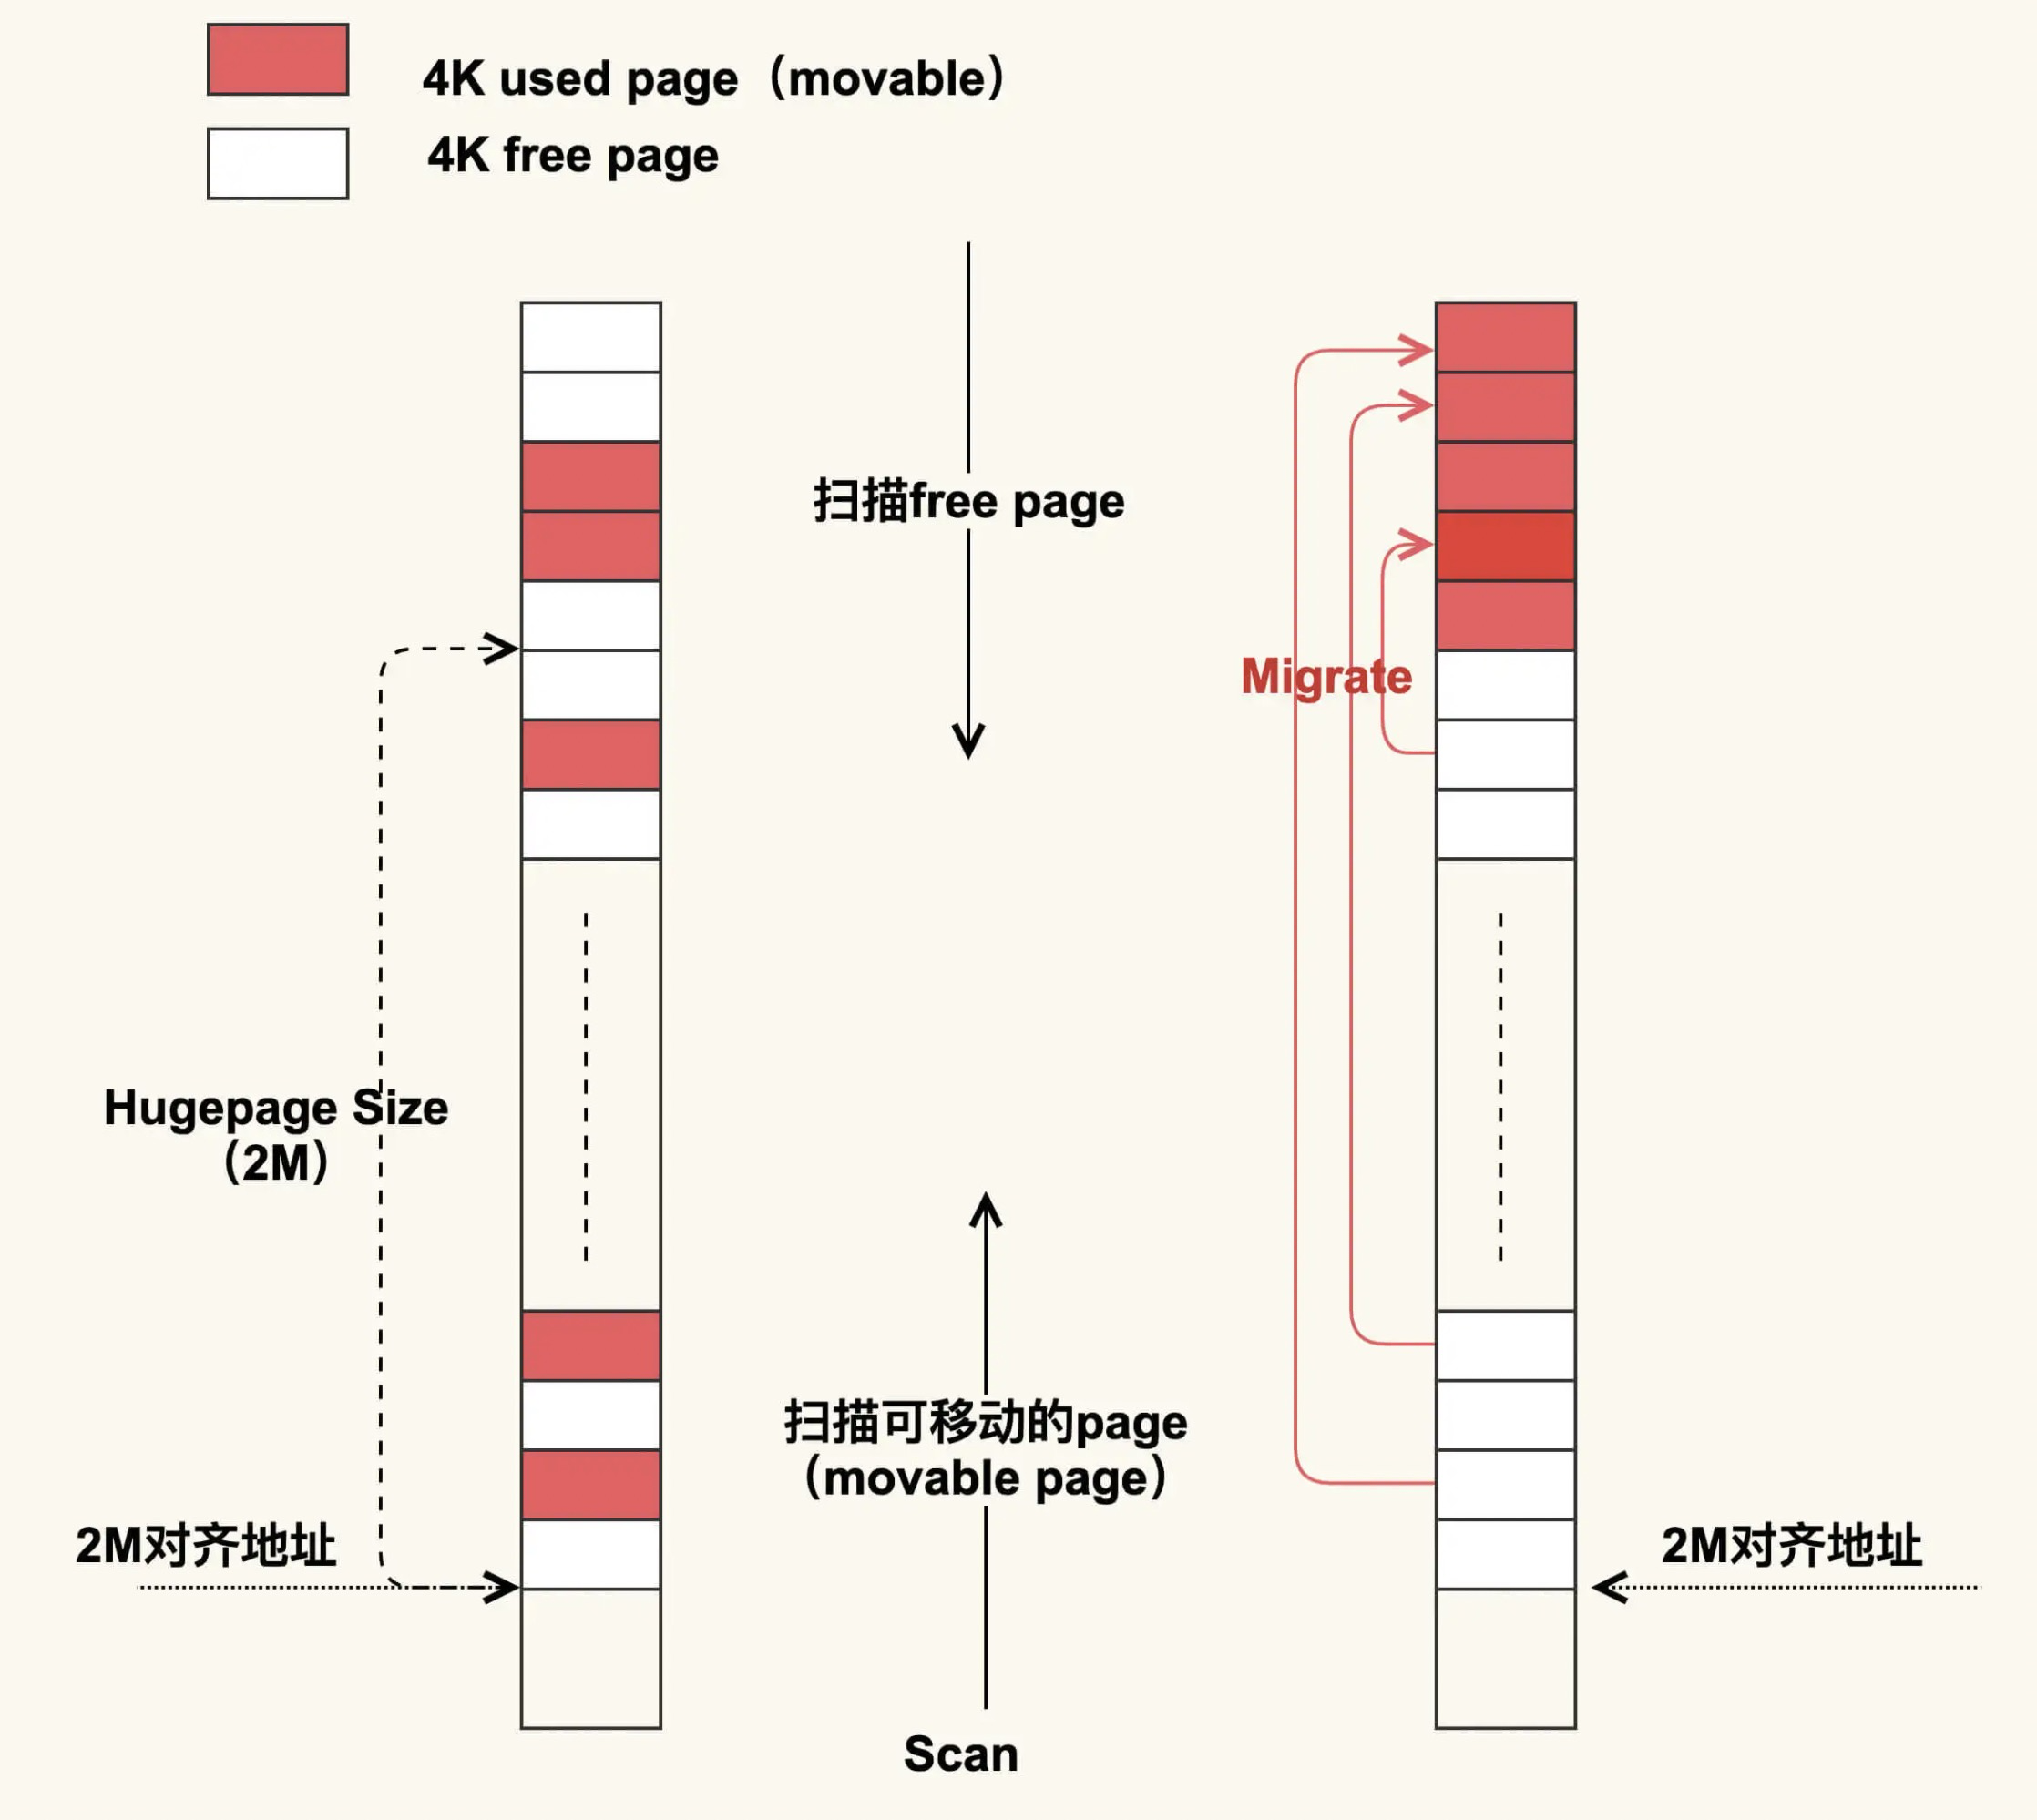
HugePage要求OS启动的时候提前分配出来,管理难度比较大,所以Enterprise Linux 6增加了一层抽象层来动态创建管理HugePage,这就是THP,而这个THP对应用透明,由khugepaged thread在后台动态将小页组成大页给应用使用,这里会遇上碎片问题导致需要compact才能得到大页,应用感知到的就是SYS CPU飙高,应用卡顿了。
Huge pages require contiguous areas of memory, so allocating them at boot is the most reliable method since memory has not yet become fragmented. To do so, add the following parameters to the kernel boot command line:
Huge pages kernel options
hugepages
Defines the number of persistent huge pages configured in the kernel at boot time. The default value is 0. It is only possible to allocate (or deallocate) huge pages if there are sufficient physically contiguous free pages in the system. Pages reserved by this parameter cannot be used for other purposes.
Default size huge pages can be dynamically allocated or deallocated by changing the value of the /proc/sys/vm/nr_hugepages file.
In a NUMA system, huge pages assigned with this parameter are divided equally between nodes. You can assign huge pages to specific nodes at runtime by changing the value of the node’s /sys/devices/system/node/node_id/hugepages/hugepages-1048576kB/nr_hugepages file.
For more information, read the relevant kernel documentation, which is installed in /usr/share/doc/kernel-doc-kernel_version/Documentation/vm/hugetlbpage.txt by default. This documentation is available only if the kernel-doc package is installed.
hugepagesz
Defines the size of persistent huge pages configured in the kernel at boot time. Valid values are 2 MB and 1 GB. The default value is 2 MB.
default_hugepagesz
Defines the default size of persistent huge pages configured in the kernel at boot time. Valid values are 2 MB and 1 GB. The default value is 2 MB.
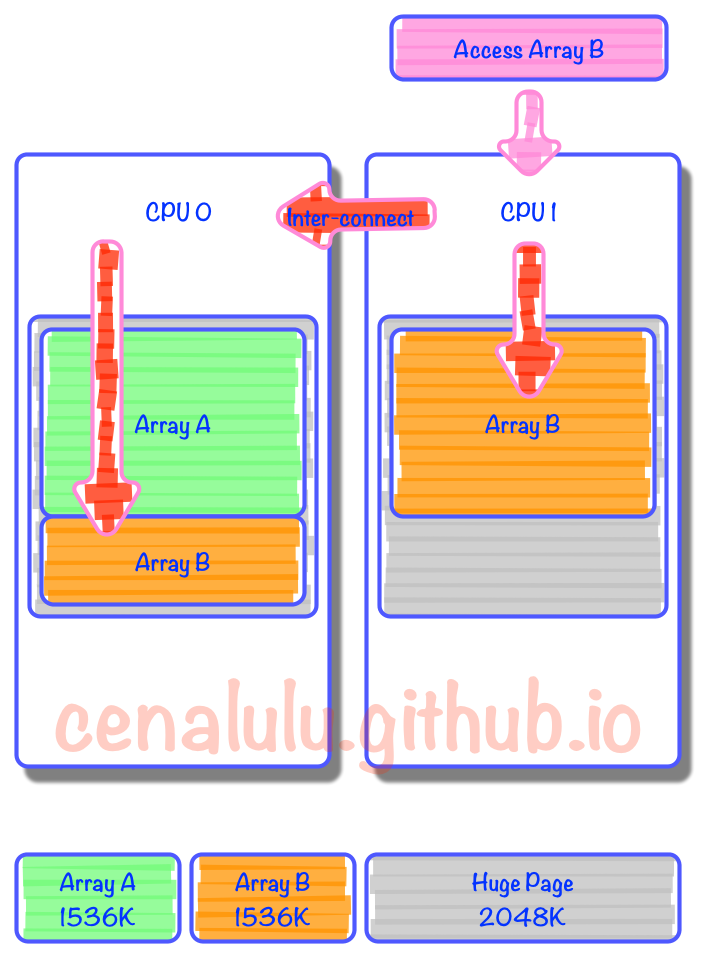
If you are using the option -XX:+UseSHM or -XX:+UseHugeTLBFS, then specify the number of large pages. In the following example, 3 GB of a 4 GB system are reserved for large pages (assuming a large page size of 2048kB, then 3 GB = 3 * 1024 MB = 3072 MB = 3072 * 1024 kB = 3145728 kB and 3145728 kB / 2048 kB = 1536):